
DOCUMENTATION
Welcome to the ConversAI Labs documentation.
Introduction
Introduction to ConversAI Labs
ConversAI Labs is a comprehensive platform designed to build, test, deploy, and monitor human-like AI phone agents. Whether you're handling inbound customer service calls, automating outbound lead generation, or scheduling appointments, our platform provides the telephony, prompt engineering, custom tooling, and analytics you need out of the box.
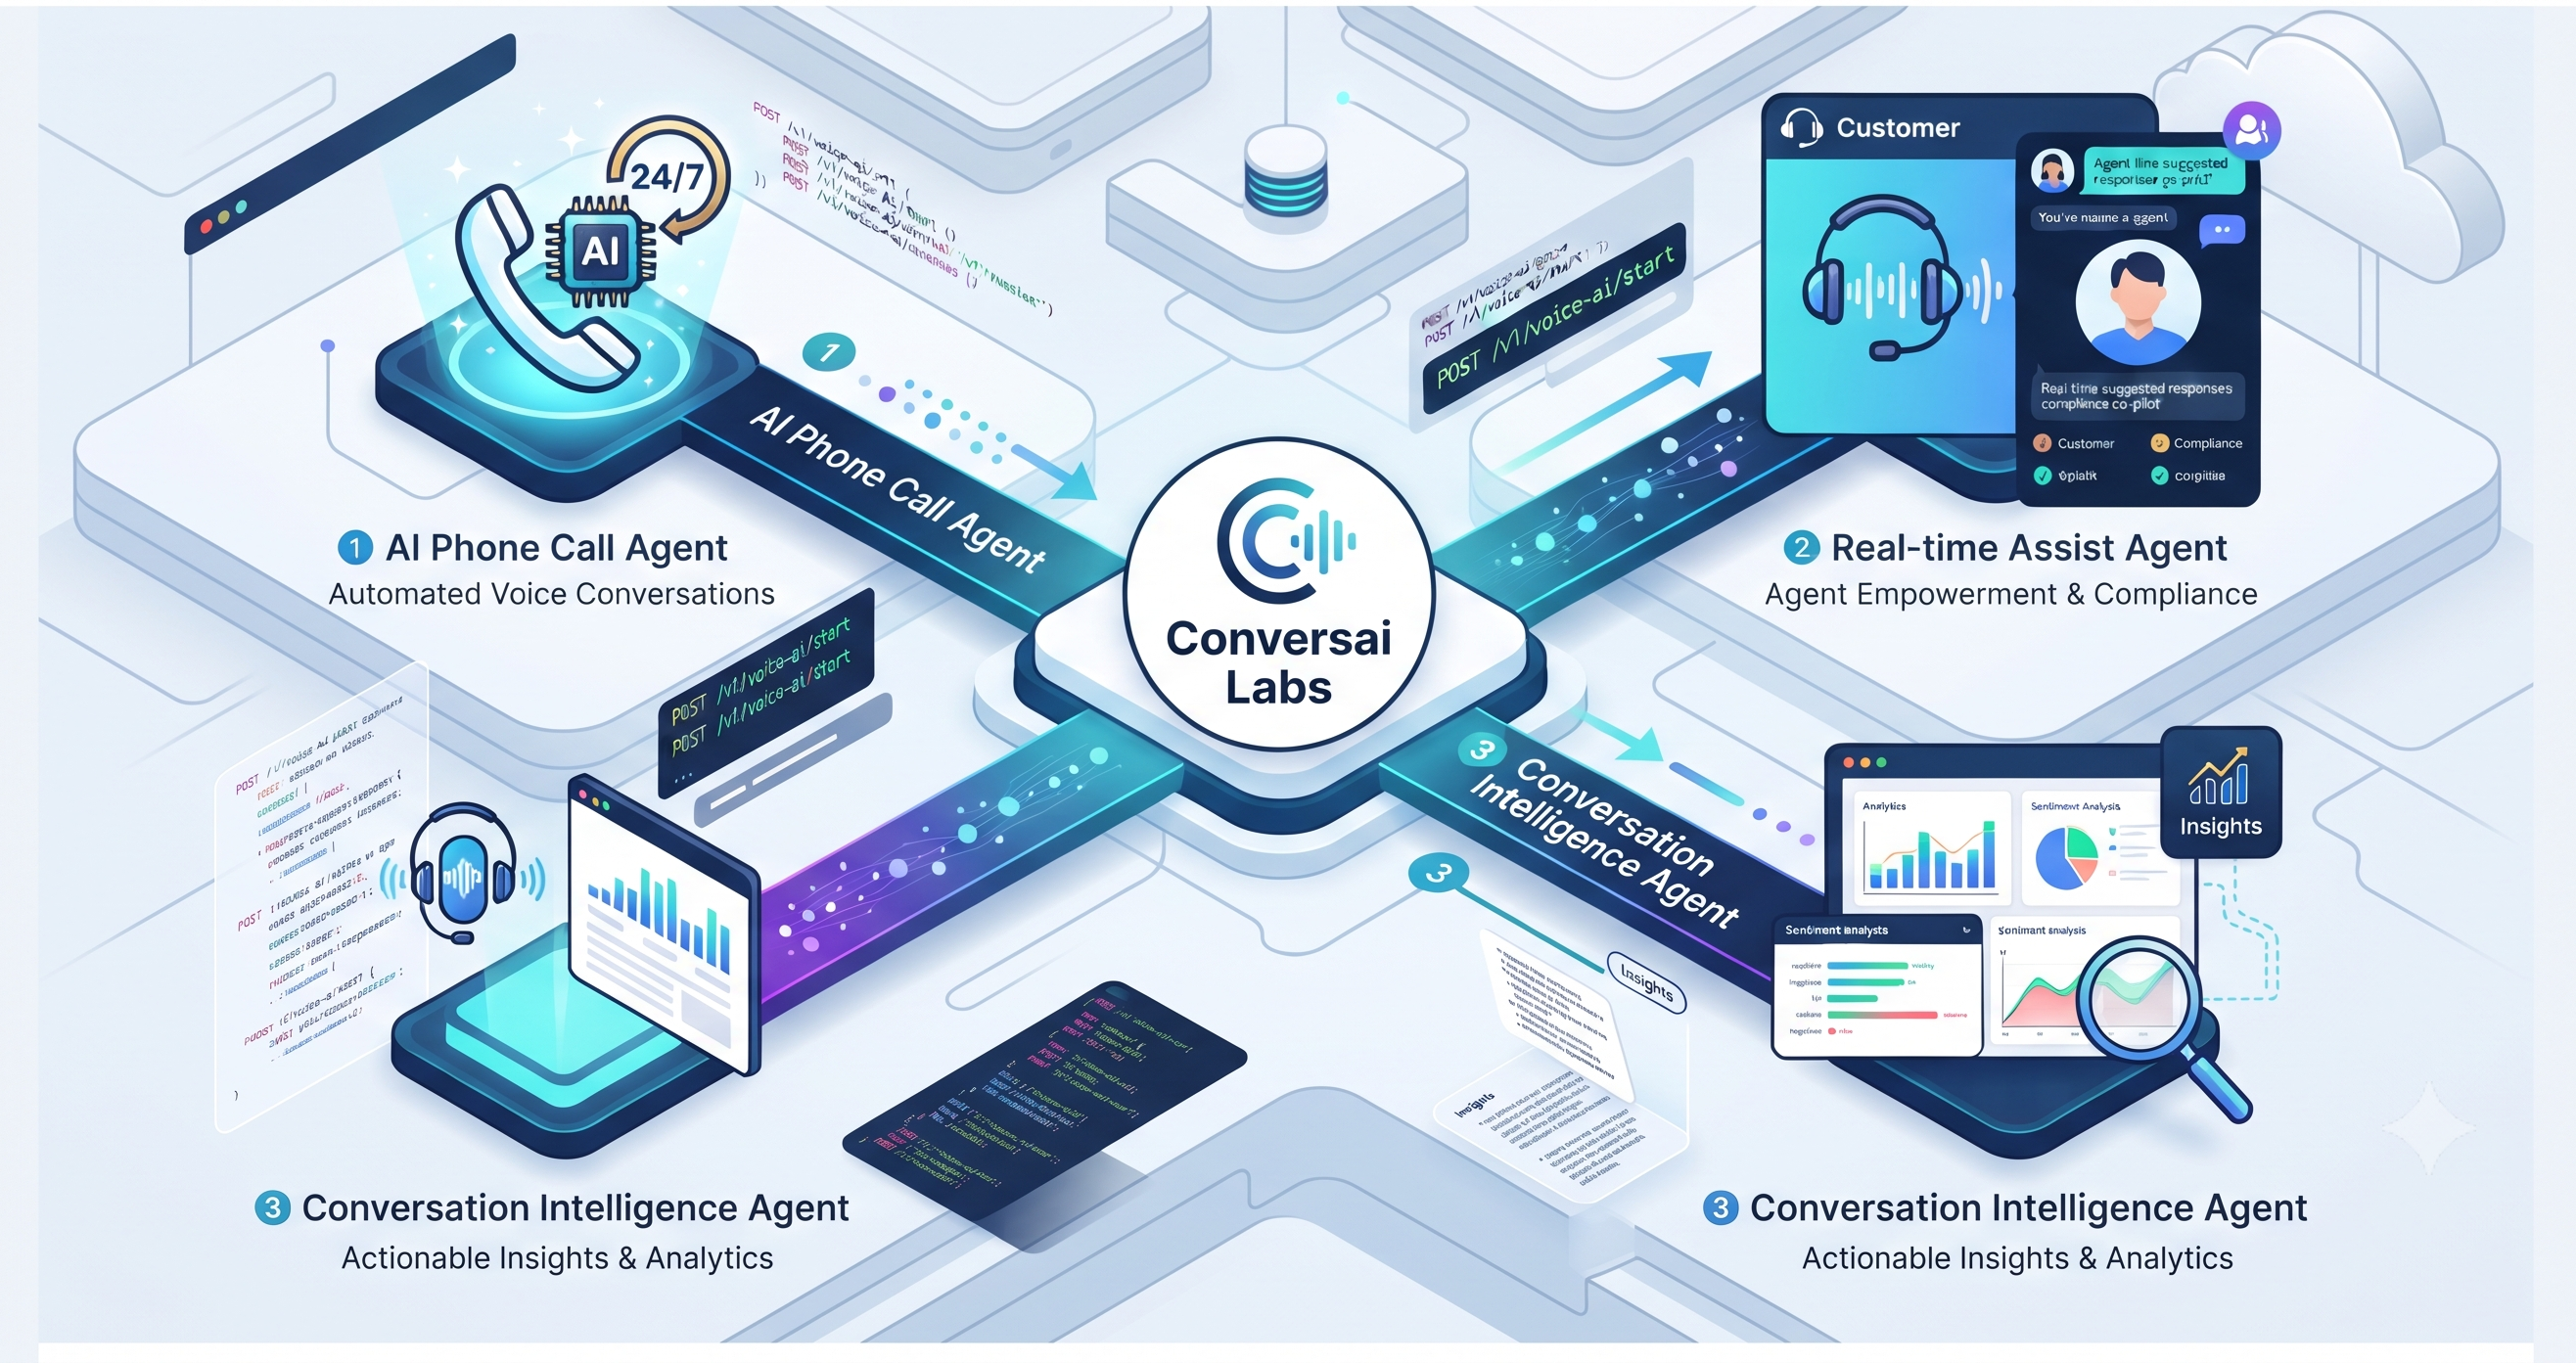
Platform Capabilities
Ultra-Low Latency Conversational AI
Agents that respond in milliseconds, making interactions feel natural and indistinguishable from a human.
Complete Customization
Customize everything from the voice selection, system prompts, knowledge base documents, and dynamic webhook tools.
Built-in Analytics & History
Instantly monitor agent performance. Review full call transcripts, listen to audio recordings, and track costs dynamically.
Developer First API
Integrate ConversAI into your own software using our robust REST API to manage agents, leads, and initiate automated calls programmatically.
Next Steps
Ready to start building? We recommend exploring these sections first:
Build your first voice workflow
Start with an agent and a read-only API request, then connect call results to your workflow.
- Open the dashboard. New users can continue with Google and complete their profile; email/password login is for existing accounts.
- Create an agent and configure its instructions, voice and knowledge.
- Open Profile → API Keys to generate an API key. Keep it on your server, outside browser code and GitHub.
- List your agents with the request below and select your agent ID.
- Add a test lead using a number you control and have permission to call. Review the agent and your balance before explicitly starting a test call. Workflows are free for now; connected calls, including test calls, cost 4 credits per connected minute (₹4/minute); ₹1 = 1 credit.
- Inspect the result in Call History and configure call-result webhooks for your application. Handle duplicate deliveries before connecting production work.
# Set CONVERSAI_API_KEY in your server or local environment first.
curl --fail-with-body \
  "https://voice-ai-admin-api-762279639608.asia-south1.run.app/api/v1/agents/" \
  -H "X-API-Key: $CONVERSAI_API_KEY"
This request lists agents; it does not initiate a call. Review the API reference for request and response details.
Getting Started
Environment Setup
Quick Start
Base URL
https://voice-ai-admin-api-762279639608.asia-south1.run.app/api/v1API Key
your-api-key-hereExample .env
.envCONVERSAI_API_KEY="your-api-key-here"
CONVERSAI_BASE_URL="https://voice-ai-admin-api-762279639608.asia-south1.run.app/api/v1"
Example .env
CONVERSAI_API_KEY="your-api-key-here"
CONVERSAI_BASE_URL="https://voice-ai-admin-api-762279639608.asia-south1.run.app/api/v1"
Authentication
API Key Authentication
All API requests must be authenticated using an API key. The API key should be included in the request header.
X-API-Key: <your-api-key>Getting Your API Key
You can generate and manage your API keys from your account settings.
Agent Creation
Creating a New Agent
Overview
Step-by-Step Guide
Learn how to set up your AI agent from scratch.
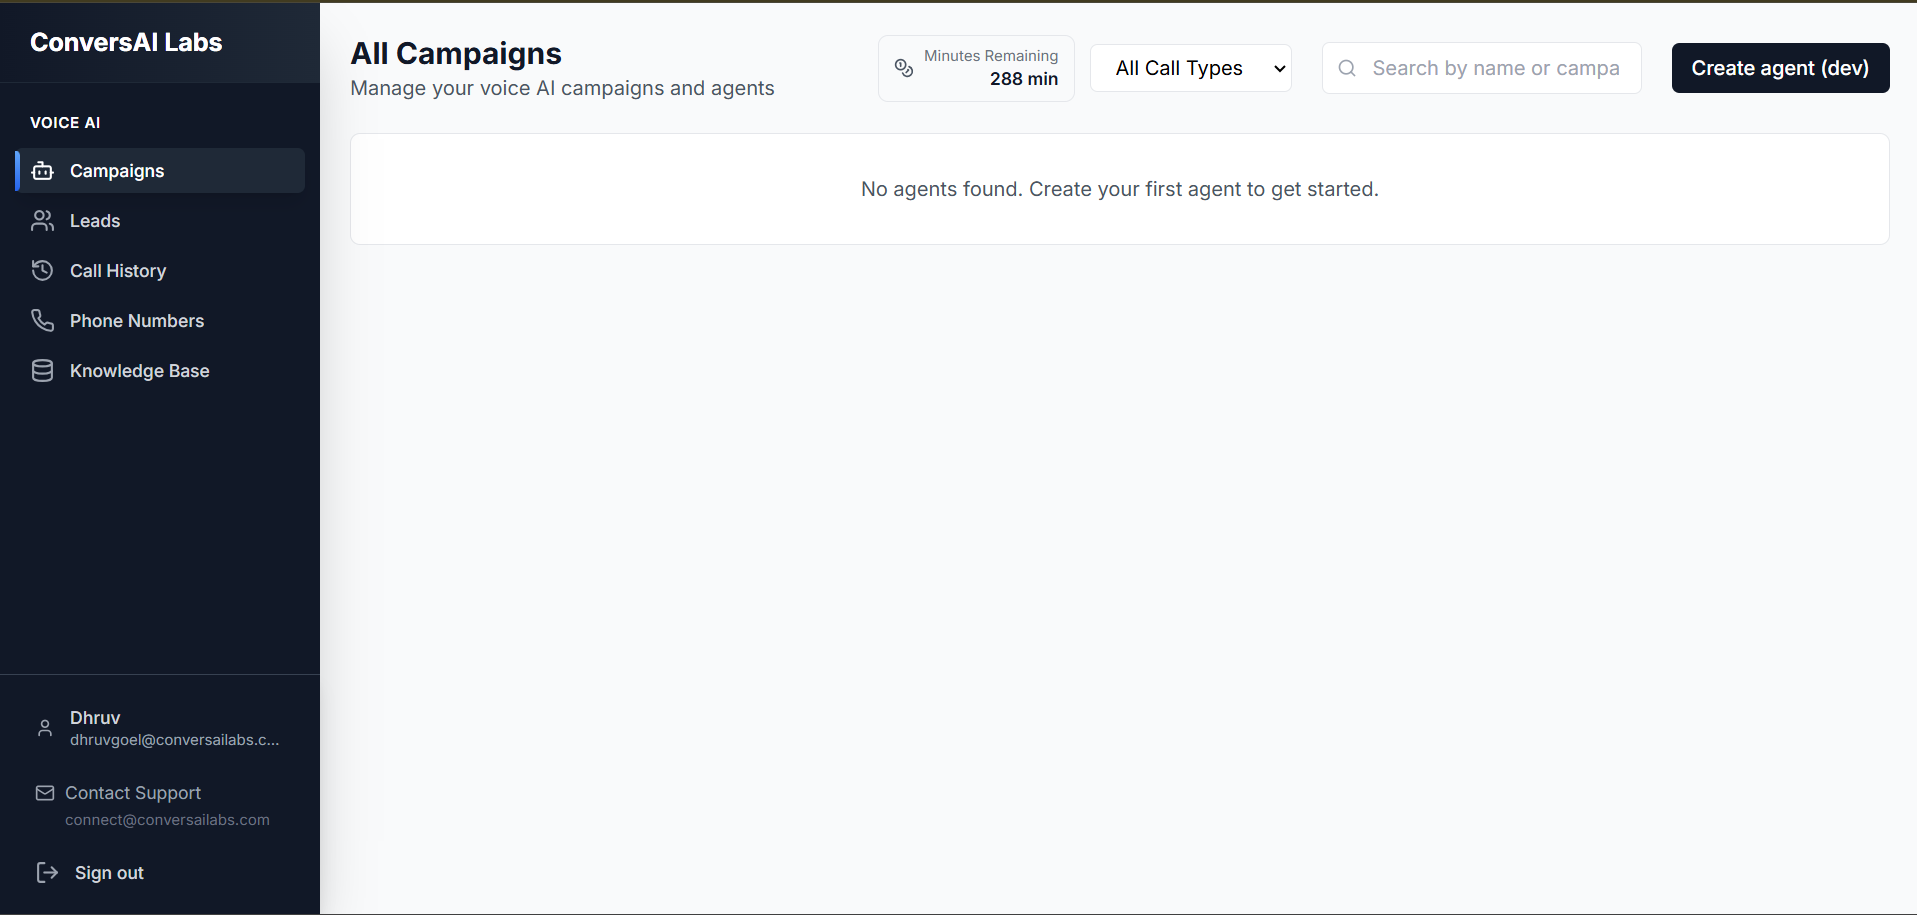
Open Agent Creation Window
From the dashboard, click on the "Create Agent" button to open the creation window.
Agent Details (Section 1)
The first section contains details about the agent, company, and campaign you want to create.
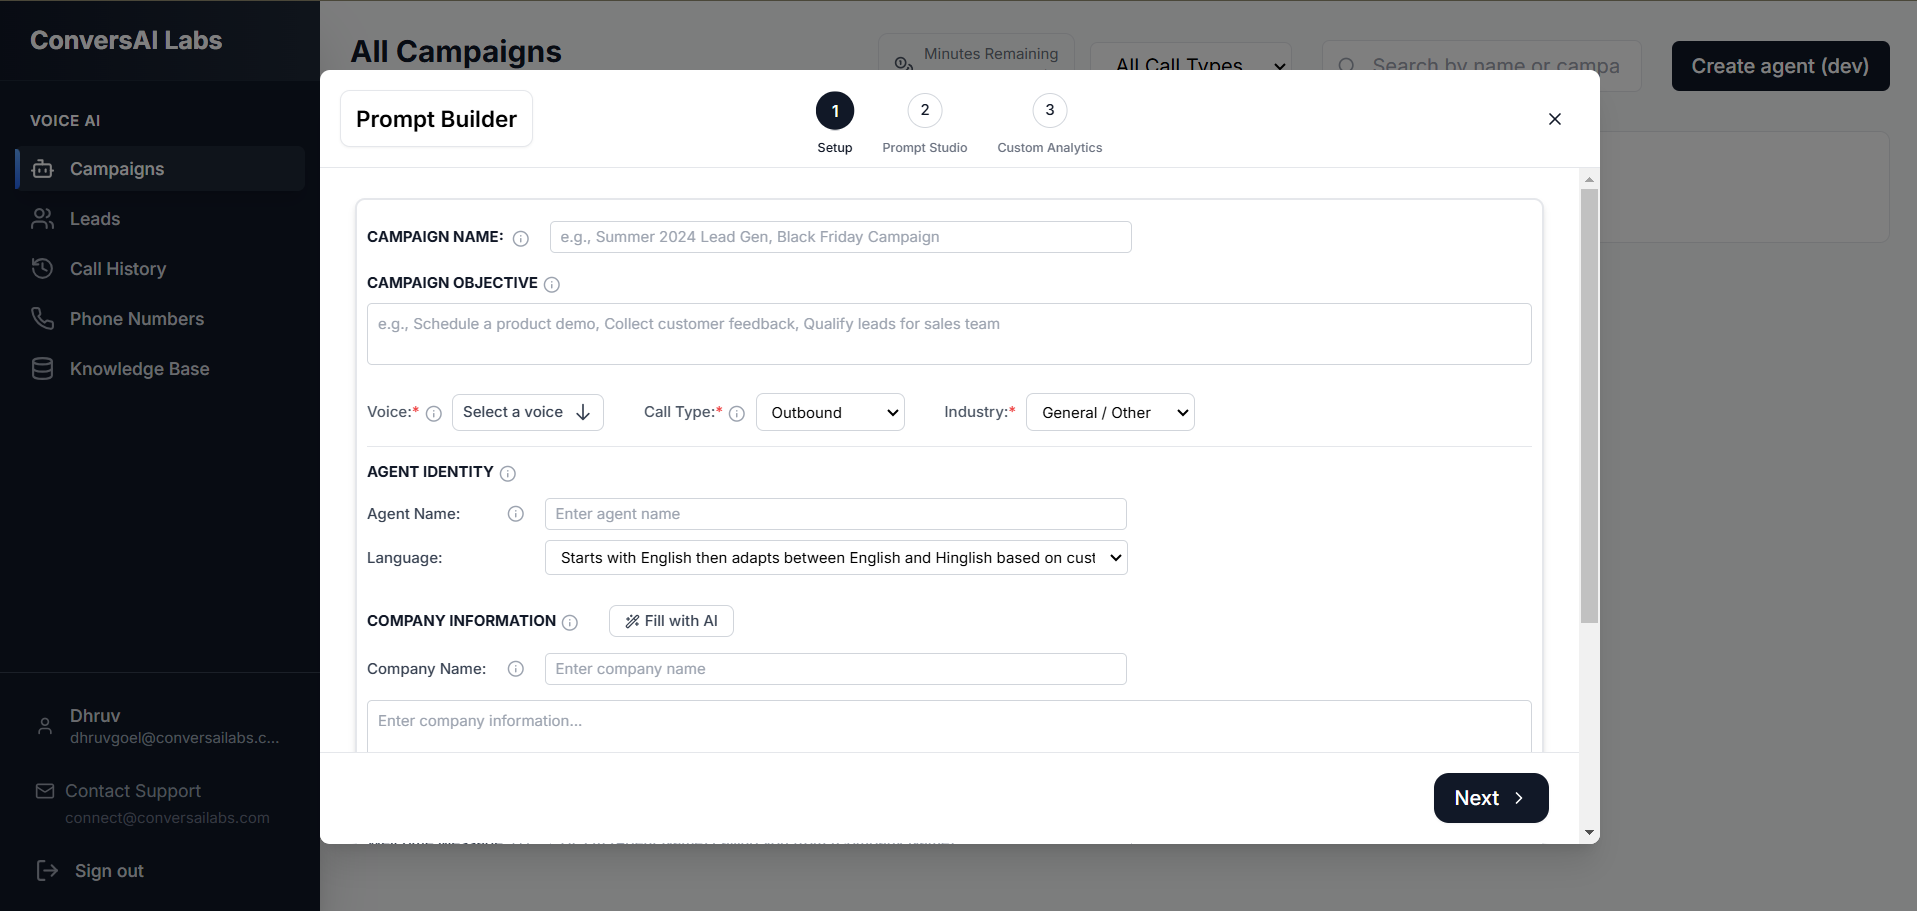
.png)
Here is how it looks after filling in the required information:
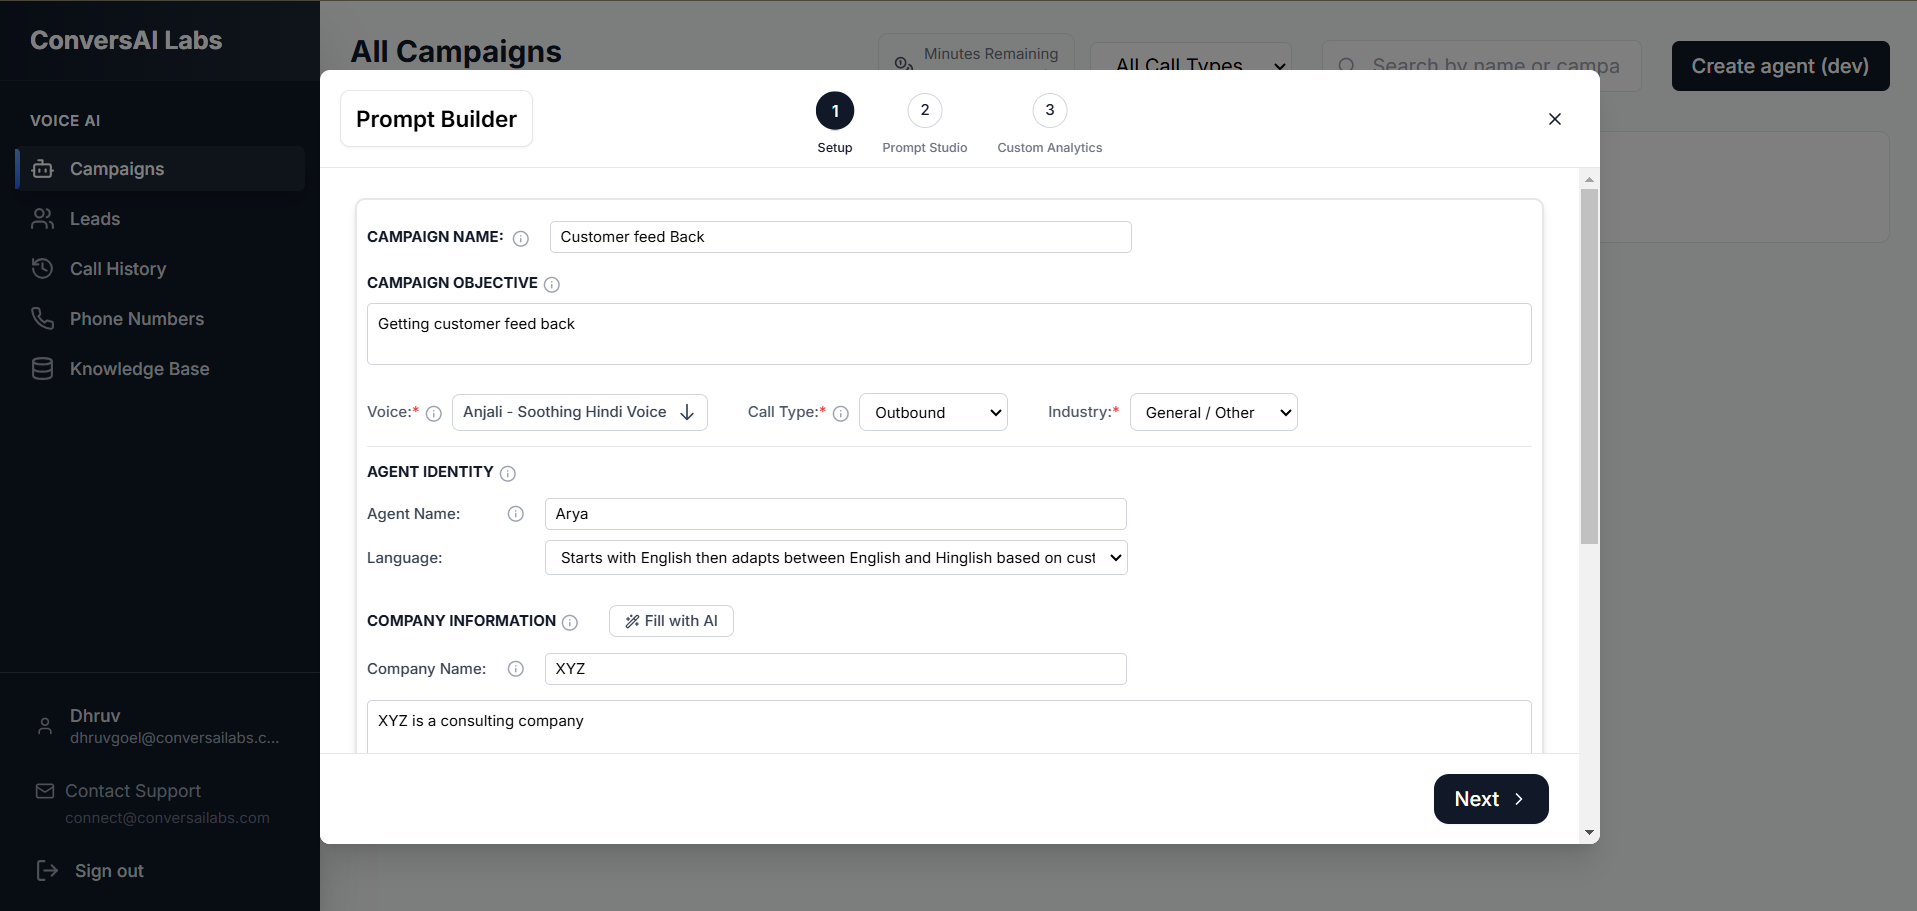
.png)
Need more details?
Check out our detailed guide explaining every configuration field and dropdown.
Generate Agent Prompt (Section 2)
After clicking "Next", you will proceed to the second section to generate the agent's prompt (YAML file). You can use our built-in assistant via the chat on the right side to help generate this.
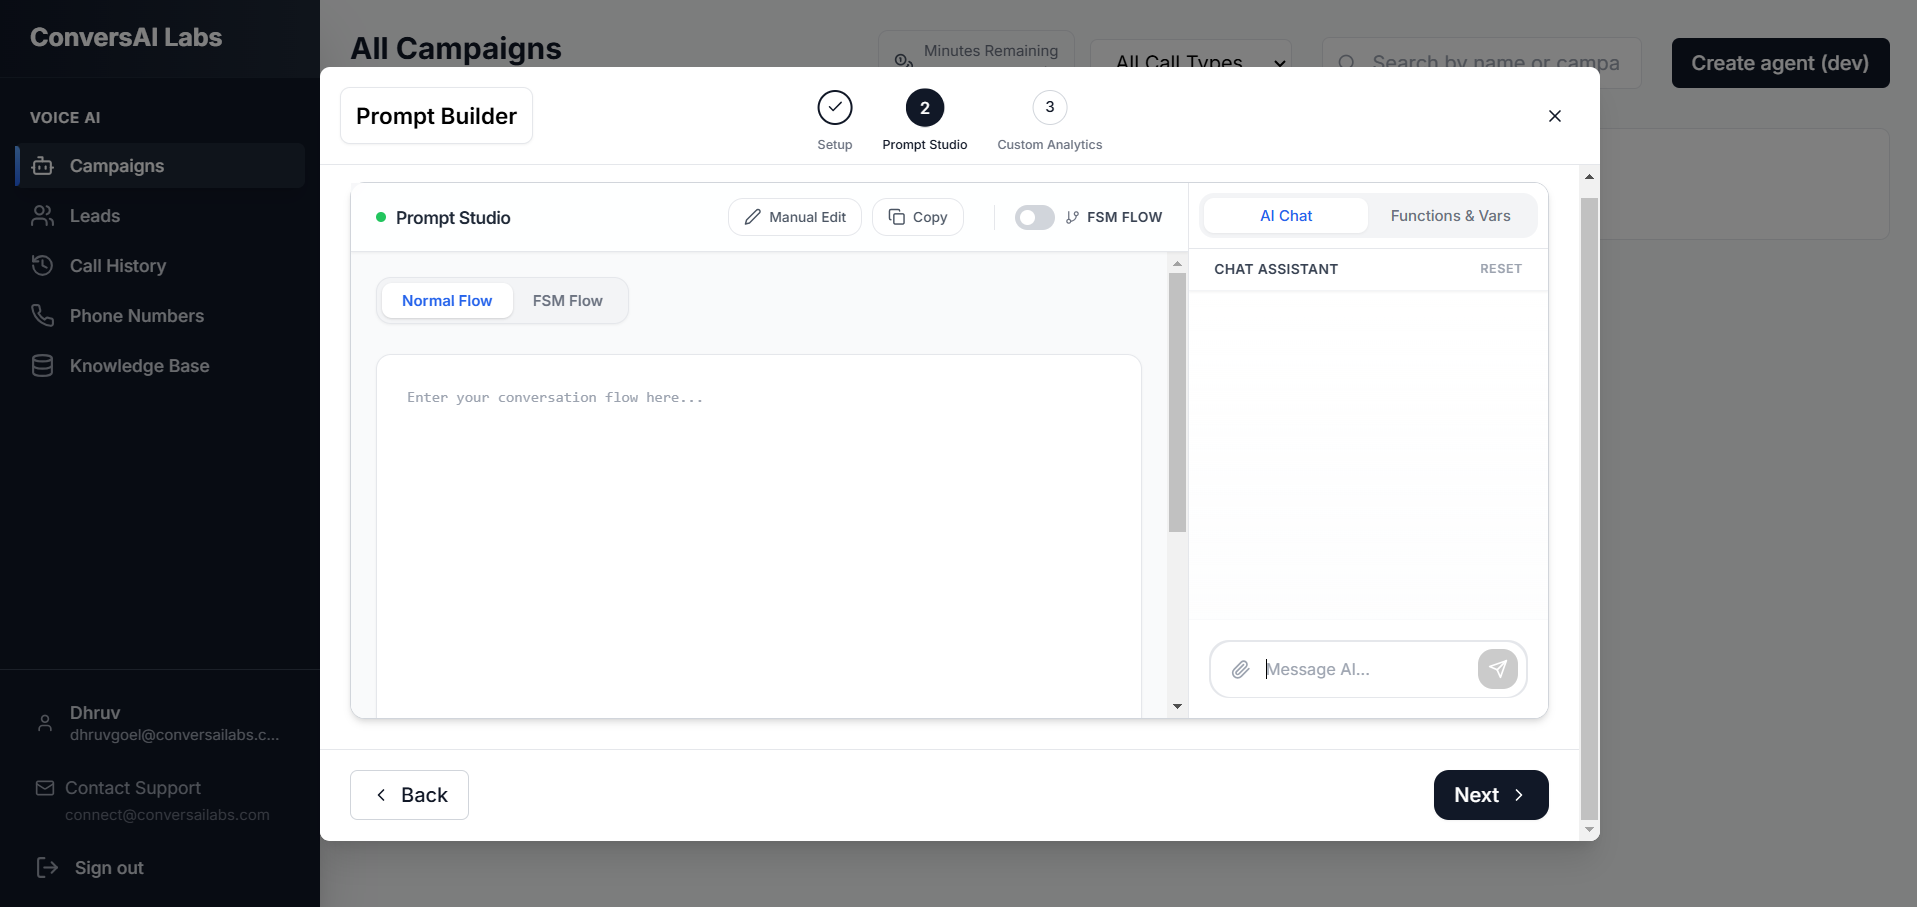
Once you have generated the file and confirmed everything is correct, your screen will look like this:
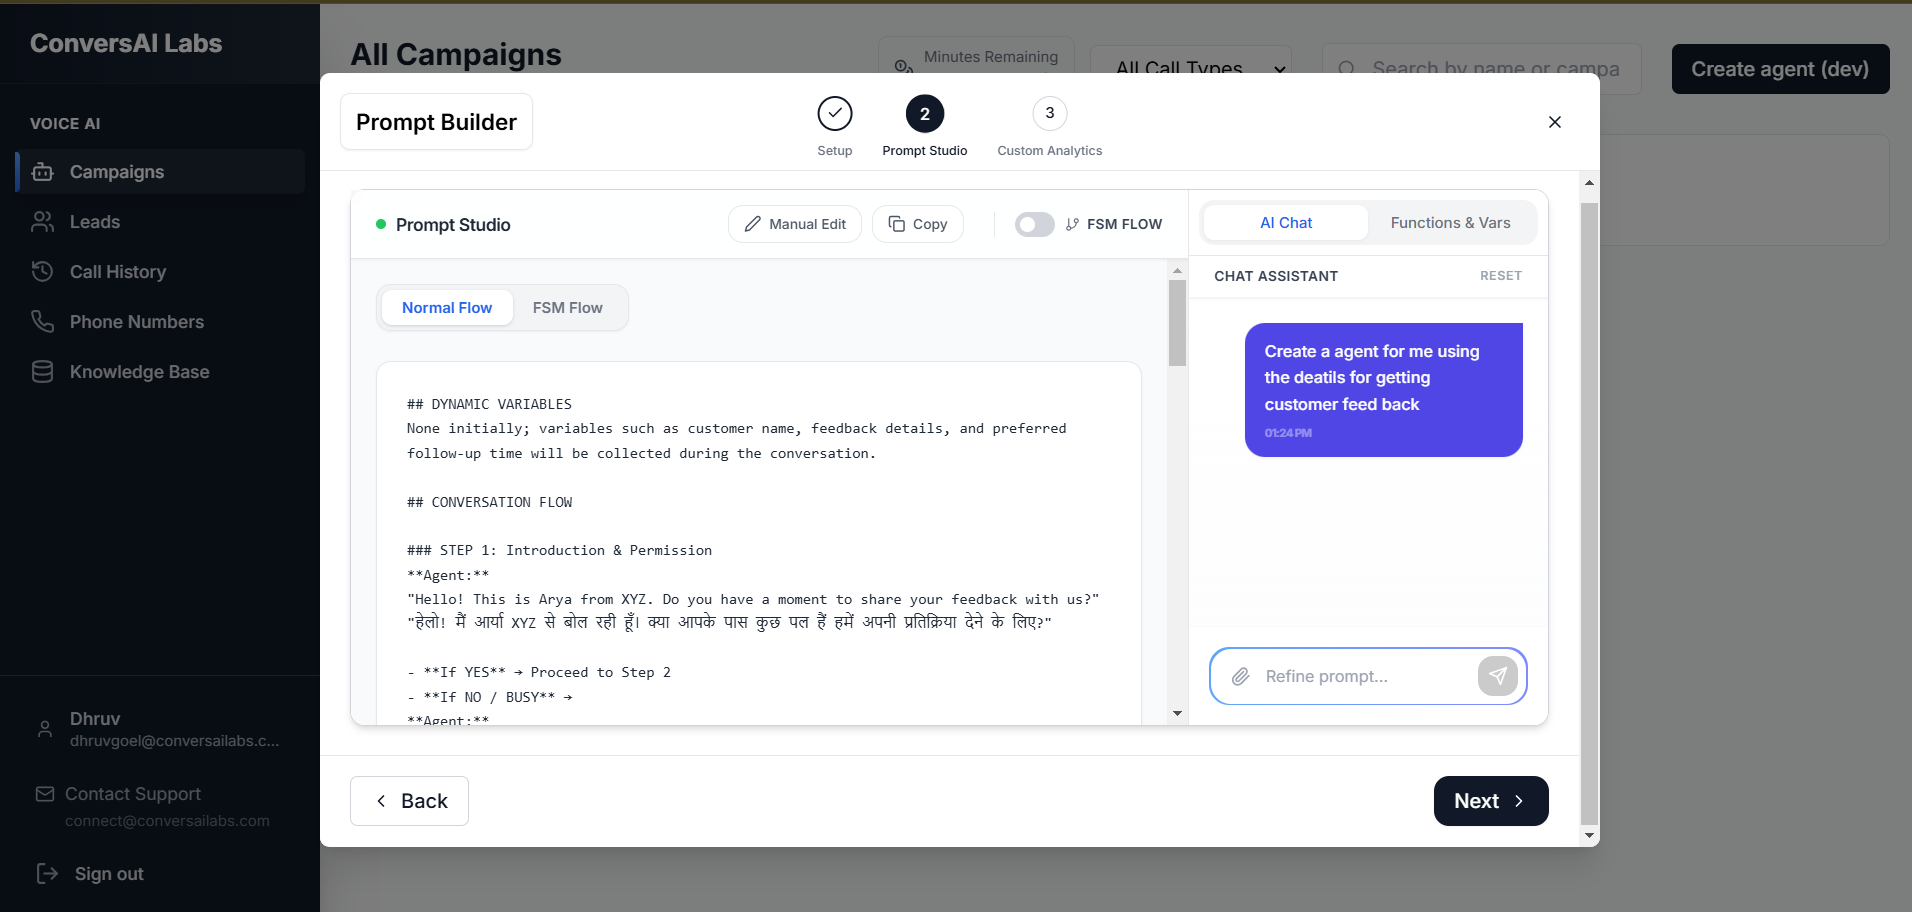
Post Call Tasks & Webhooks (Section 3)
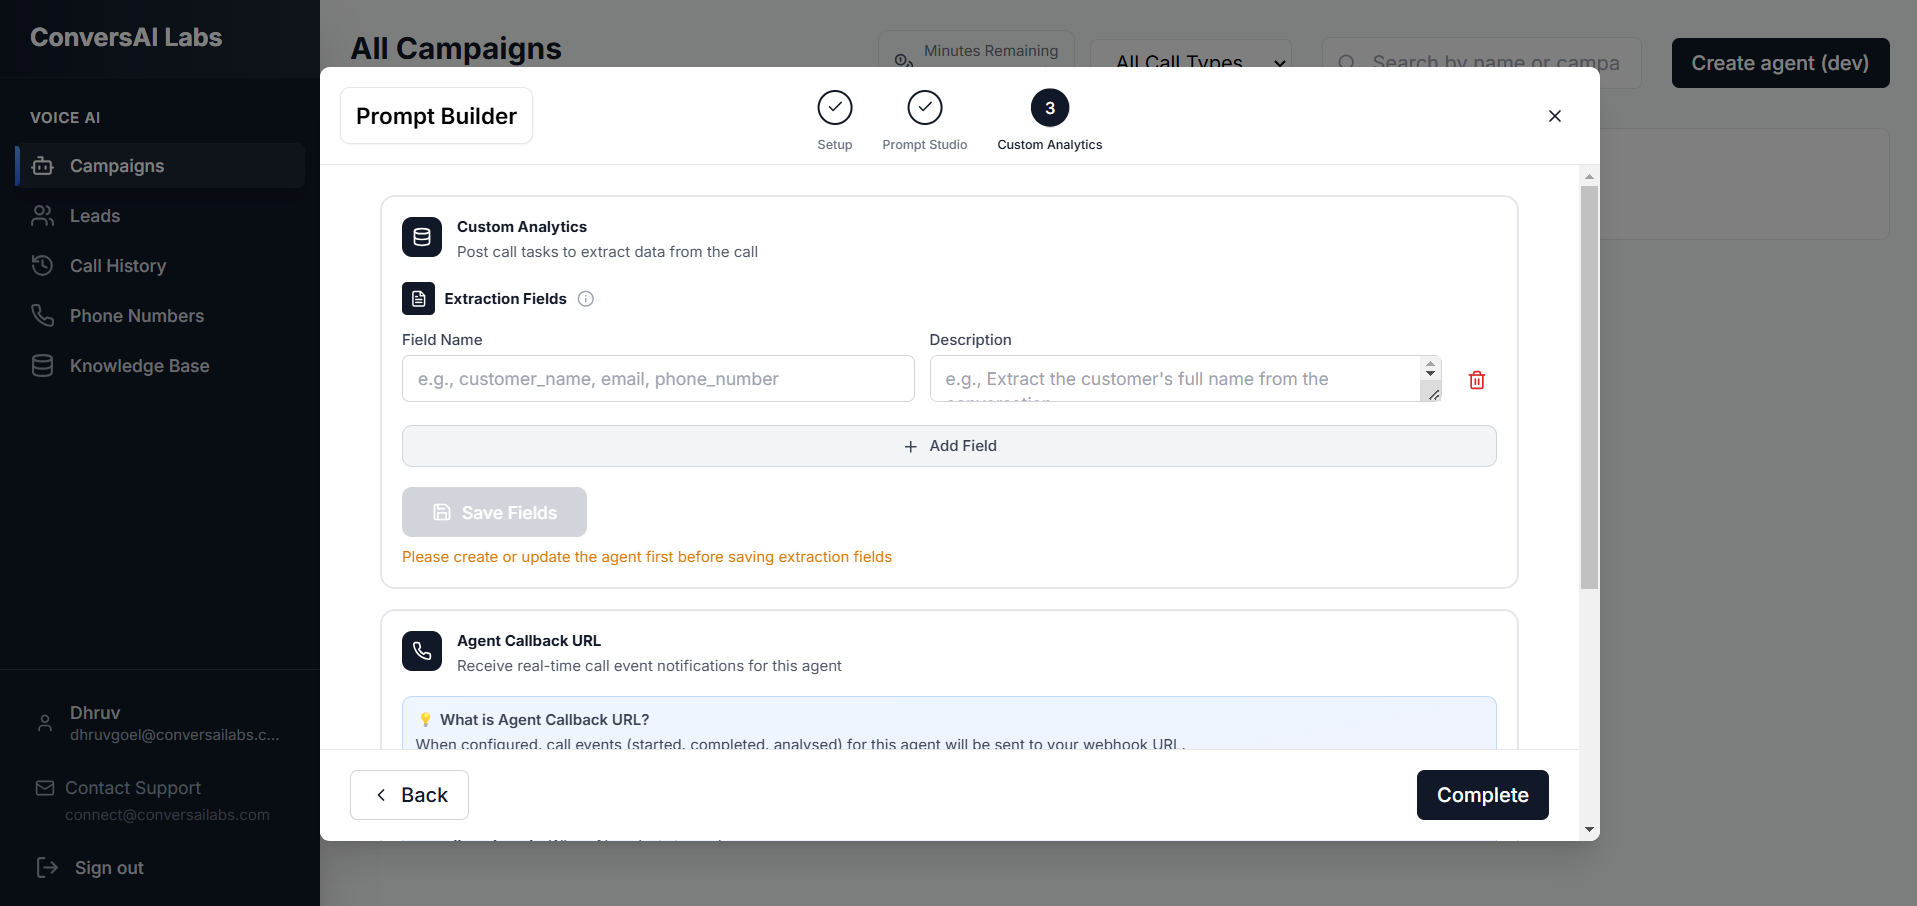
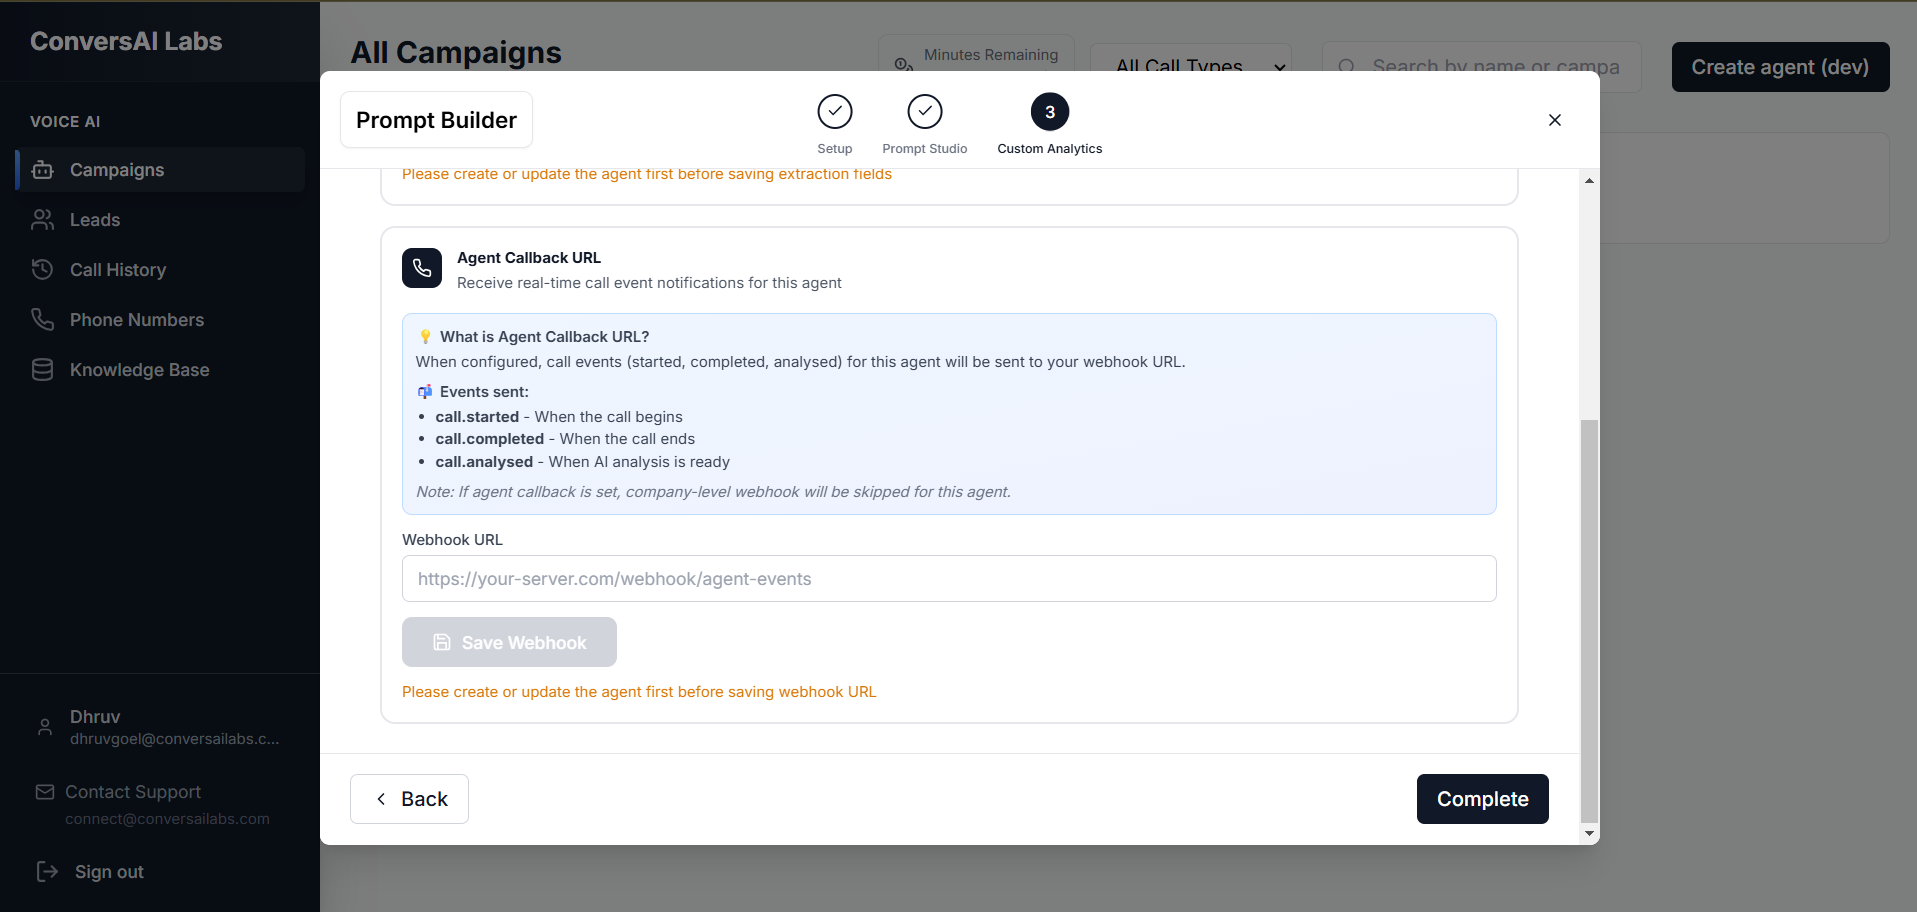
Click "Next" to enter the third section. Here, you can add post-call tasks in the first tab, and set up a webhook for your application in the second tab.
Post Call Tasks
Webhook Configuration
Complete Creation
Click on the "Complete" button. Your agent will be successfully created!
Detailed Configuration Guide
Deep Dive
Section 1: Agent Details
This section collects the core identity and behavioral settings for your AI agent.
Agent Name
Purpose: The internal identifier for your agent.
What to add: A clear, recognizable name (e.g., "Support Bot V2").
Company Name
Purpose: The name of your organization. The agent uses this context during conversations to represent your brand.
What to add: Your official company name.
Campaign Name
Purpose: Groups the agent under a specific campaign for analytics and reporting.
What to add: A descriptive campaign title (e.g., "Summer Sales 2024").
Role
Purpose: Defines the primary function of the agent.
What to add: A job title-like description (e.g., "Customer Support Representative" or "Sales Development Rep").
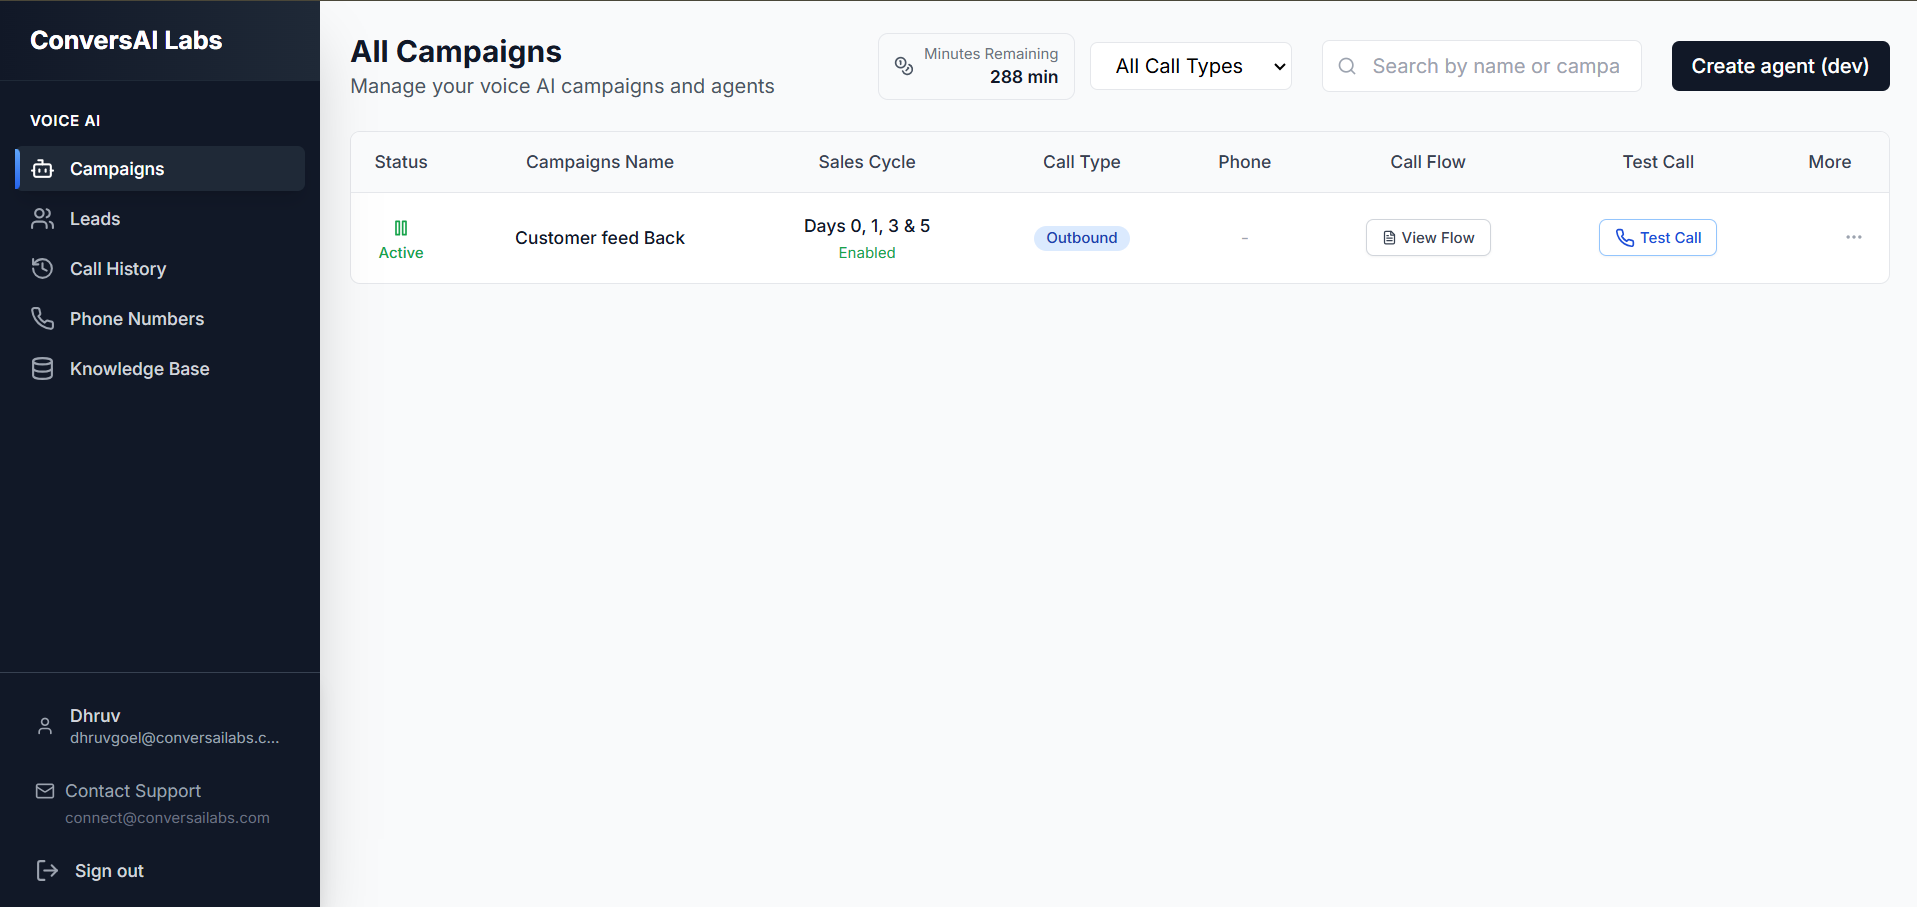
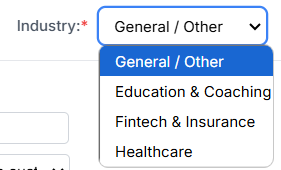
Configuration Dropdowns
Images are provided below for these dropdowns to help you identify the visual options available.
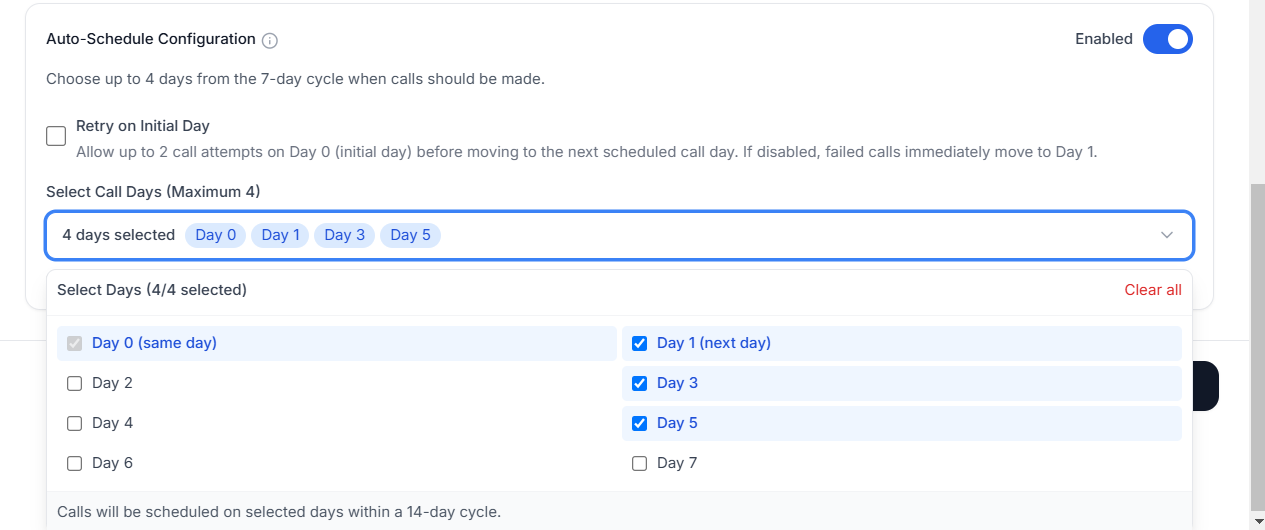
Auto Schedule
Purpose: Determines if the agent should automatically schedule follow-ups or callbacks.
What to add: Toggle true/false based on whether you want the AI to handle calendar interactions seamlessly.
Language
Purpose: Defines the language model used for speech recognition and voice synthesis.
What to add: Select the primary language and dialect (e.g., English US) that matches your target audience.

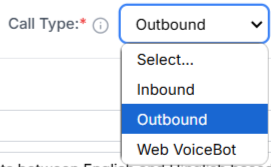
Call Nature
Purpose: Optimizes the agent's behavior for specific types of interactions.
What to add: Select whether the primary purpose is inbound customer support, outbound sales, etc.
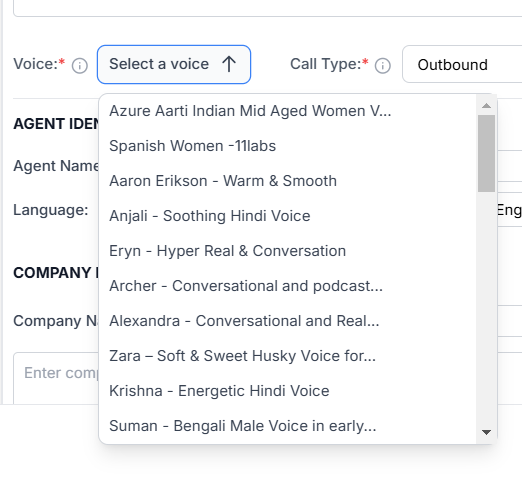
Agent Voice
Purpose: Sets the vocal identity of your agent.
What to add: Choose the voice profile that best matches your brand identity from various options varying in tone and gender.
Industry
Purpose: Pre-loads industry-specific terminology and conversational practices.
What to add: Select your industry context (e.g., Healthcare, Real Estate, E-commerce).
Section 2: Prompt Generation
In this section, you define exactly how your agent will behave using a YAML configuration, assisted by our AI.
Built-in Assistant Chat (Right Panel)
Purpose: Helps you generate complex YAML configurations without writing code.
What to add: Describe your agent's persona, goals, and constraints in plain English. The assistant will translate this into valid YAML.
YAML Editor (Left Panel)
Purpose: Direct access to the underlying agent configuration for fine-tuning.
What to add: You can manually edit the generated prompt, adjust the initial greeting, define specific fallback behaviors, and set conversation boundaries.
Visual Reference (Optional)
An image is optionally provided here as the interface is quite intuitive, but here is a reference of the prompt generation workflow:
Section 3: Actions & Webhooks
This final section connects your agent to the outside world, allowing it to sync data and trigger tasks.
Post Call Tasks
Task Name
Purpose: Identifies the automated task.
What to add: A clear name like "Send SMS Summary" or "Update CRM".
Execution URL & Method
Purpose: Directs where the post-call payload should be sent.
What to add: The API endpoint (URL) and HTTP method (POST, GET) that our system should call.
Headers
Purpose: Authenticates the request to your backend.
What to add: Any required API keys or Bearer tokens.
Payload
Purpose: The data sent to your system.
What to add: A JSON body. You can use variables to map the agent's extracted data into your system's required format.
Visual reference for Post Call Tasks configuration (Optional):
Webhook Configuration
Webhook URL
Purpose: Receives live events during the call.
What to add: The secure endpoint on your server.
Authentication
Purpose: Secures the webhook connection.
What to add: Necessary headers to ensure the webhook payloads are securely accepted by your server.
Events Payload
Purpose: Specifies what data is sent on events.
What to add: JSON configuration mapping events to specific payload structures.
Visual reference for Webhook configuration (Optional):
Knowledge Base
Managing the Knowledge Base
Overview
Step-by-Step Guide
Follow these steps to populate your Knowledge Base.
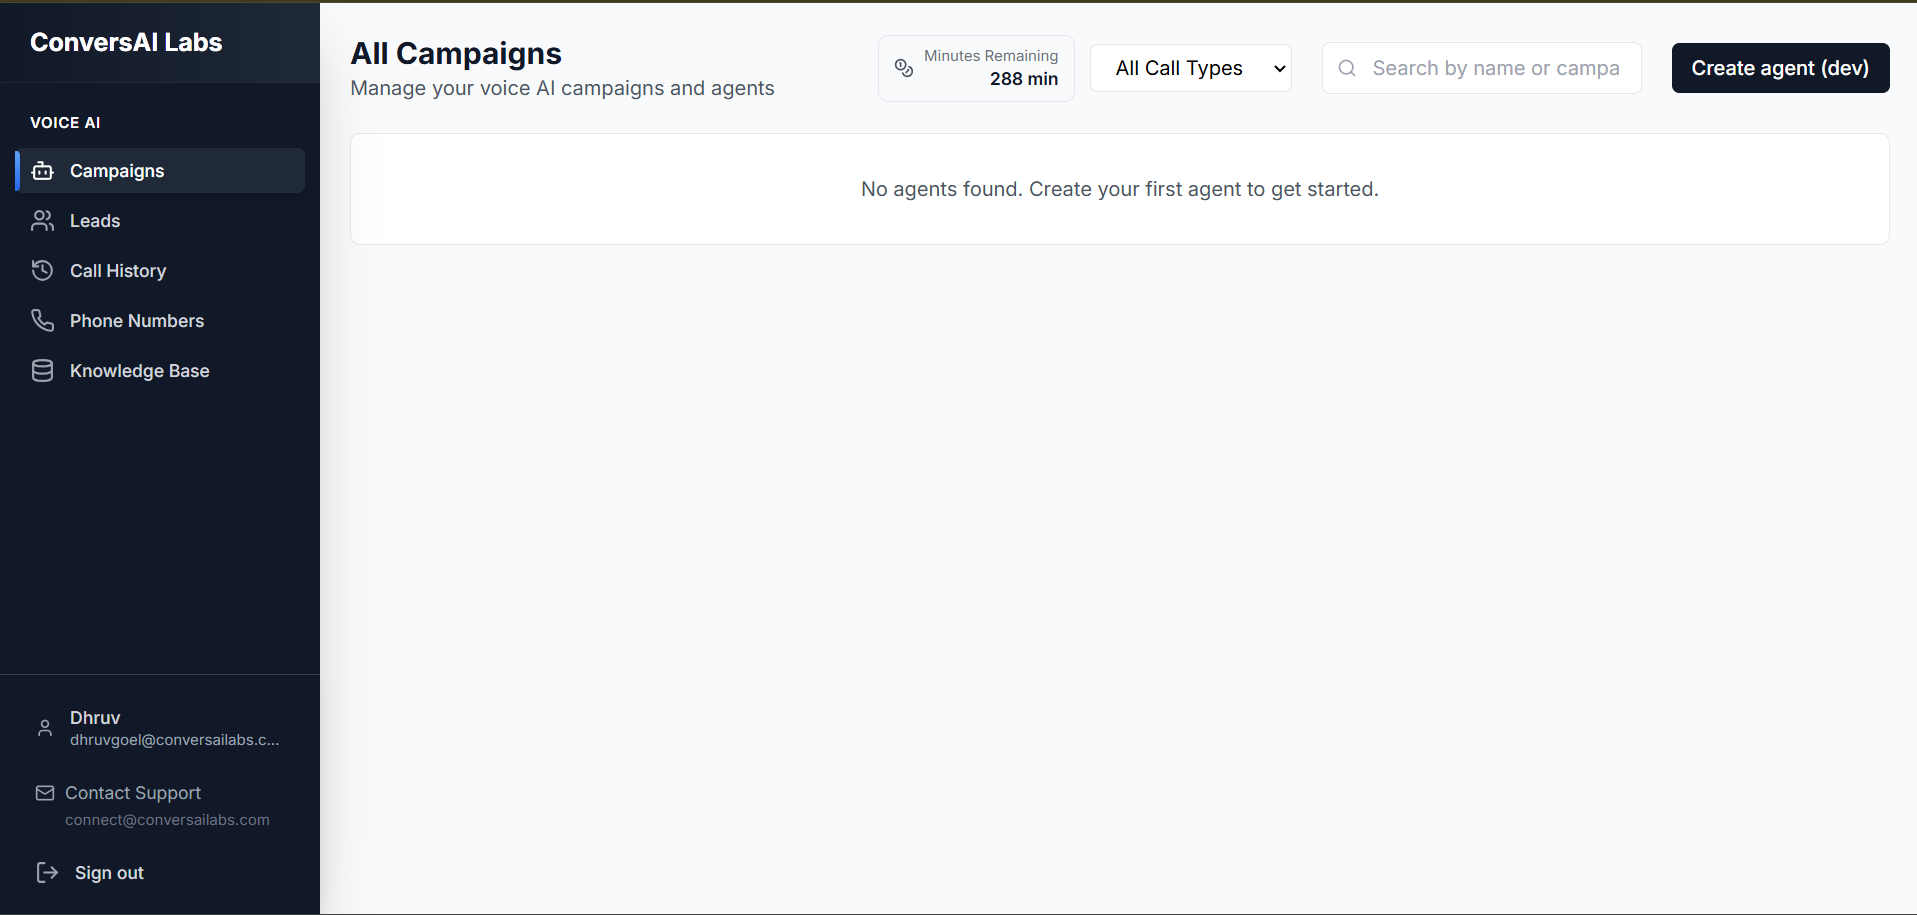
Open Knowledge Base
From the dashboard, navigate to the Knowledge Base section.
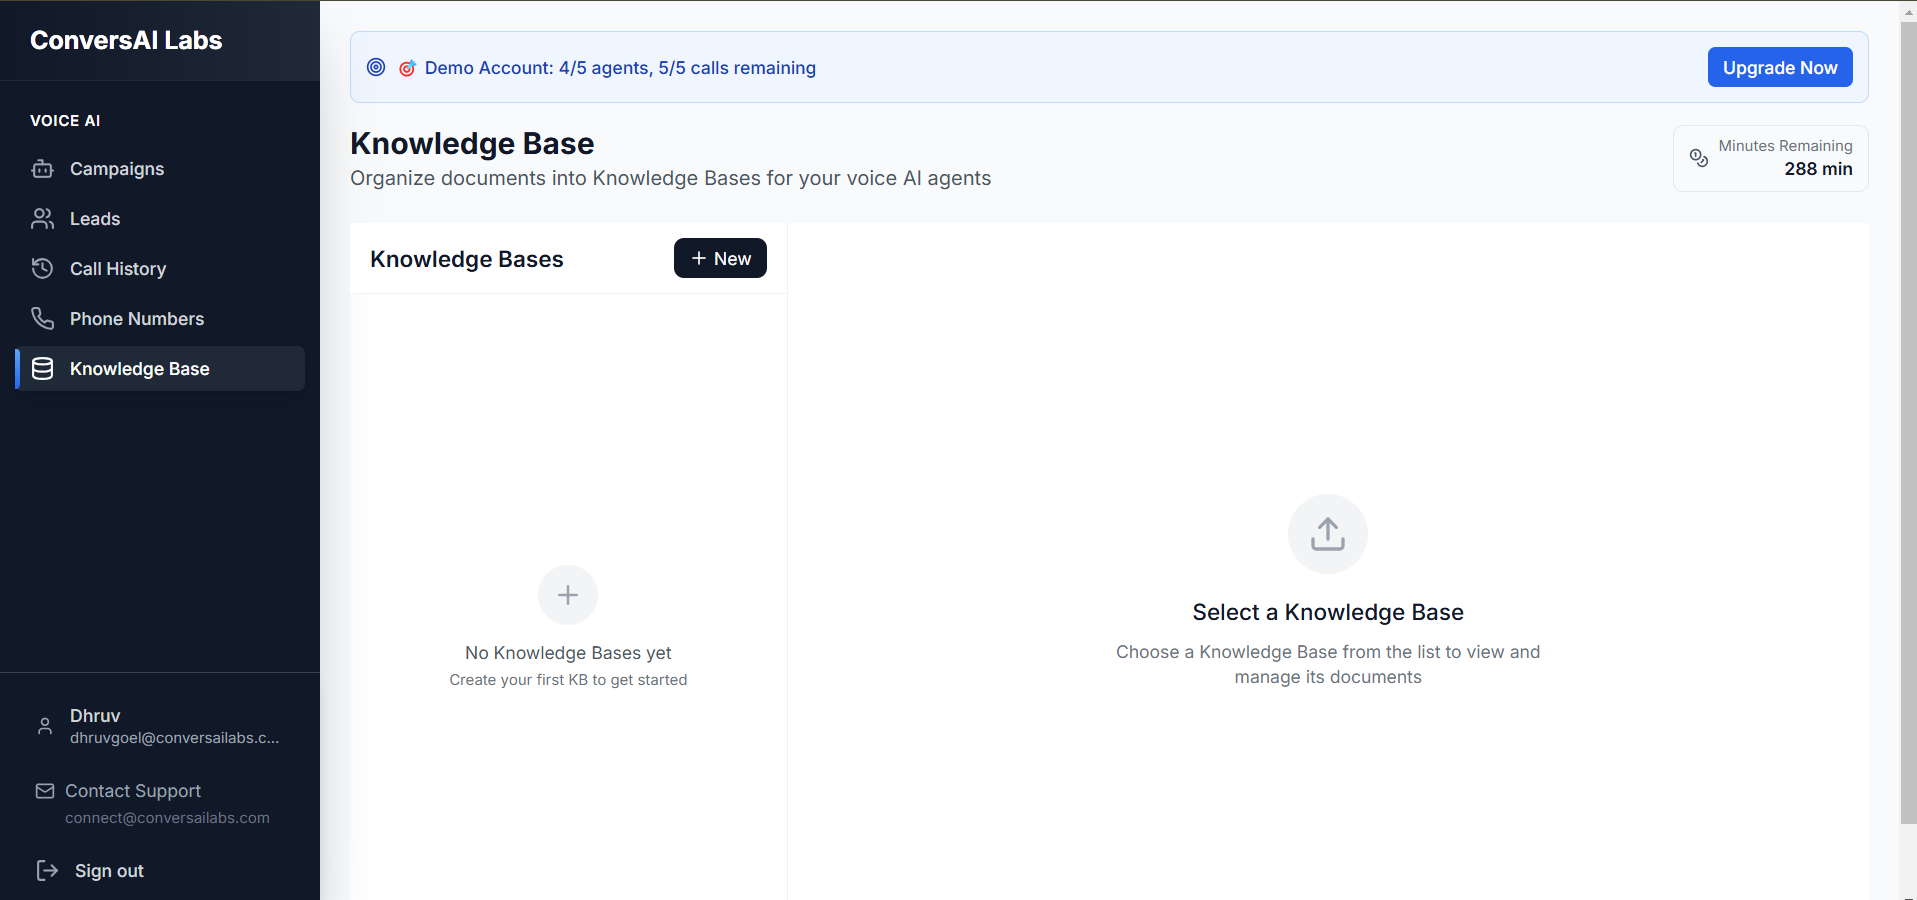
Knowledge Base Dashboard
Here you can see all your existing files. Click on the button to add a new file.
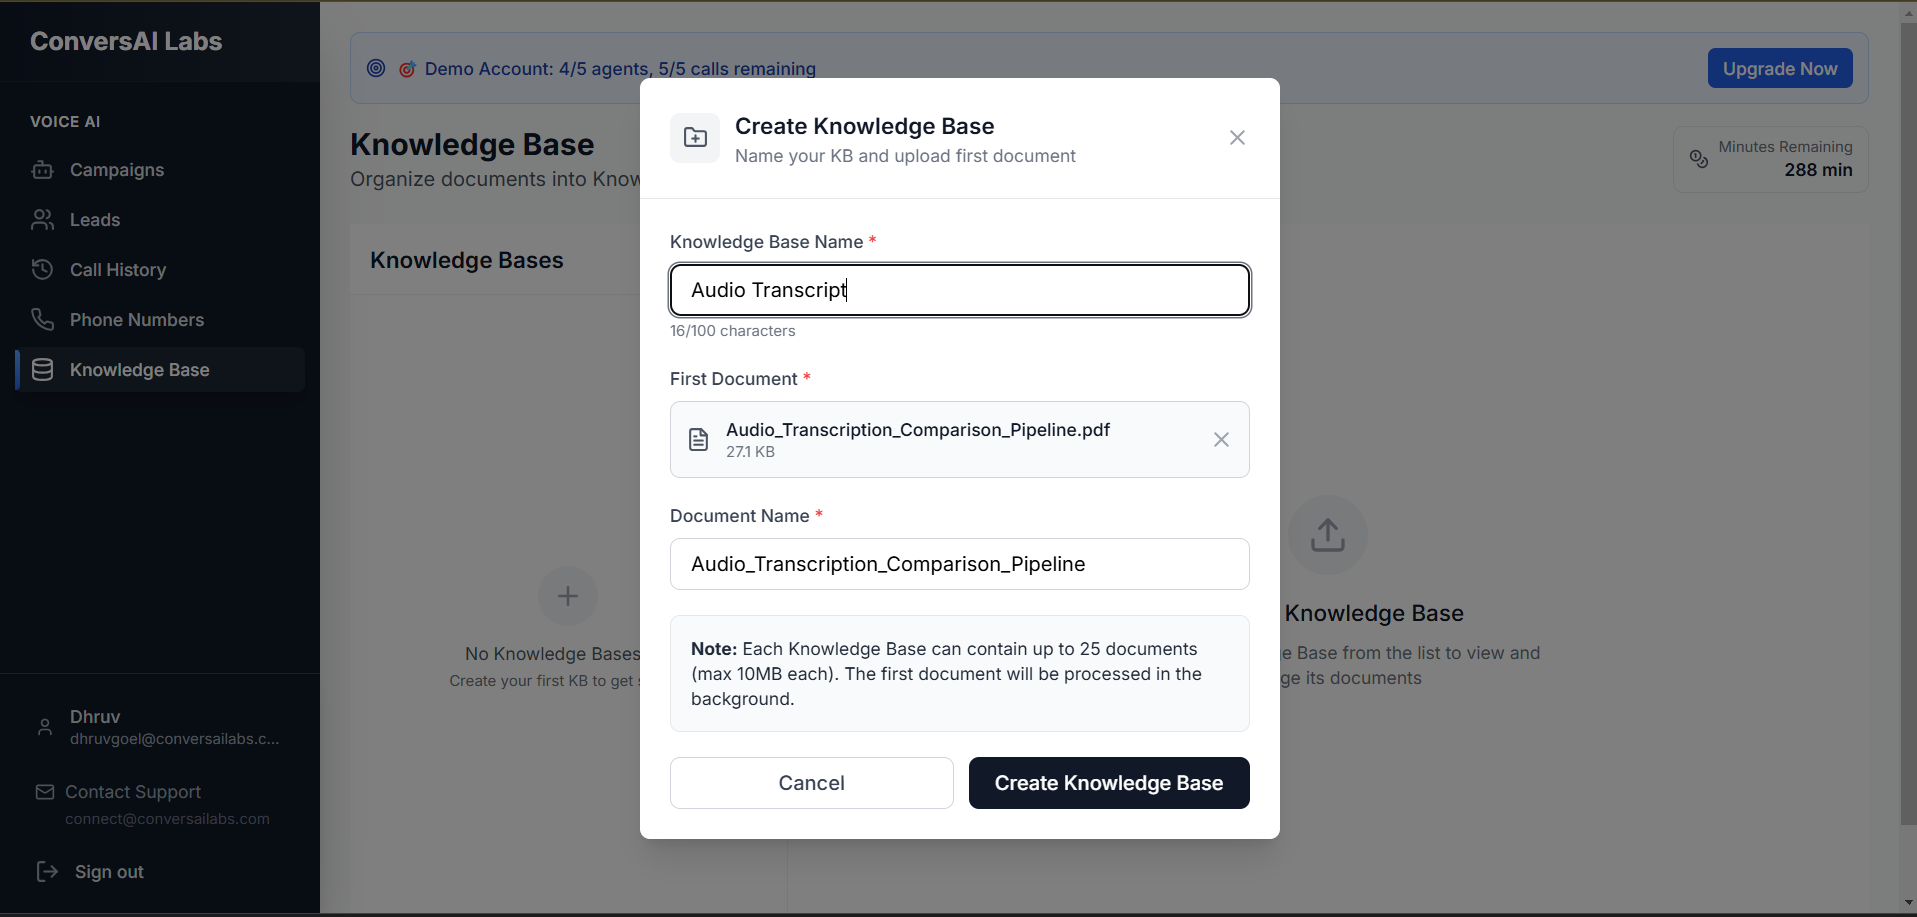
Upload File
A window will appear where you can upload your document and give it a name.
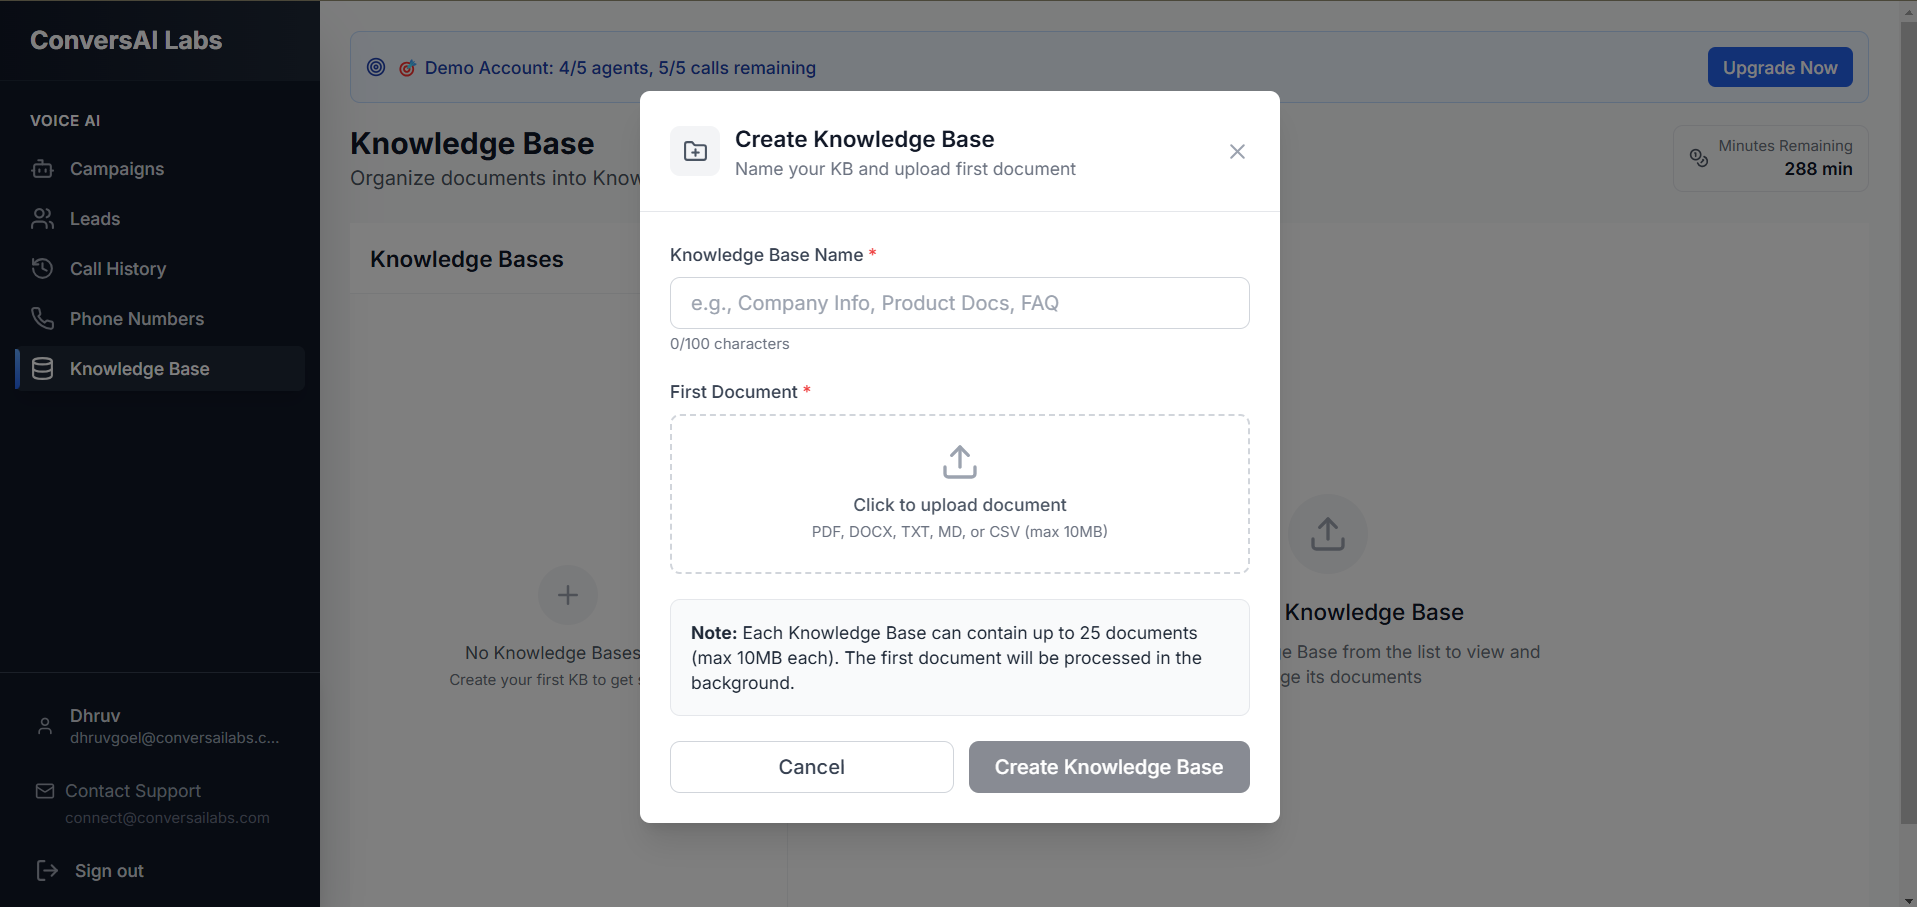
Fill in the details as shown below:
File Added Successfully & Organization
Once uploaded, the file will be processed and become available for your agents to use.
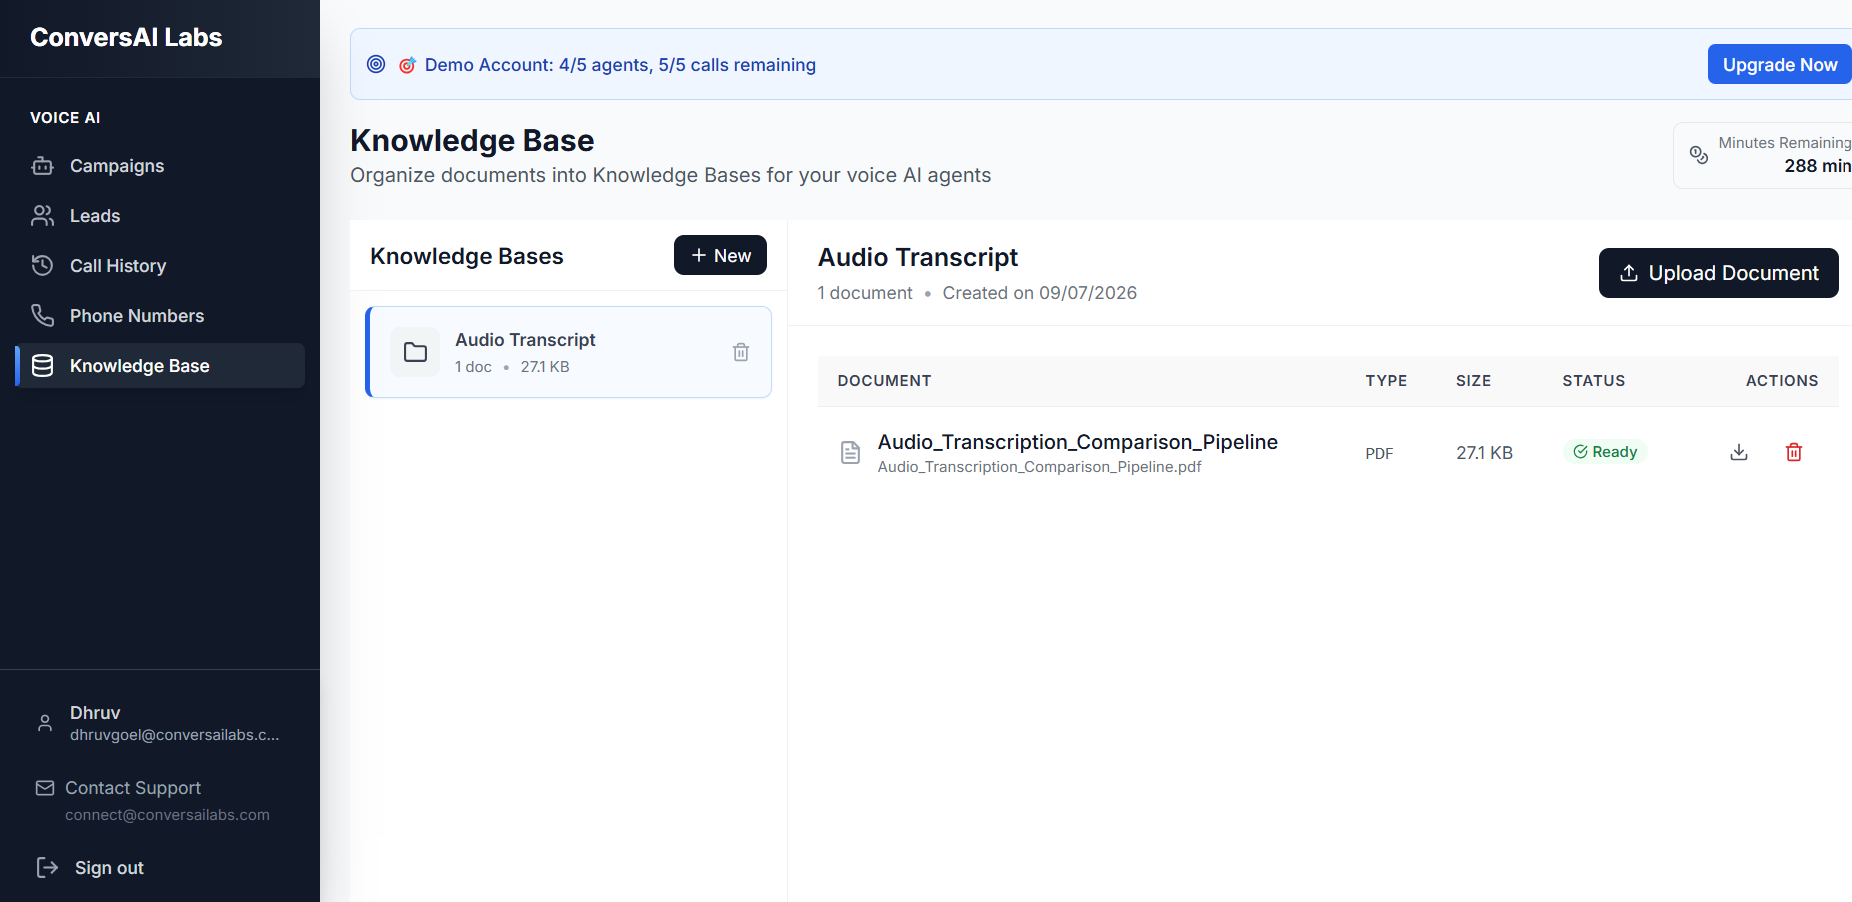
Organizing your Knowledge Base
As seen in the image above, you have powerful tools to keep your documents organized:
- Create Folders: Use the New button to create folders. This allows you to group similar documents together (e.g., "HR Policies", "Product Manuals") so your Knowledge Base remains clean and easy to navigate.
- Upload More Files: Use the Upload Document button to continue adding more files directly into your newly created folders or the main directory.
Why is this important?
Learn exactly how these files are used by the AI and why you need them.
Detailed Explanation
The Power of Context
Why Adding Files is Important
Grounding the AI
By default, AI models only know general information from their training. Uploading your company's documents, policies, or product catalogs grounds the agent in your specific business reality, preventing hallucinations and inaccurate answers.
Instant Updates
Instead of trying to fit all instructions into the agent's prompt (which has size limits), you can upload massive PDFs or text files. When your business information changes, you simply update the file in the Knowledge Base instead of rewriting prompts.
How Files are Used by the Agent
Semantic Search (RAG)
When a user asks a question during a call, the system instantly performs a semantic search across your uploaded files. It retrieves only the most relevant paragraphs and feeds them to the AI agent in real-time.
Contextual Answering
The agent reads the retrieved snippets and uses them to formulate a natural, accurate response on the fly. This ensures the agent sounds knowledgeable and stays on-brand while handling complex customer queries.
Leads Overview
Overview
Managing Your Leads
From the main page, you can view your existing leads, search for specific contacts, and initiate new lead creation using the two primary buttons at the top right.
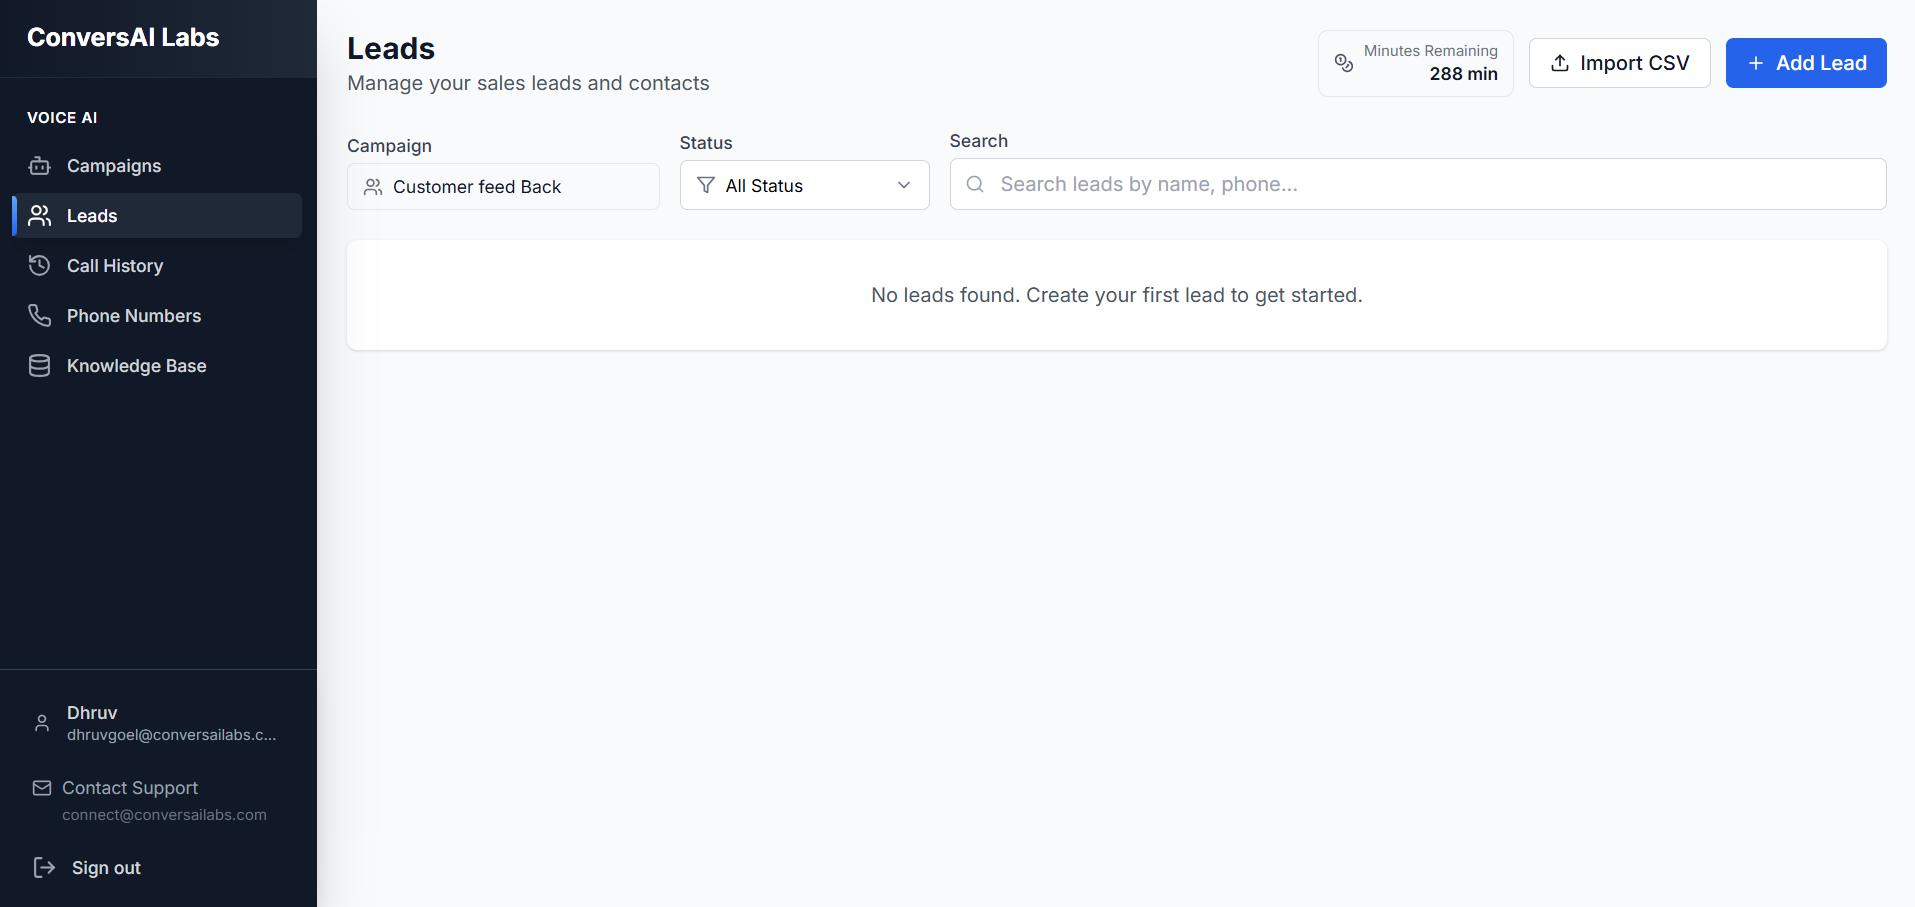
Import CSV
Click this button to bulk upload hundreds or thousands of leads at once using a formatted spreadsheet.
Add Lead
Click this button to manually create a single lead by filling out a simple form.
Importing via CSV
Overview
CSV Format & Restrictions
When you click the Import CSV button, you'll be prompted to upload a file. To ensure a smooth upload process, your CSV file must adhere to specific formatting guidelines.
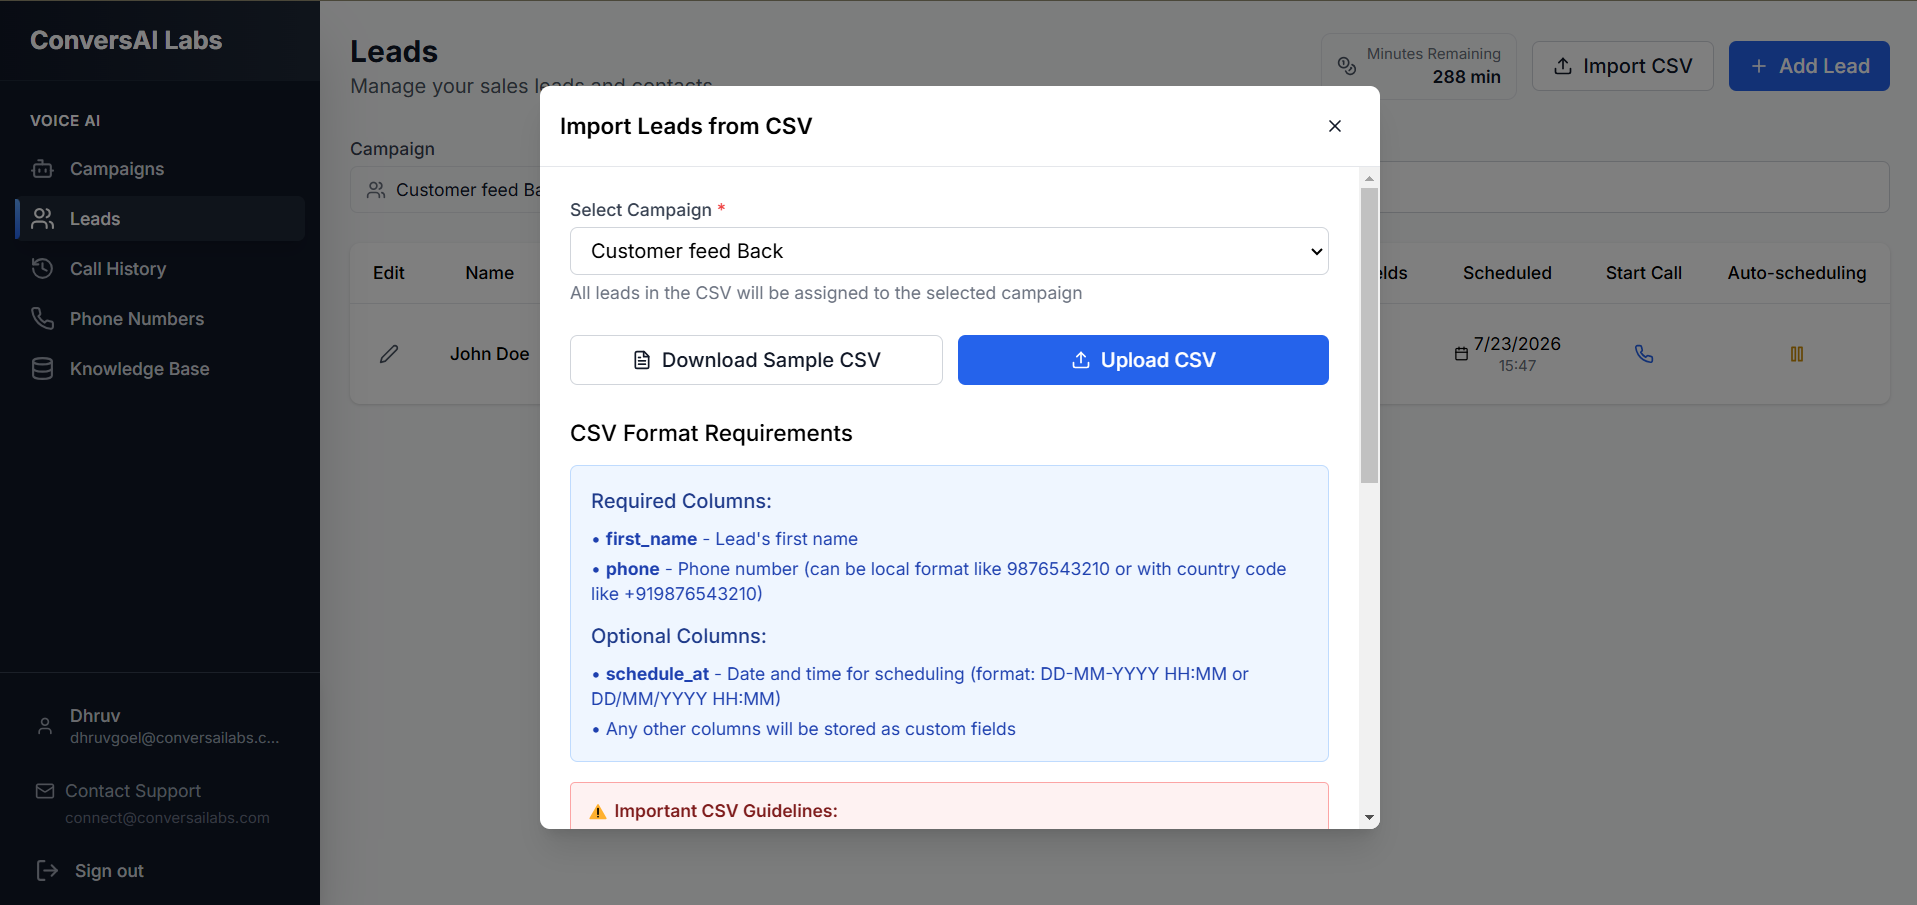
Important CSV Guidelines
Comma Usage
- DO NOT use commas (
,) in any field values. - Commas will split data into separate columns.
- ? Wrong: "Home Number, Society Name"
- ? Correct: "Home Number - Society Name" or "Home Number | Society Name"
schedule_at Format
- Supported formats:
DD-MM-YYYY HH:MMorDD/MM/YYYY HH:MM - Date separator:
-or/ - Time separator:
: - Examples:
01-06-2025 10:00 ?or01/06/2025 14:30 ? - Business hours: 9 AM to 7 PM IST only.
Phone Numbers
- Without country code is Preferred.
- You can choose the country code from the dropdown in the UI.
- Example (without code):
9876543210(uses the selected country code).
Adding Leads Manually
Overview
Step-by-Step Creation
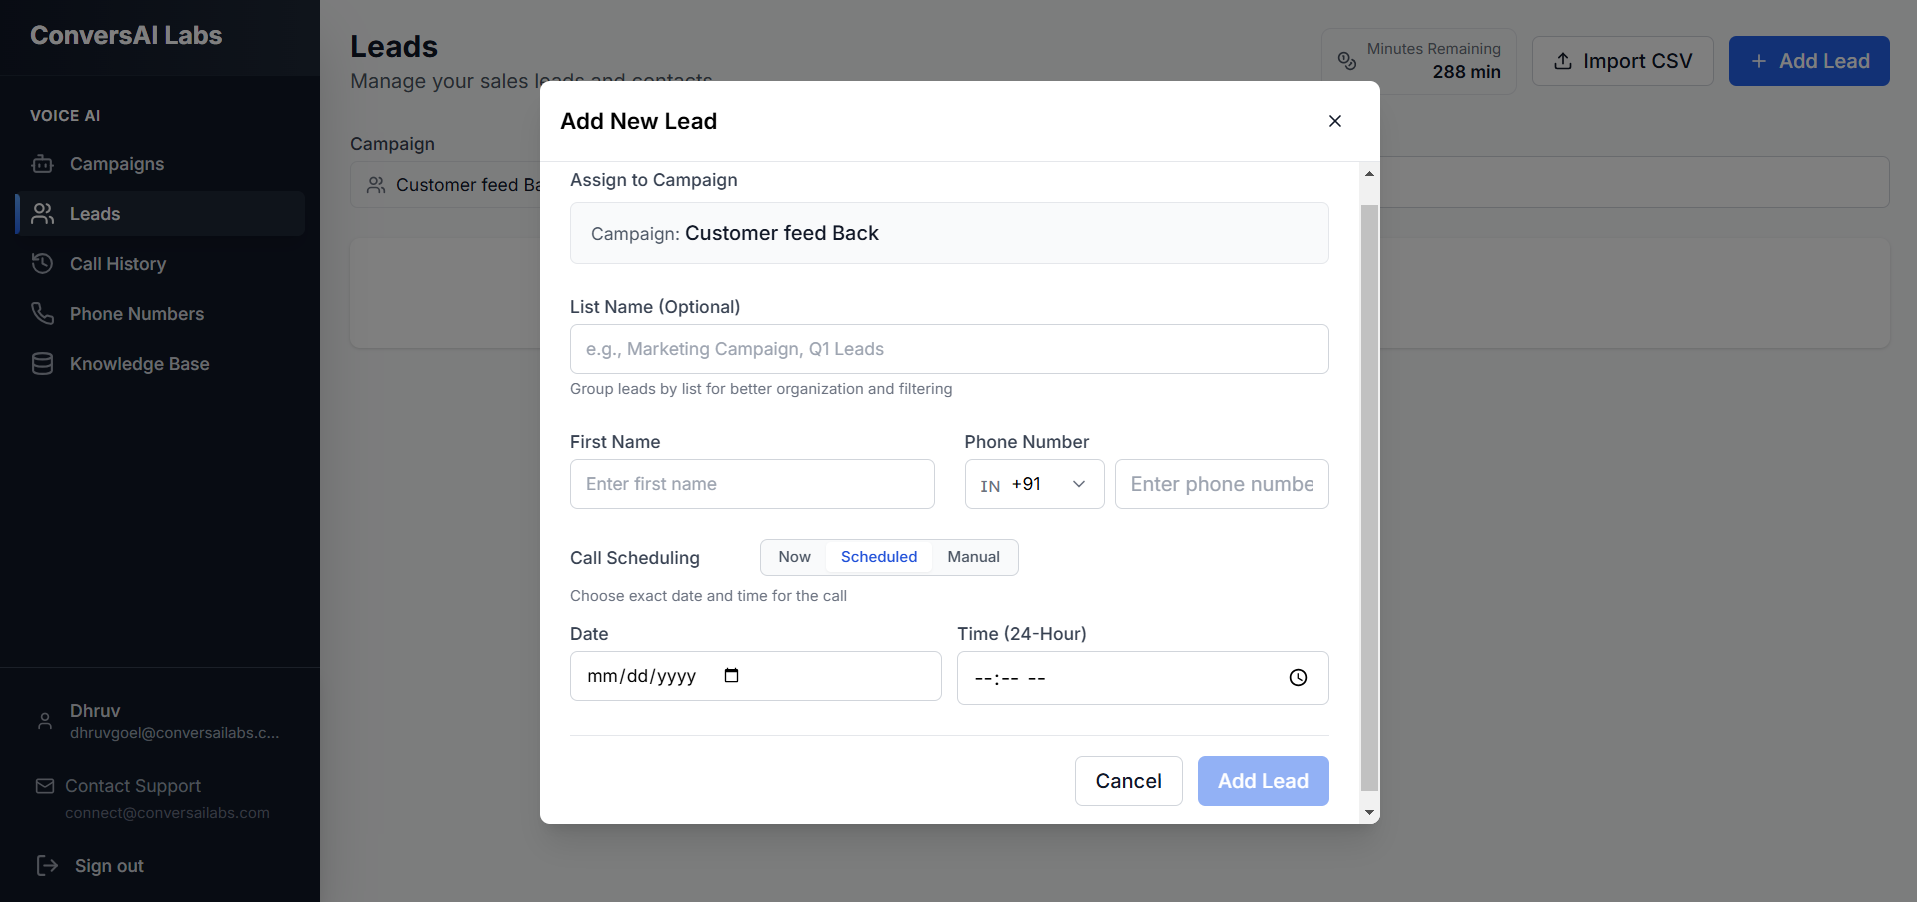
1. Open the Form
Clicking Add Lead opens a blank form. This form collects the minimum required information to make a successful call.
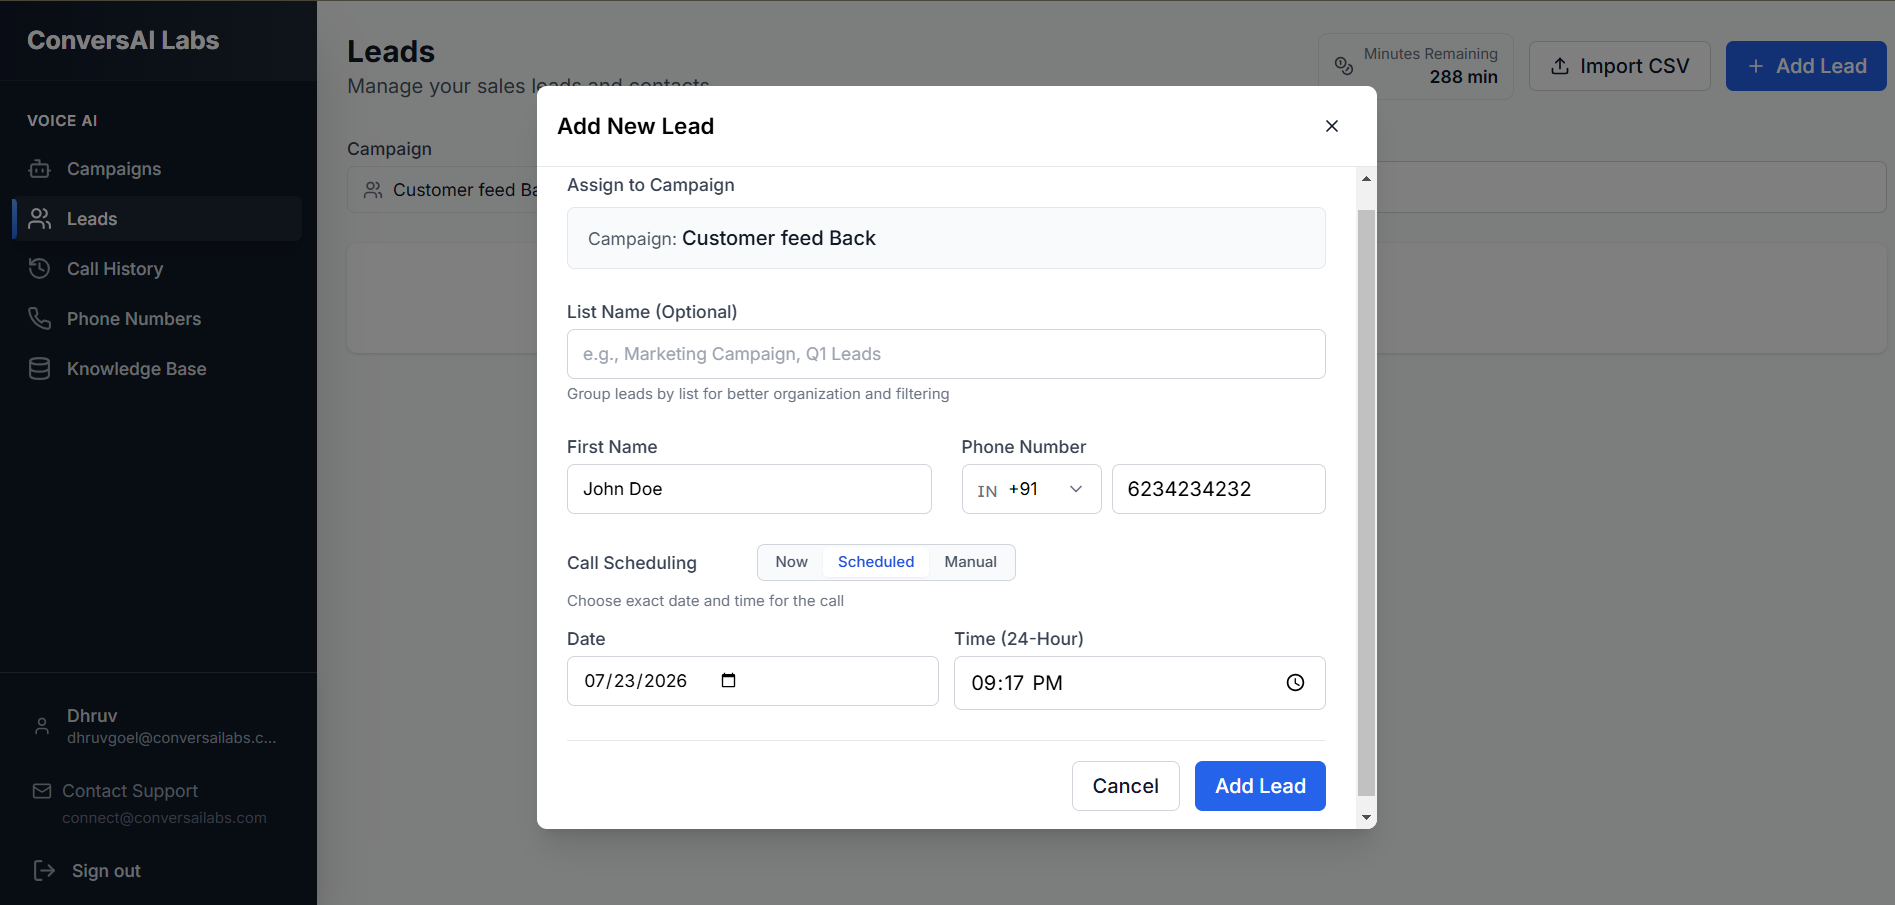
2. Fill Out Details
Complete the fields to define your lead. Below is an explanation of each field:
- Agent: Select the specific AI agent from the dropdown that will handle this lead.
- First Name / Last Name: The contact's name. This allows the AI to personalize the greeting.
- Phone Number: The exact number the AI will call. Don't forget the country code!
- Email / Company (Custom Fields): Extra context for the AI. If the AI needs to reference their company name during the pitch, it reads it from here.
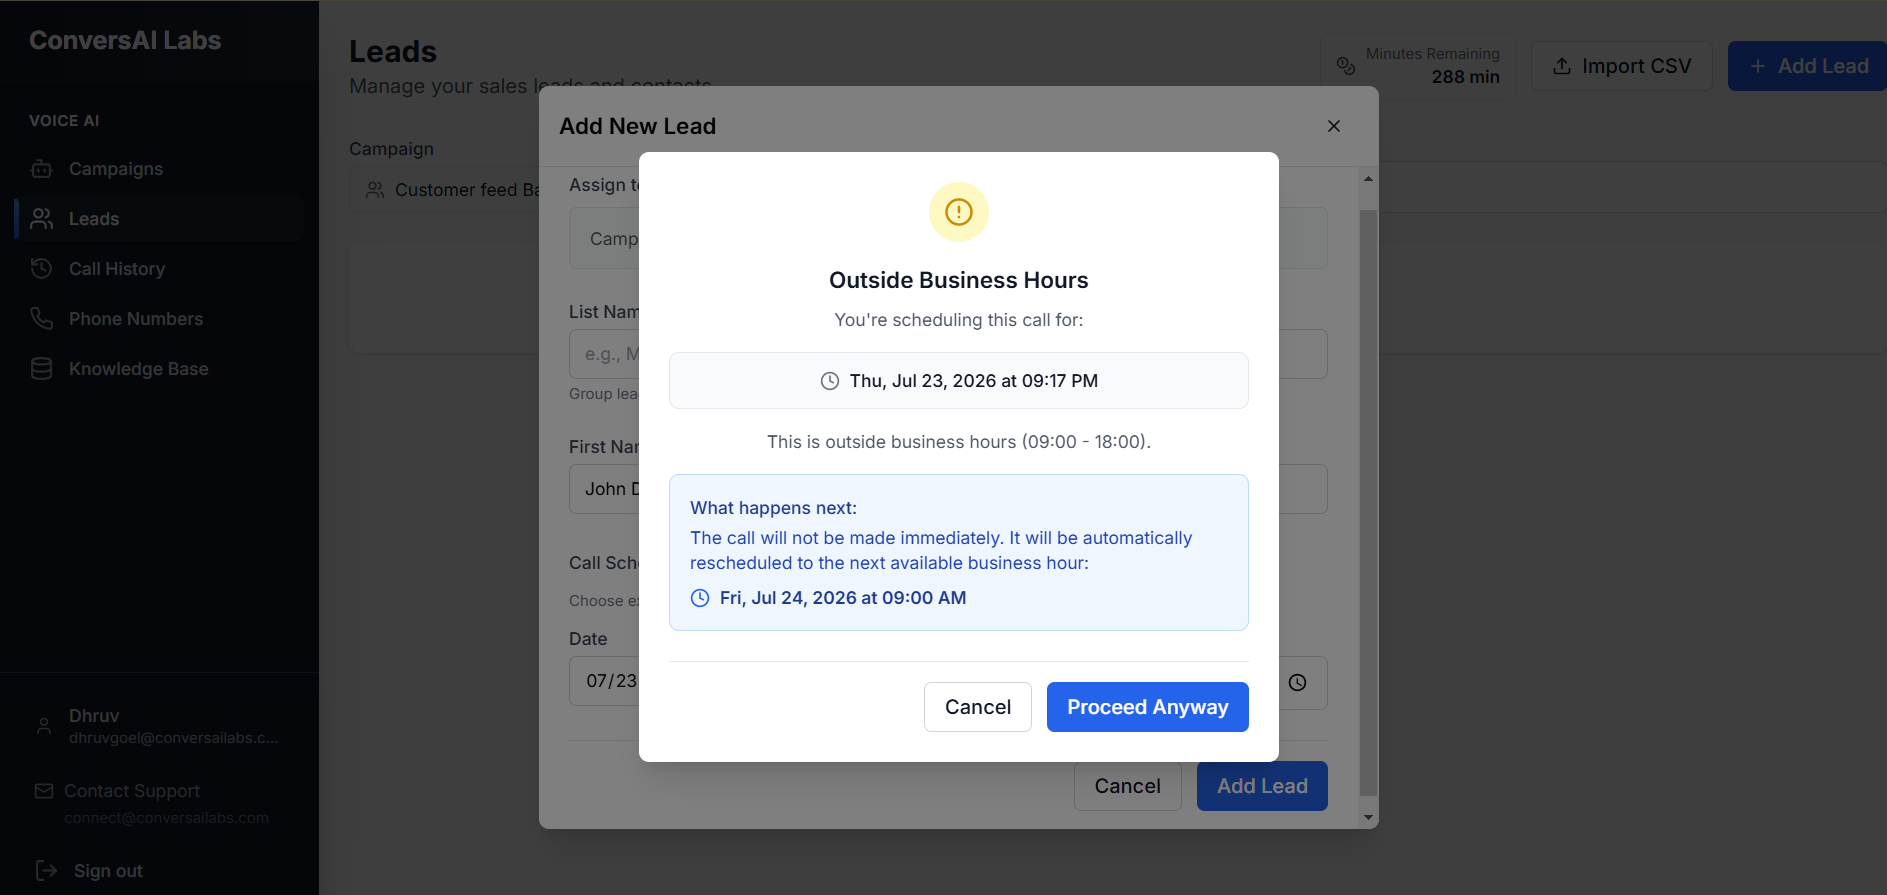
3. Submission & Confirmation
Upon clicking submit, you'll briefly see a loading or confirmation state while the lead is securely saved to your database.
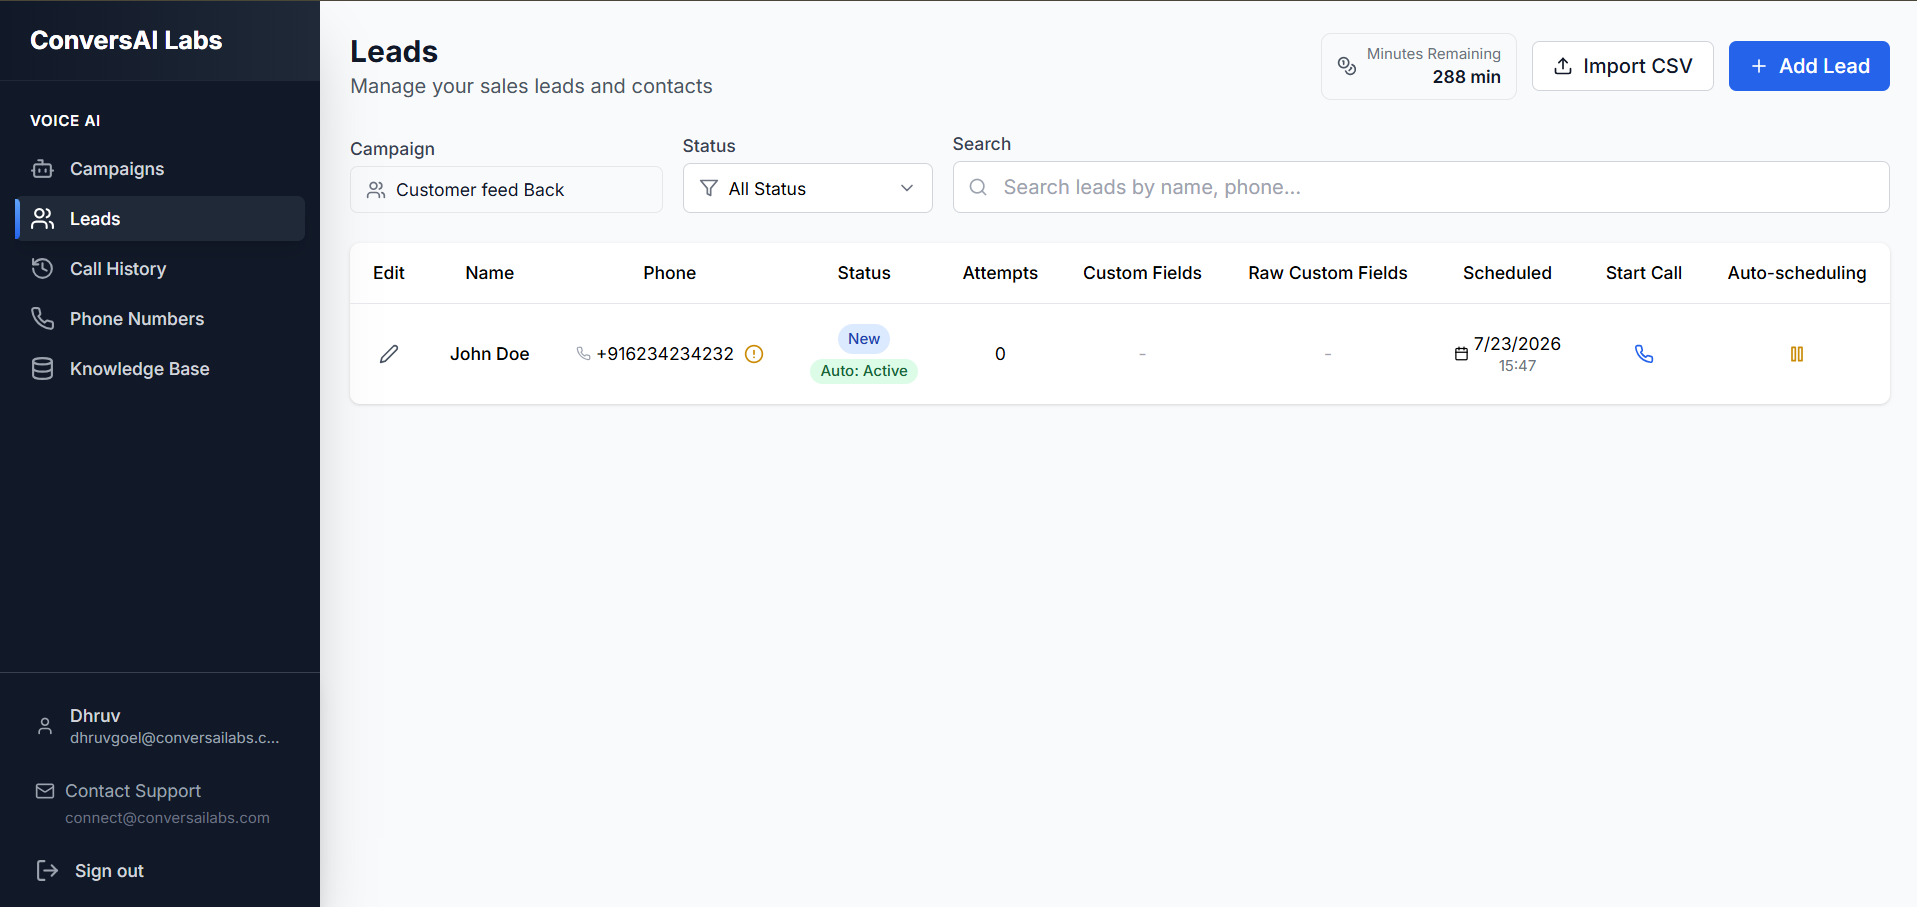
4. Final Look
Your new lead immediately appears in your Leads dashboard, ready to be engaged.
Call History
Overview
Overview
Fetching Call Data
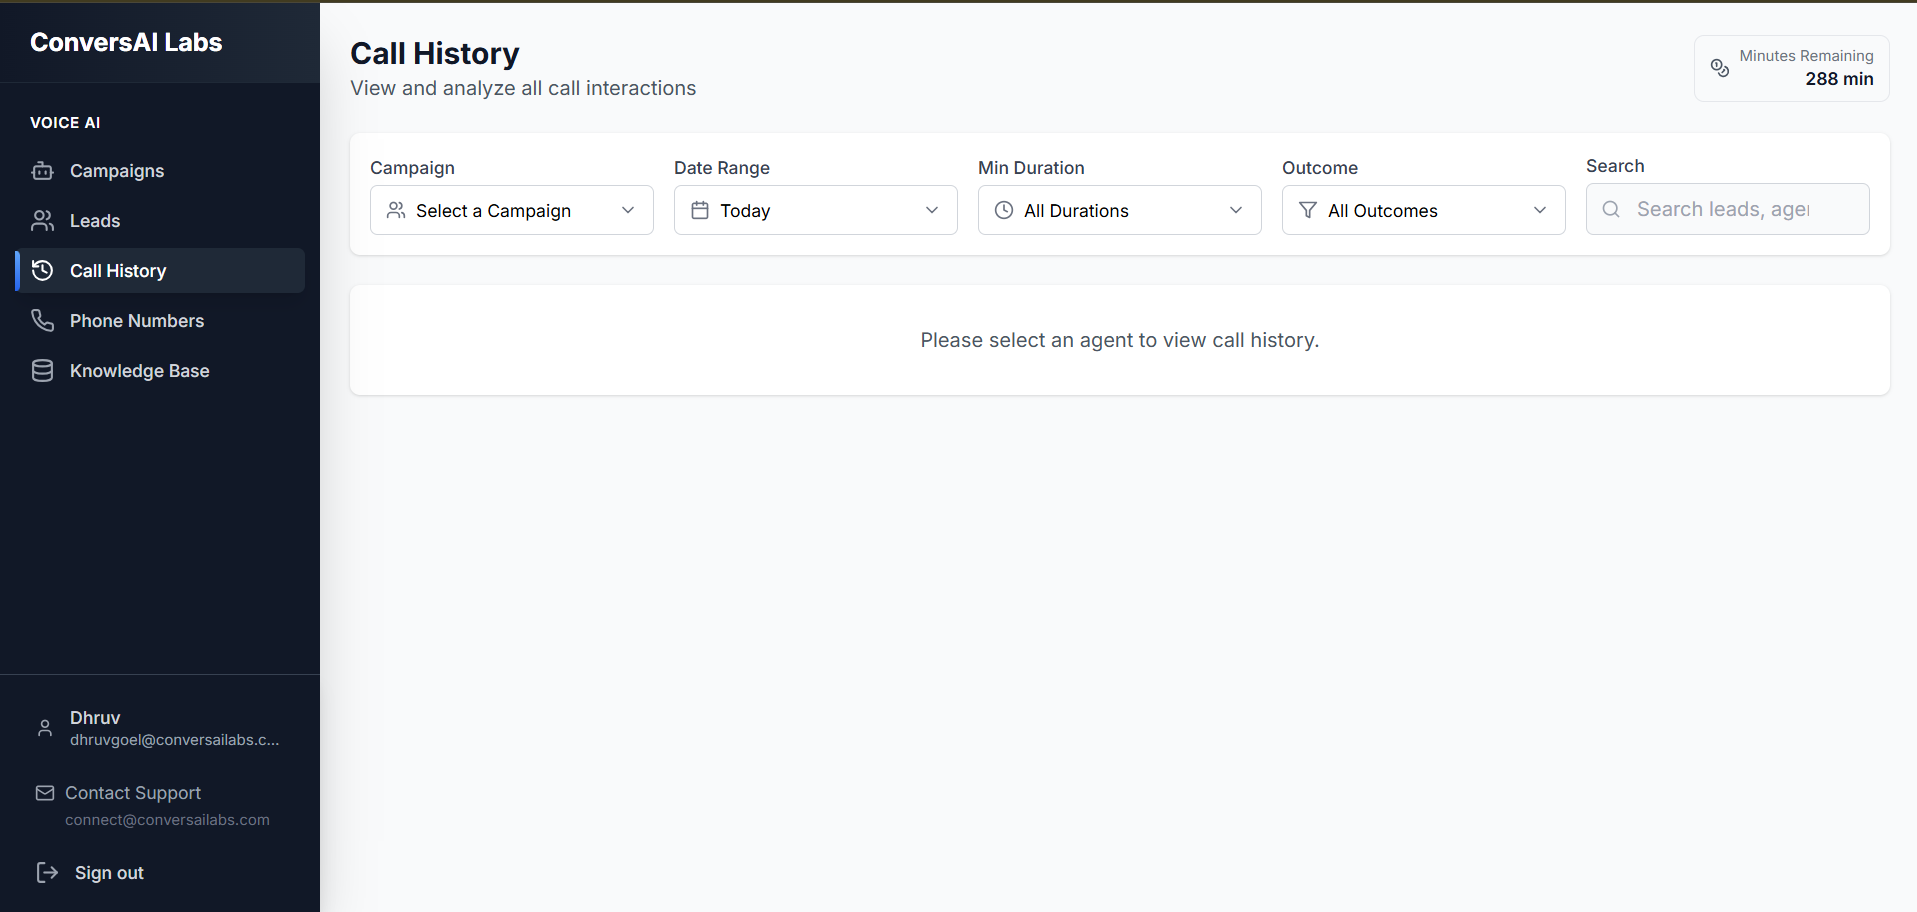
The Call History dashboard acts as the central ledger for your AI phone calls. To begin, you must select the specific campaign you want to review.
1. The Main Page
When you first arrive at the Call History page, you will see a campaign dropdown menu. Select the campaign you want to review.
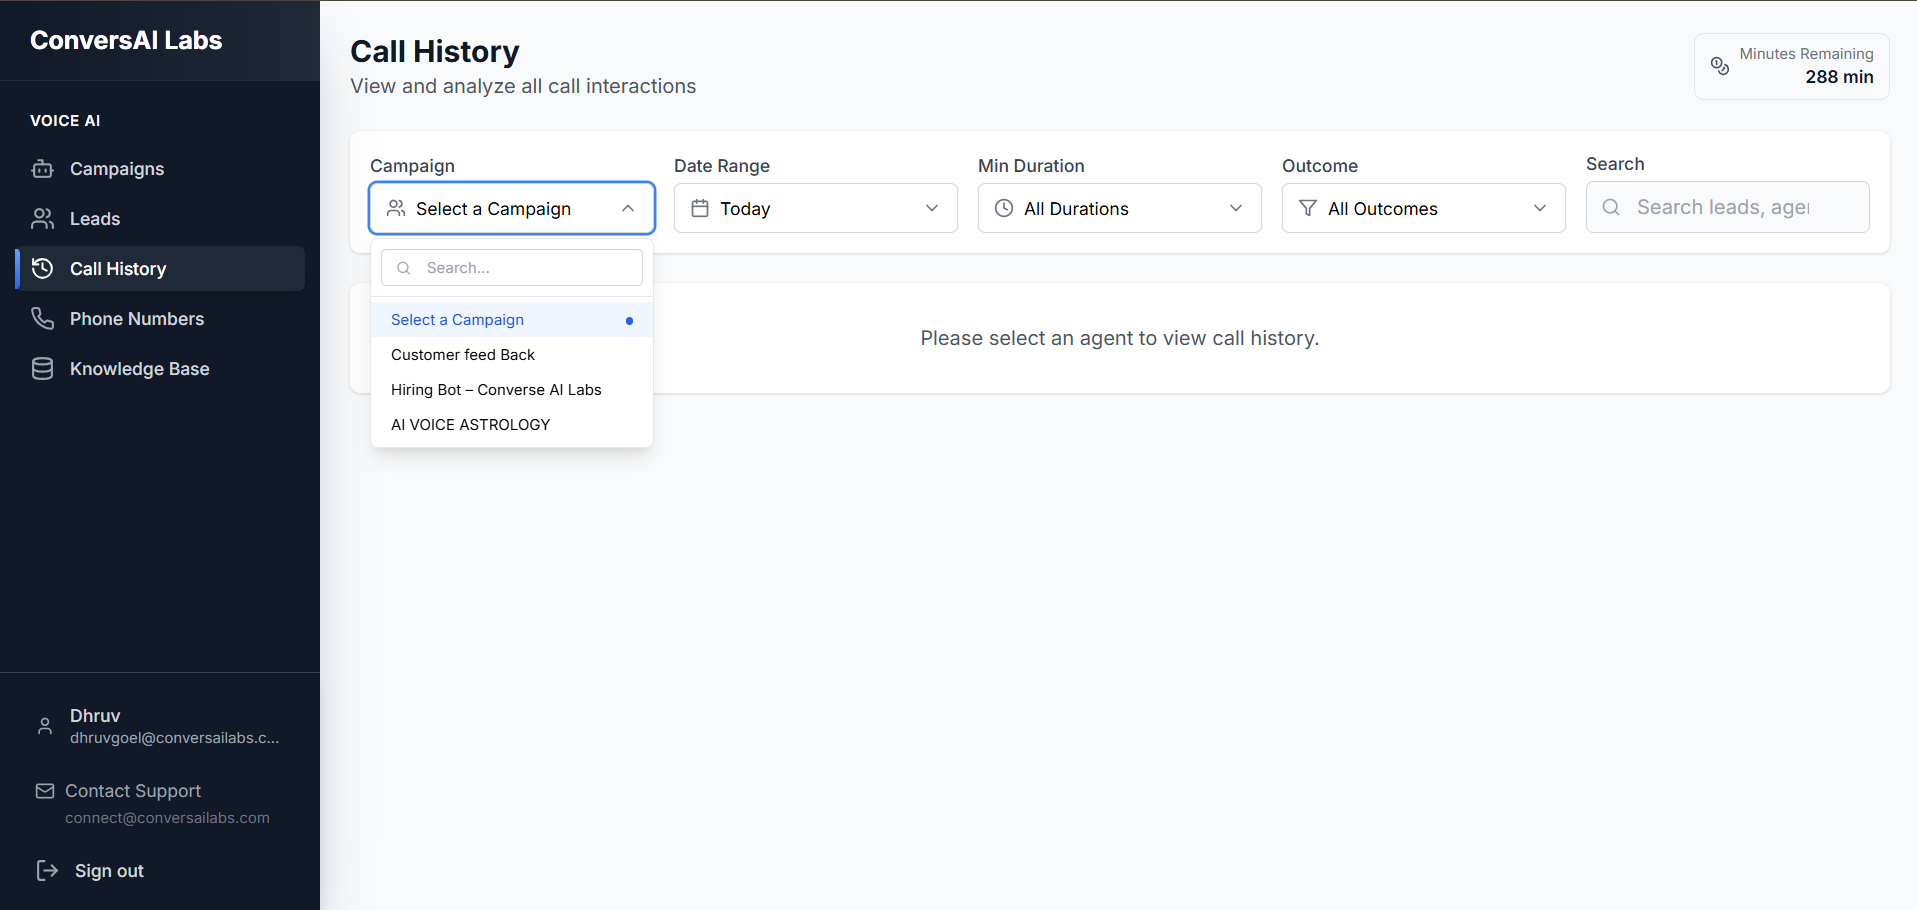
2. Selecting a Campaign
Clicking the dropdown will show all your active campaigns. Select one to proceed.
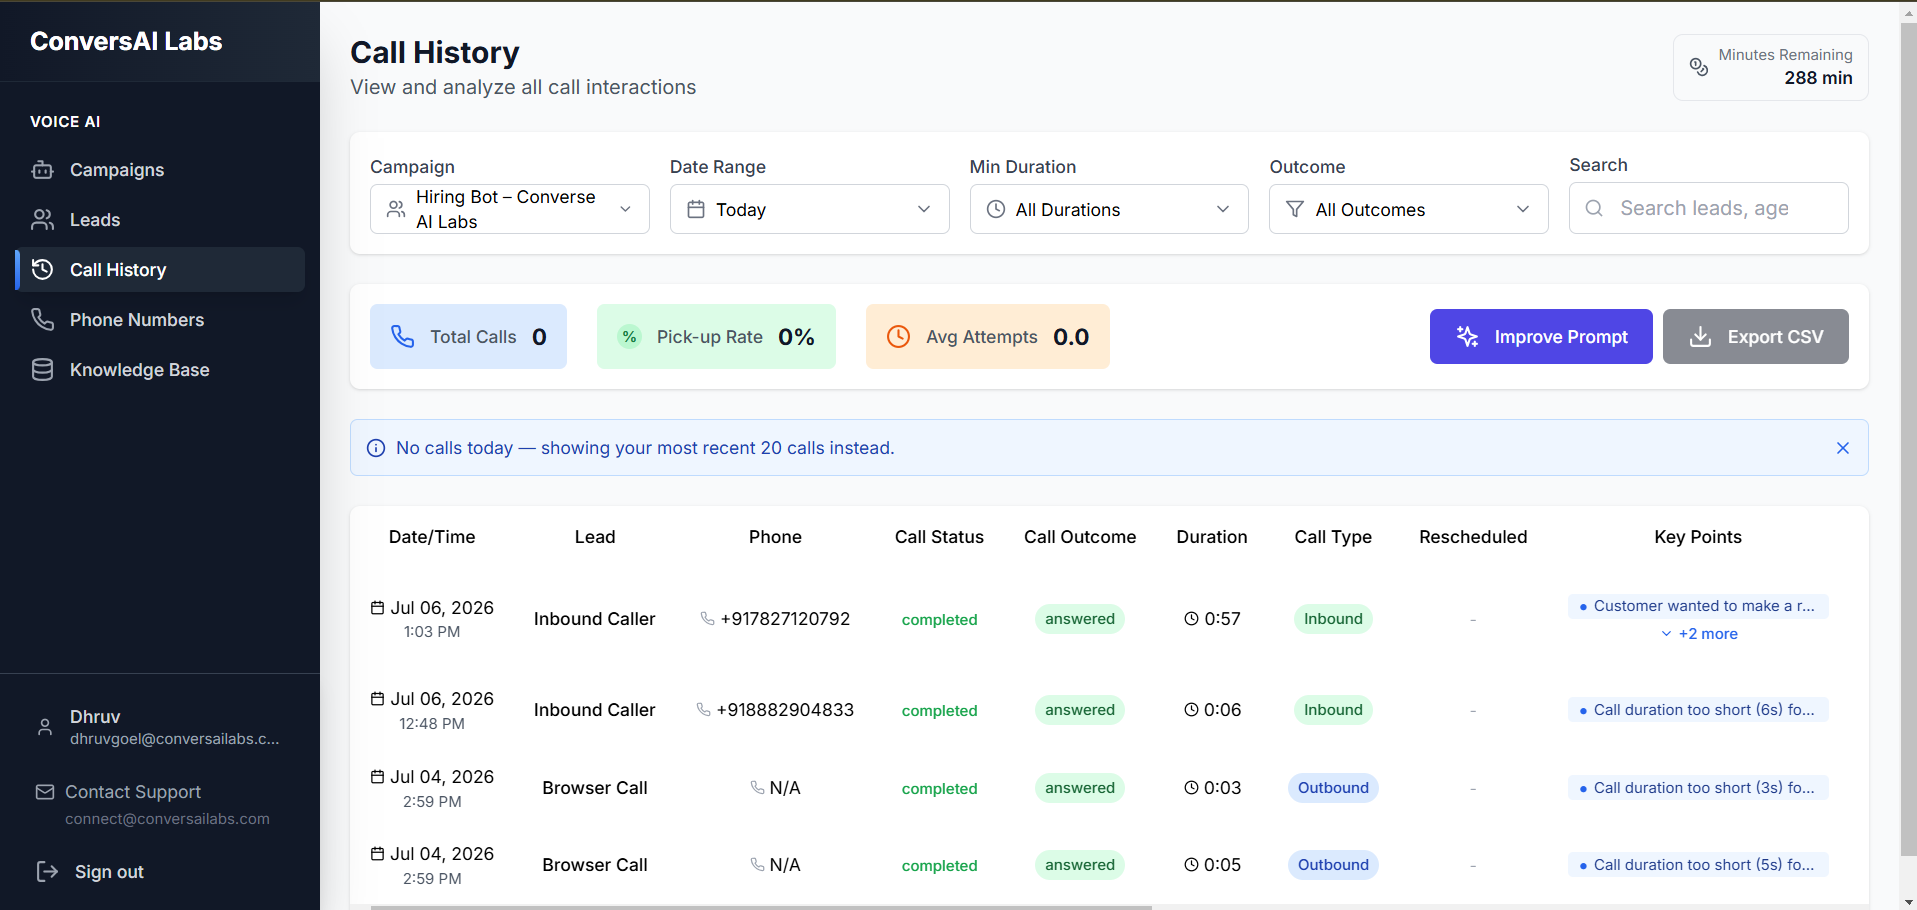
3. Viewing Fetched History
Once selected, the dashboard will fetch and display all calls associated with that campaign. You can see important initial data immediately on this screen.
Detailed Explanation
Deep Dive
Table Data & Navigation
The history table provides a wealth of information about each call. Some columns are visible immediately, while others require horizontal scrolling.
Visible Metrics
- Lead Name & Phone: The contact details of the person called.
- Status: The final outcome of the call (e.g., Completed, Failed, Voicemail).
- Duration: The total length of the call in seconds/minutes.
- Cost: Credits consumed during the interaction.
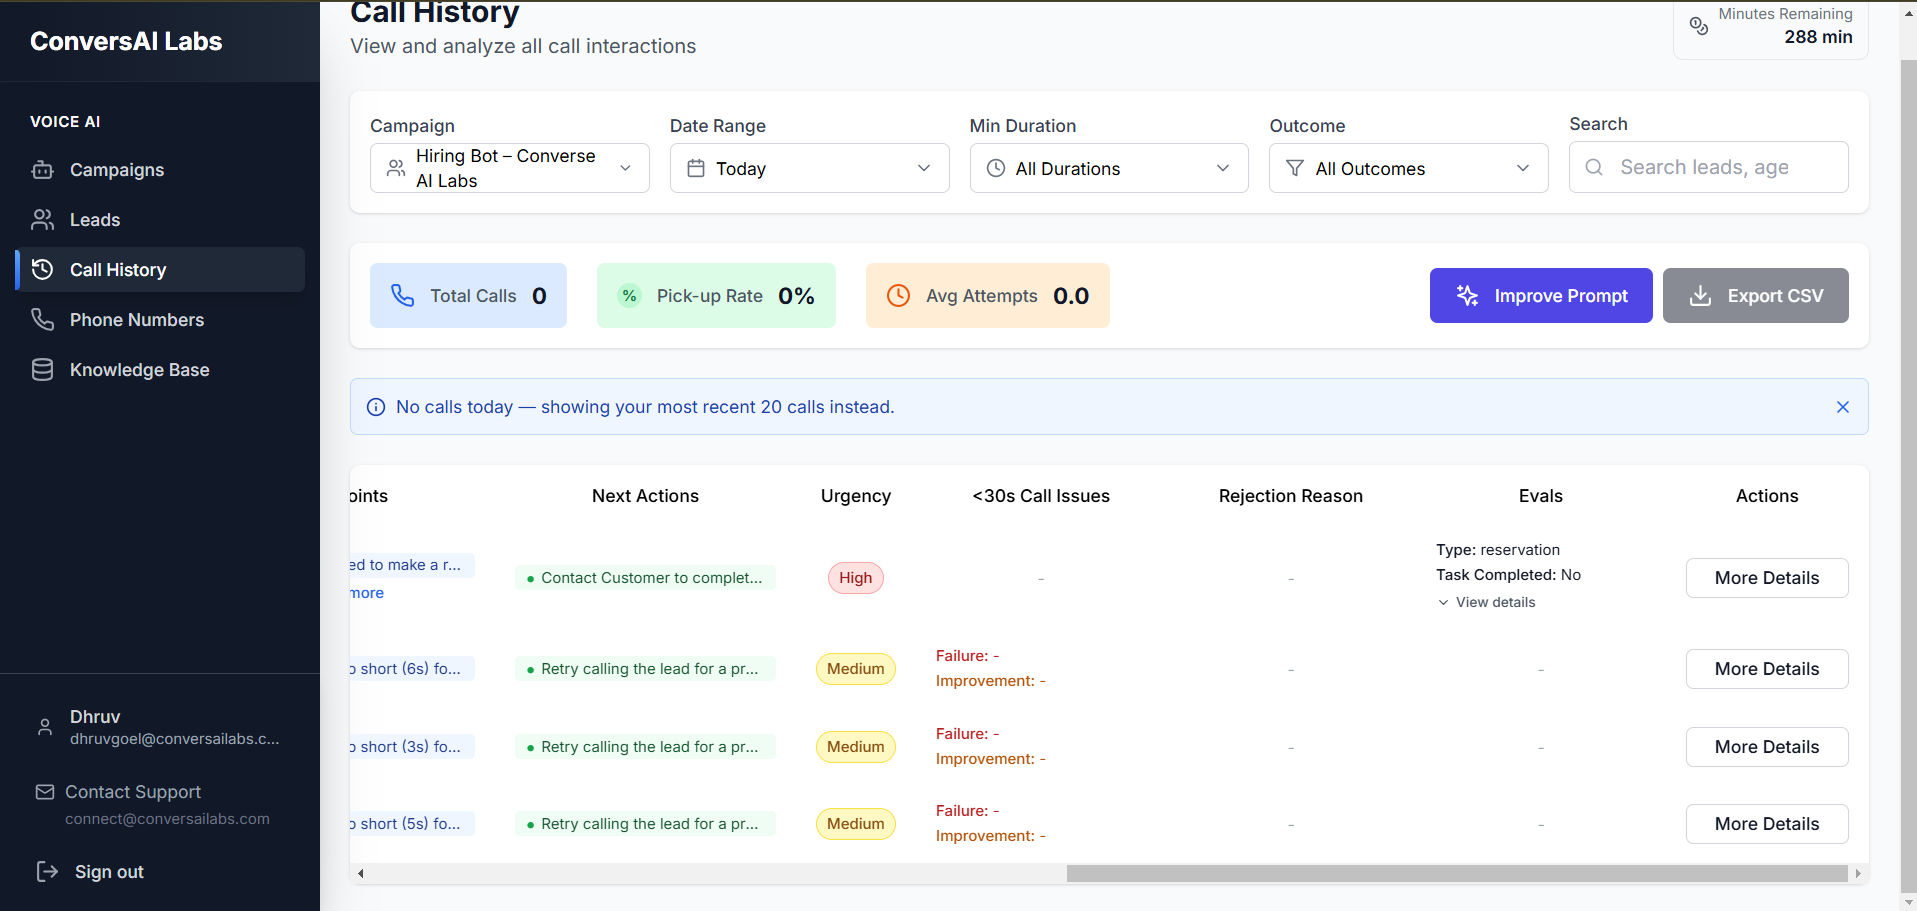
Scrolling for More Options
The table contains more columns than can fit on a standard screen. Scroll to the right side of the list to reveal the "More Details" button for each specific call.
Call Details Window
Clicking the "More Details" button opens a comprehensive window that provides deep insights into that specific interaction.
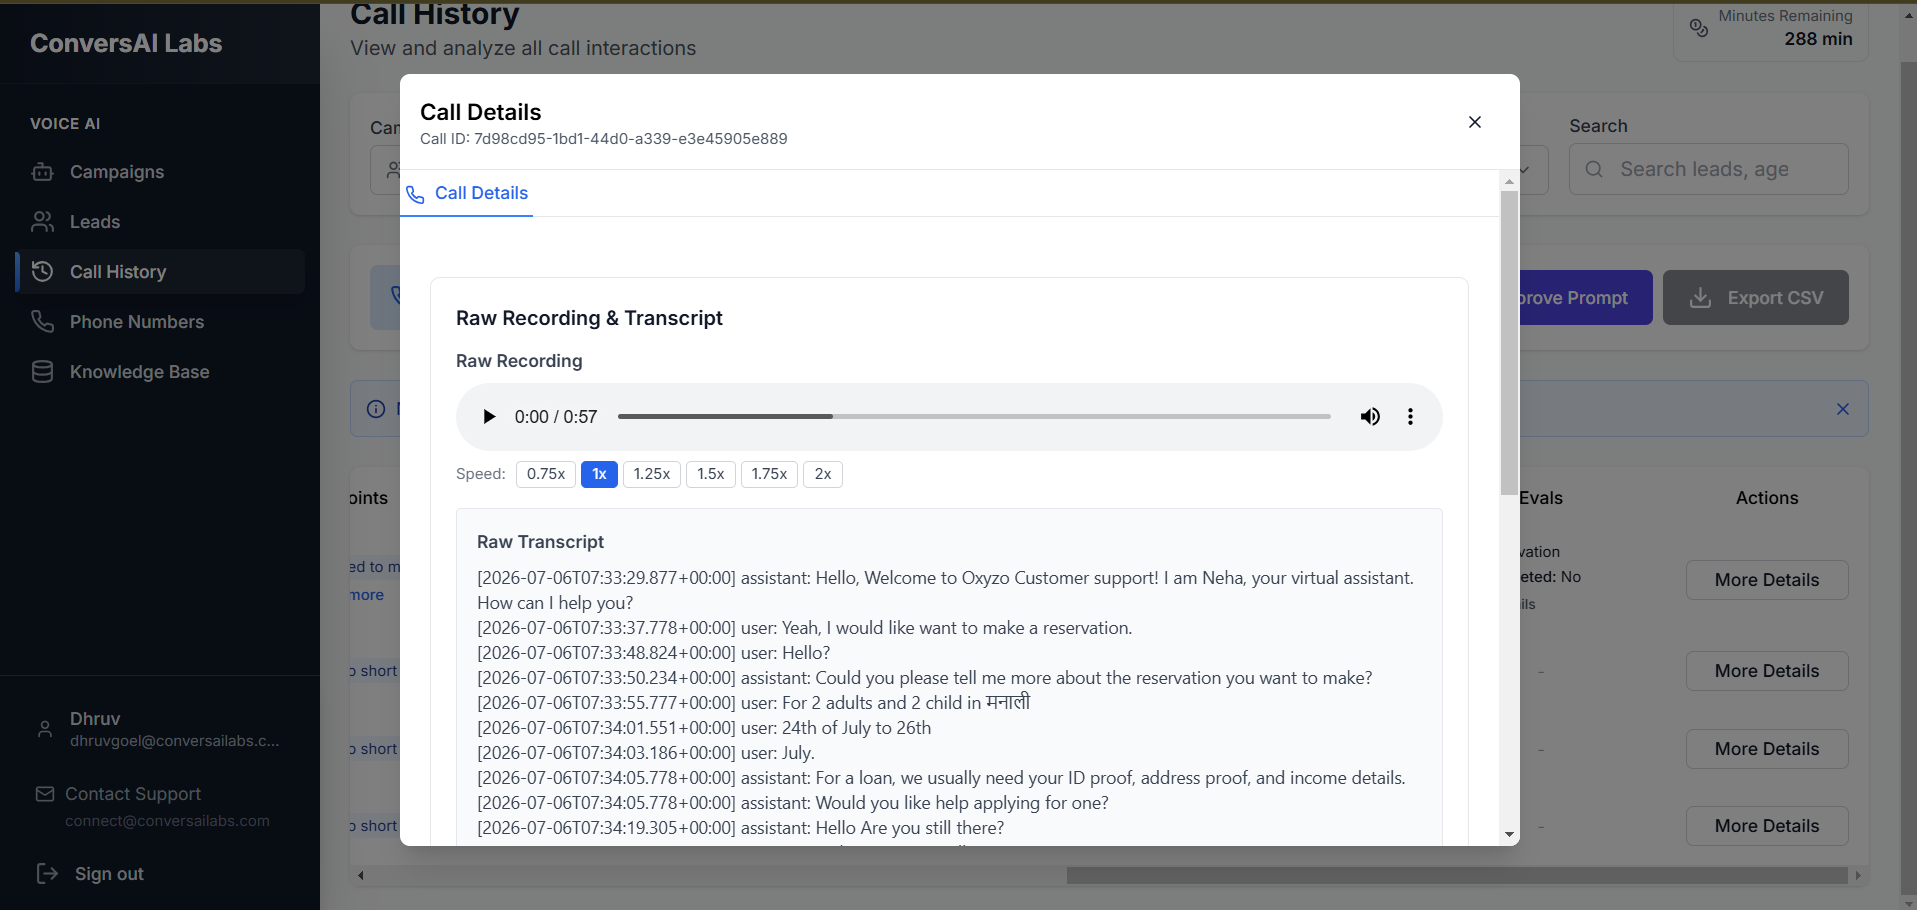
Audio Recording
A built-in audio player allows you to listen to the exact conversation between your AI agent and the lead. This is crucial for quality assurance and training.
Full Transcript
A text transcript of the entire call is provided, clearly separating what the AI said versus what the user said, making it easy to scan through long conversations.
Call Summary
An AI-generated summary of the call's outcome, highlighting key takeaways without requiring you to read the full transcript.
Variables & Metadata
Any custom variables extracted during the call (like appointment times or answers to specific questions) are displayed here.
Profile Settings
Overview
Personal & Company Details
Your profile page gives you a bird's-eye view of your account. You can view and update key information such as:
Company ID
Your unique organization identifier, required for some advanced integrations and support requests.
Personal Details
Your registered email address, name, and role within the company.
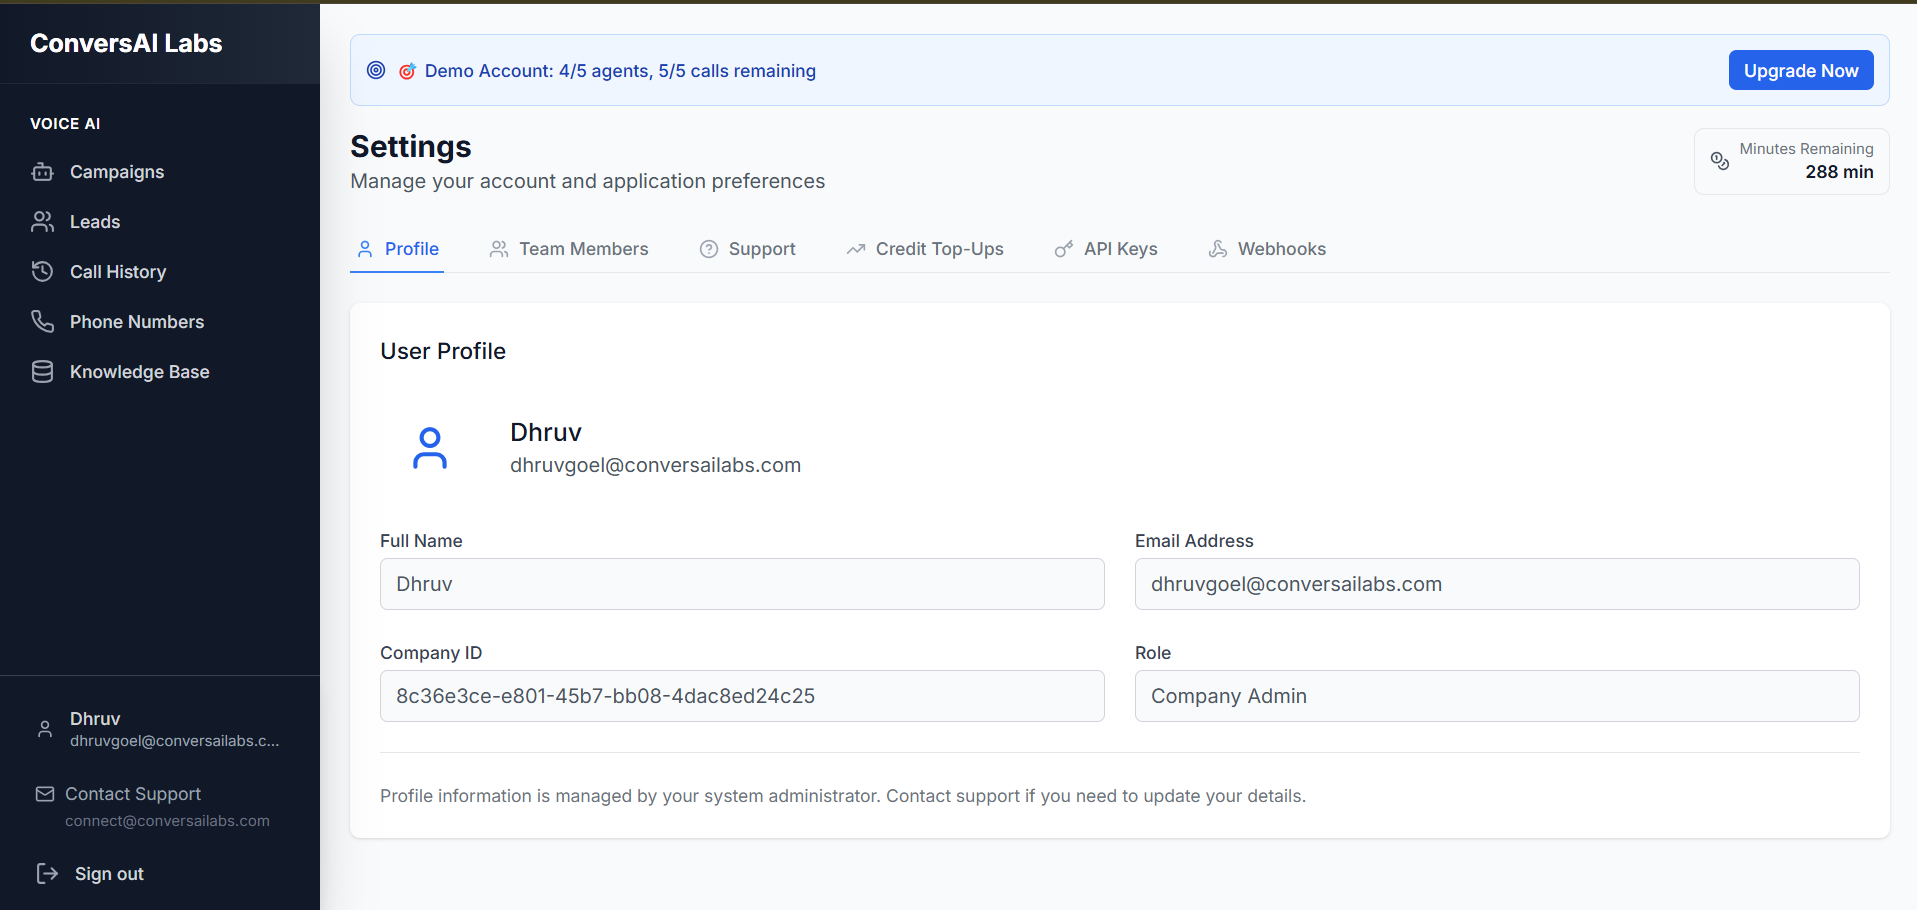
How to Update Profile Information
Locate the Fields
On the Profile Settings page, locate the text fields for the information you want to change (e.g., Your Name, Company Name).
Enter New Details
Click inside the text field, clear the existing information, and type in your updated details.
Save Changes
Once you have finished editing, click the Save Changes button located at the bottom of the section to apply your updates.
Team Members
Overview
Managing Your Team
The Team Members page lists everyone who has access to your company's ConversaiLabs workspace.
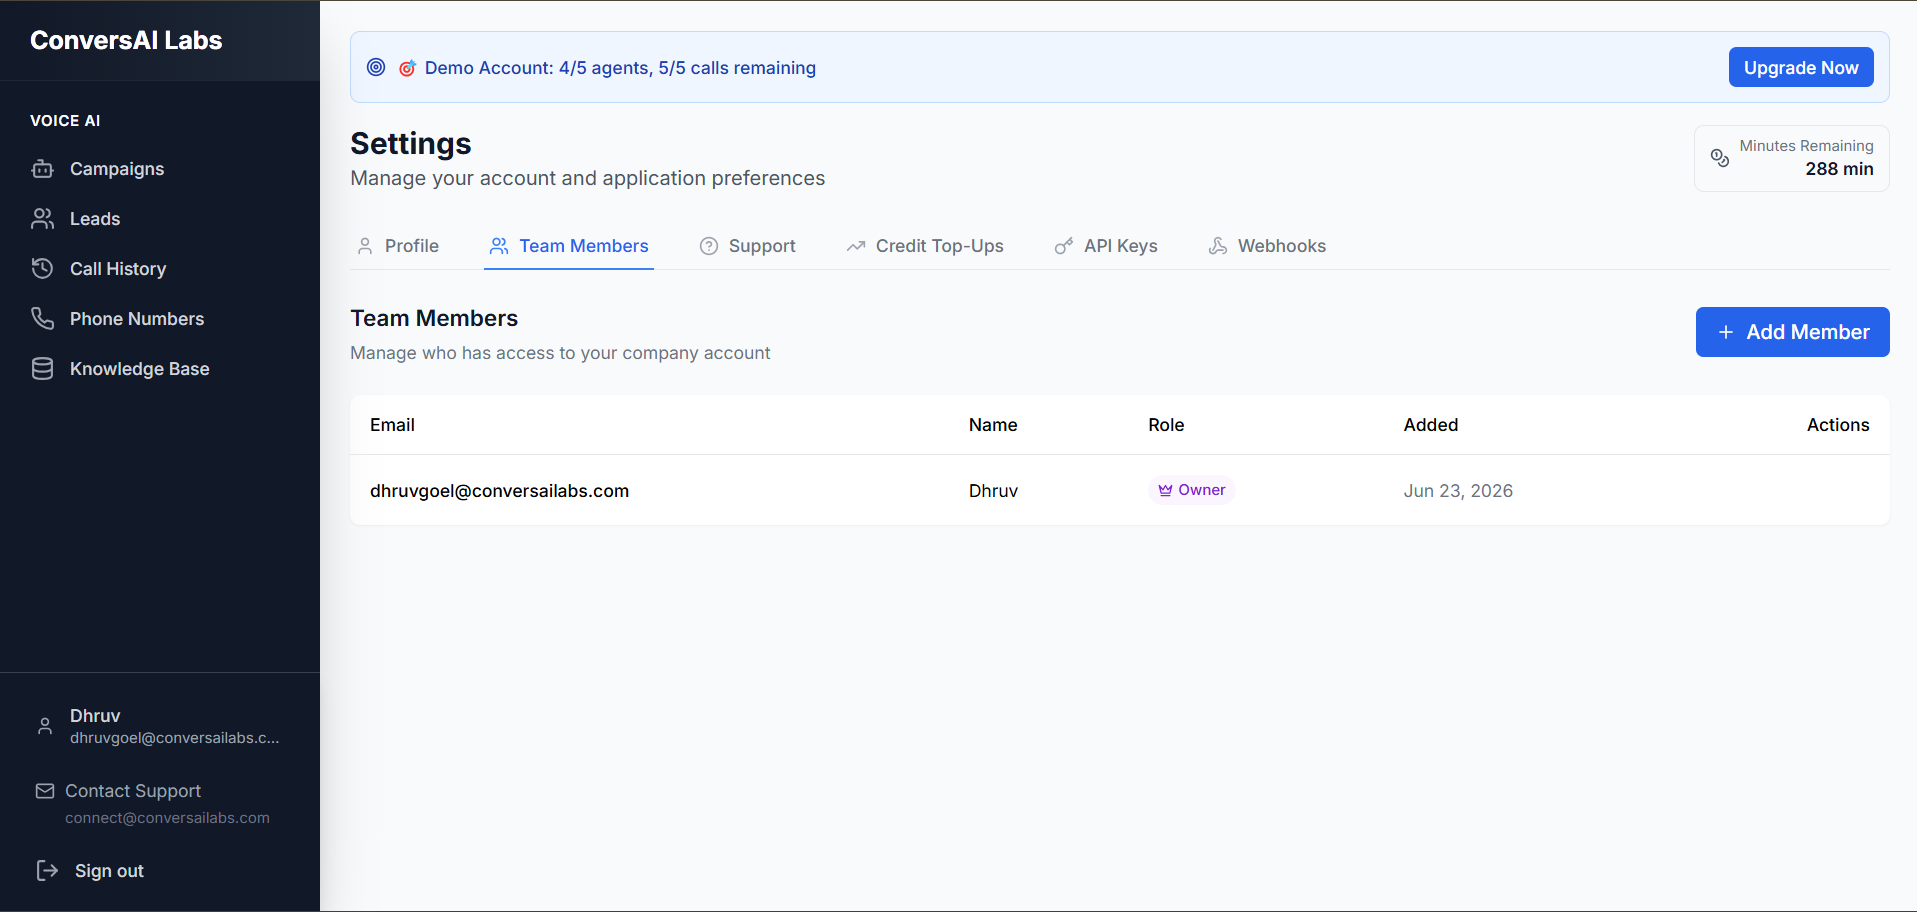
Adding a New Member
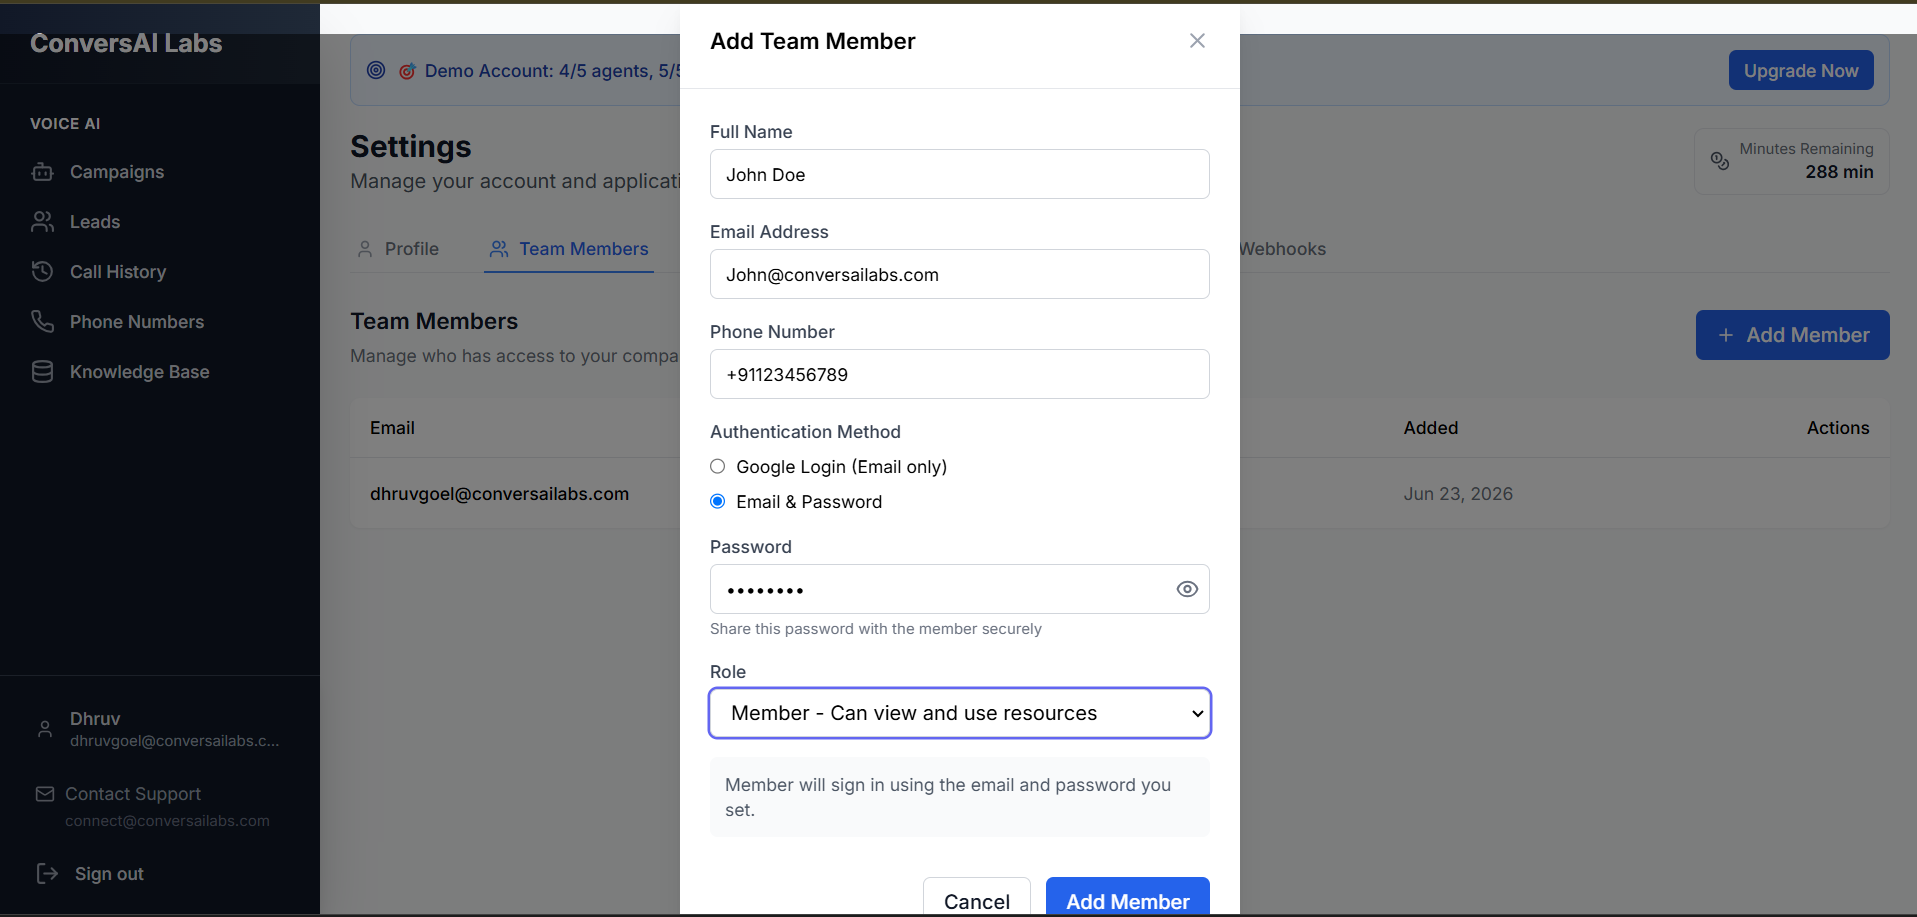
1. Open the Invite Form
Click the Add Member button to open the invitation form.
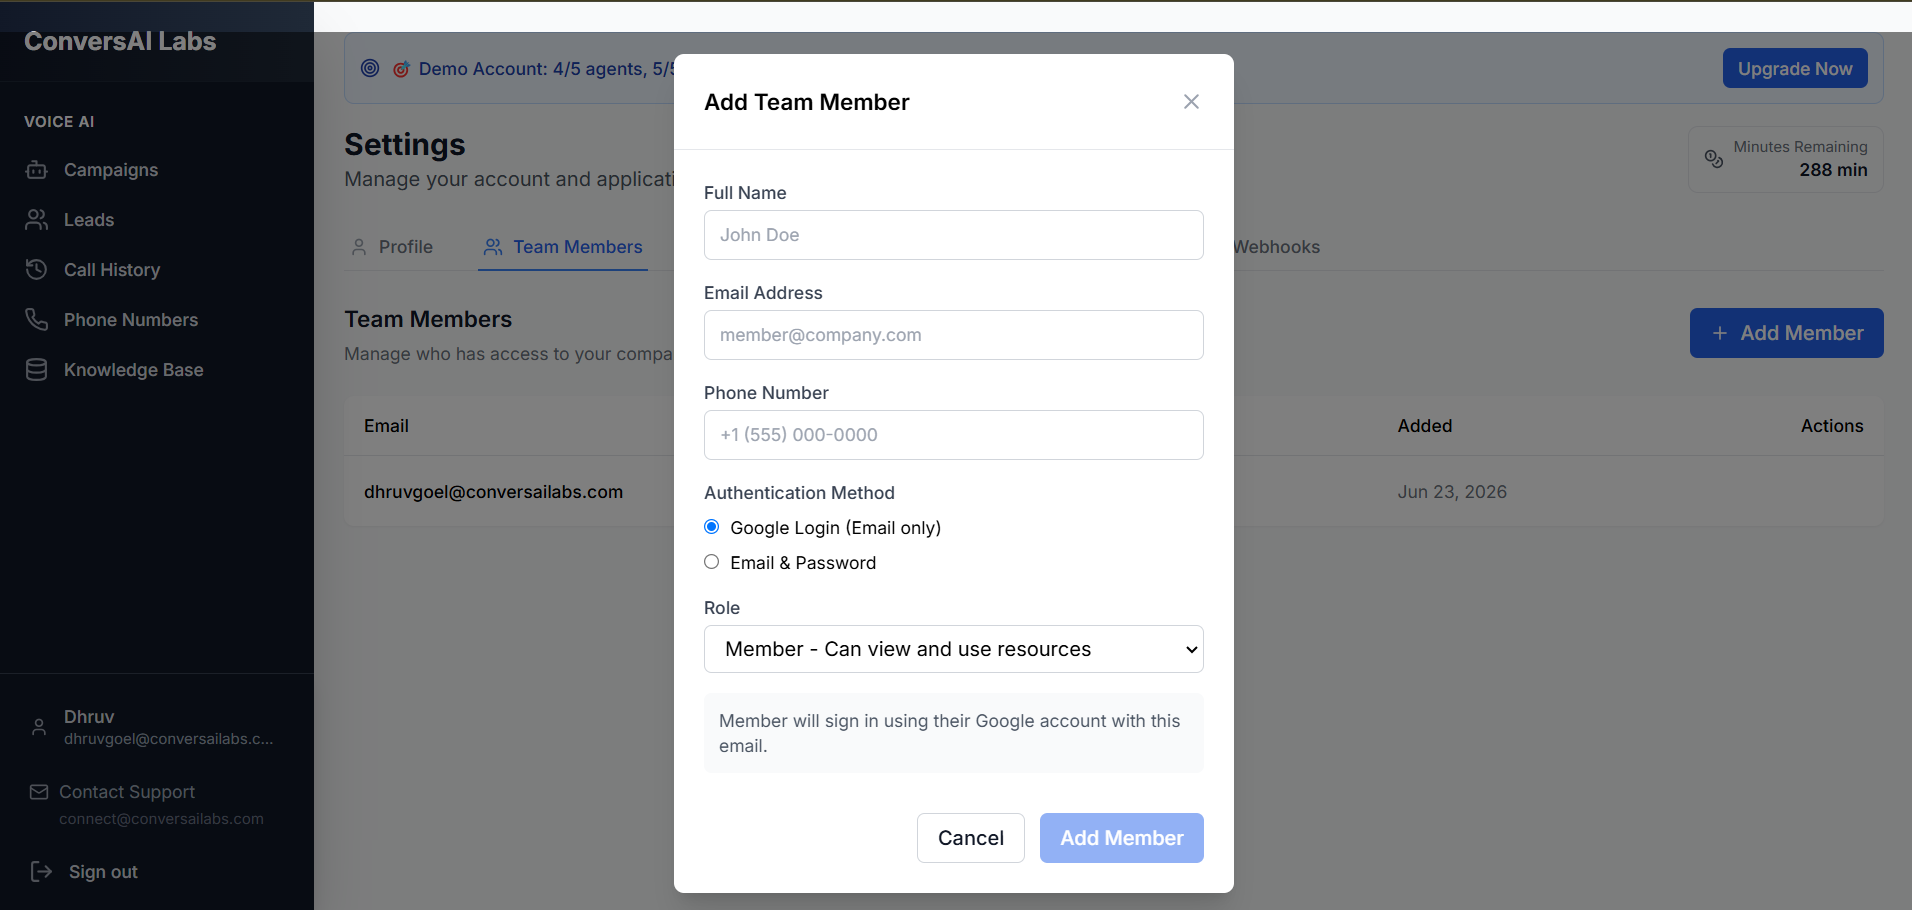
2. Fill in Details
Provide their Name, Email address, and assign them a Role (e.g., Admin, Editor, Viewer). Click Add Member.
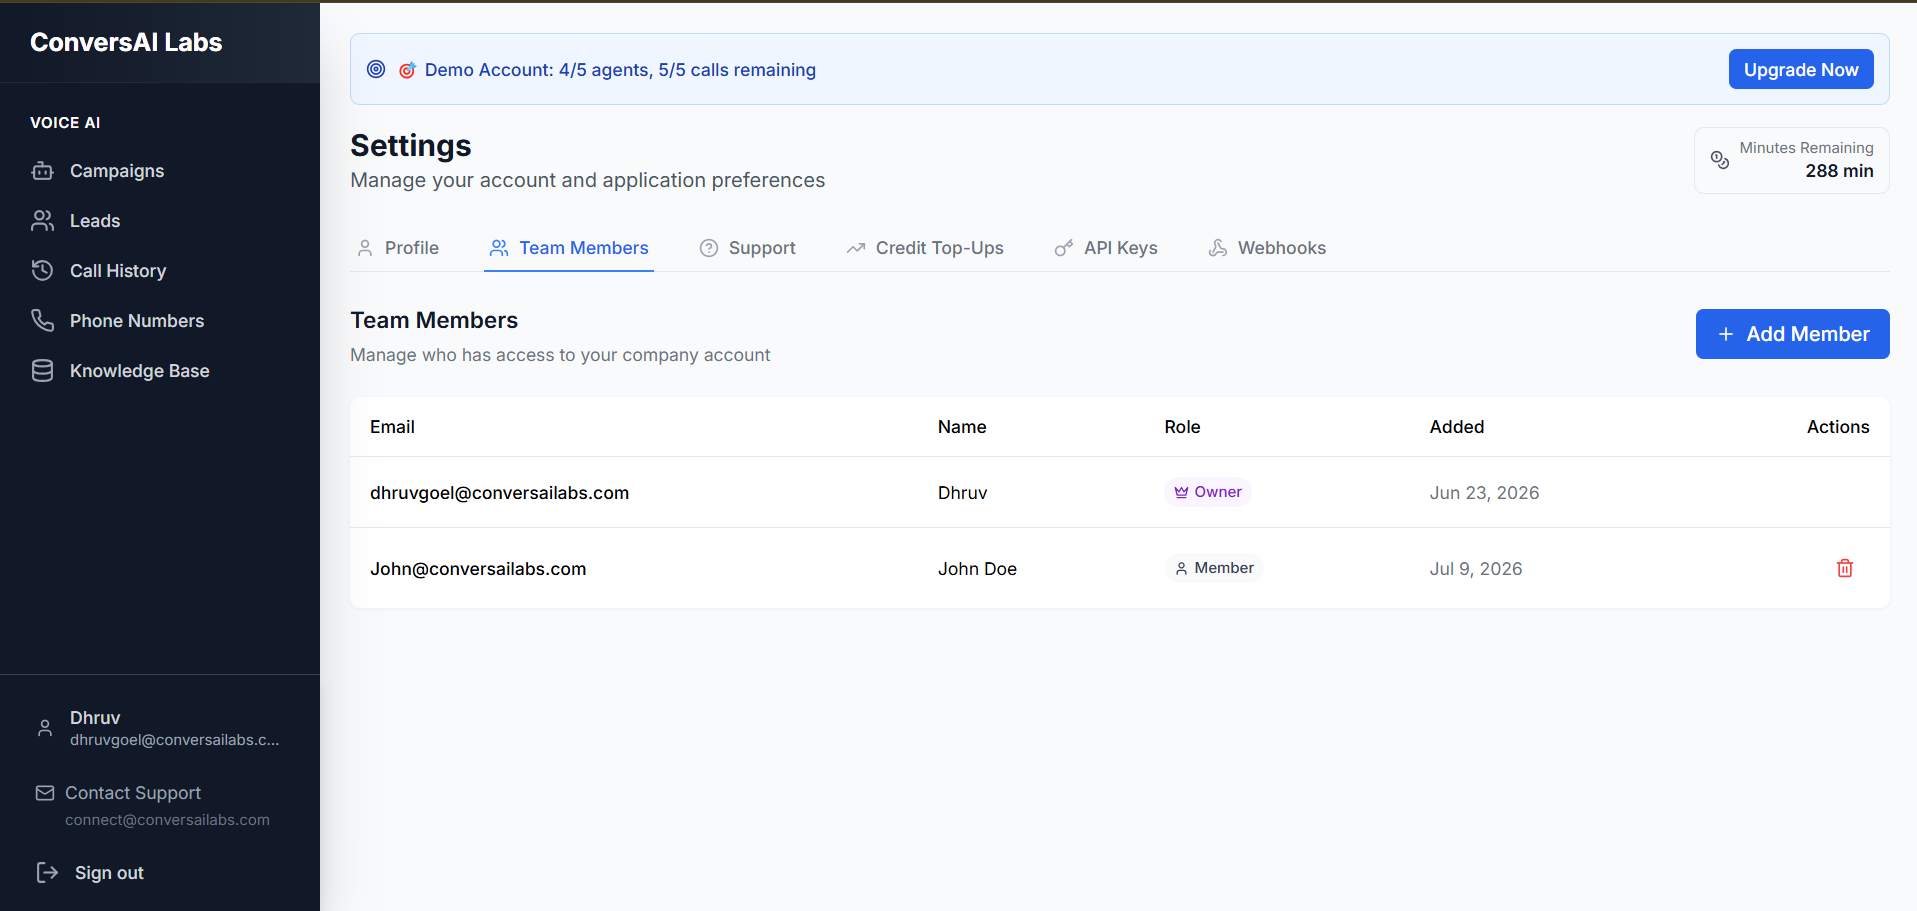
3. Member Added
The new team member will instantly appear in your directory.
Updating or Removing Team Members
Find the Member
Scroll through your team directory or use the search bar to locate the specific member you want to update.
Edit Role
Click on the role dropdown next to their name in the table to change their permissions instantly.
Remove Member
To revoke access entirely, click the Remove (or trash can) icon at the end of their row and confirm the action.
Support
Overview
Support Dashboard
The Support page is your central hub for resolving issues. You can view your active support tickets, search through our knowledge base, and contact our engineering team directly for technical assistance.
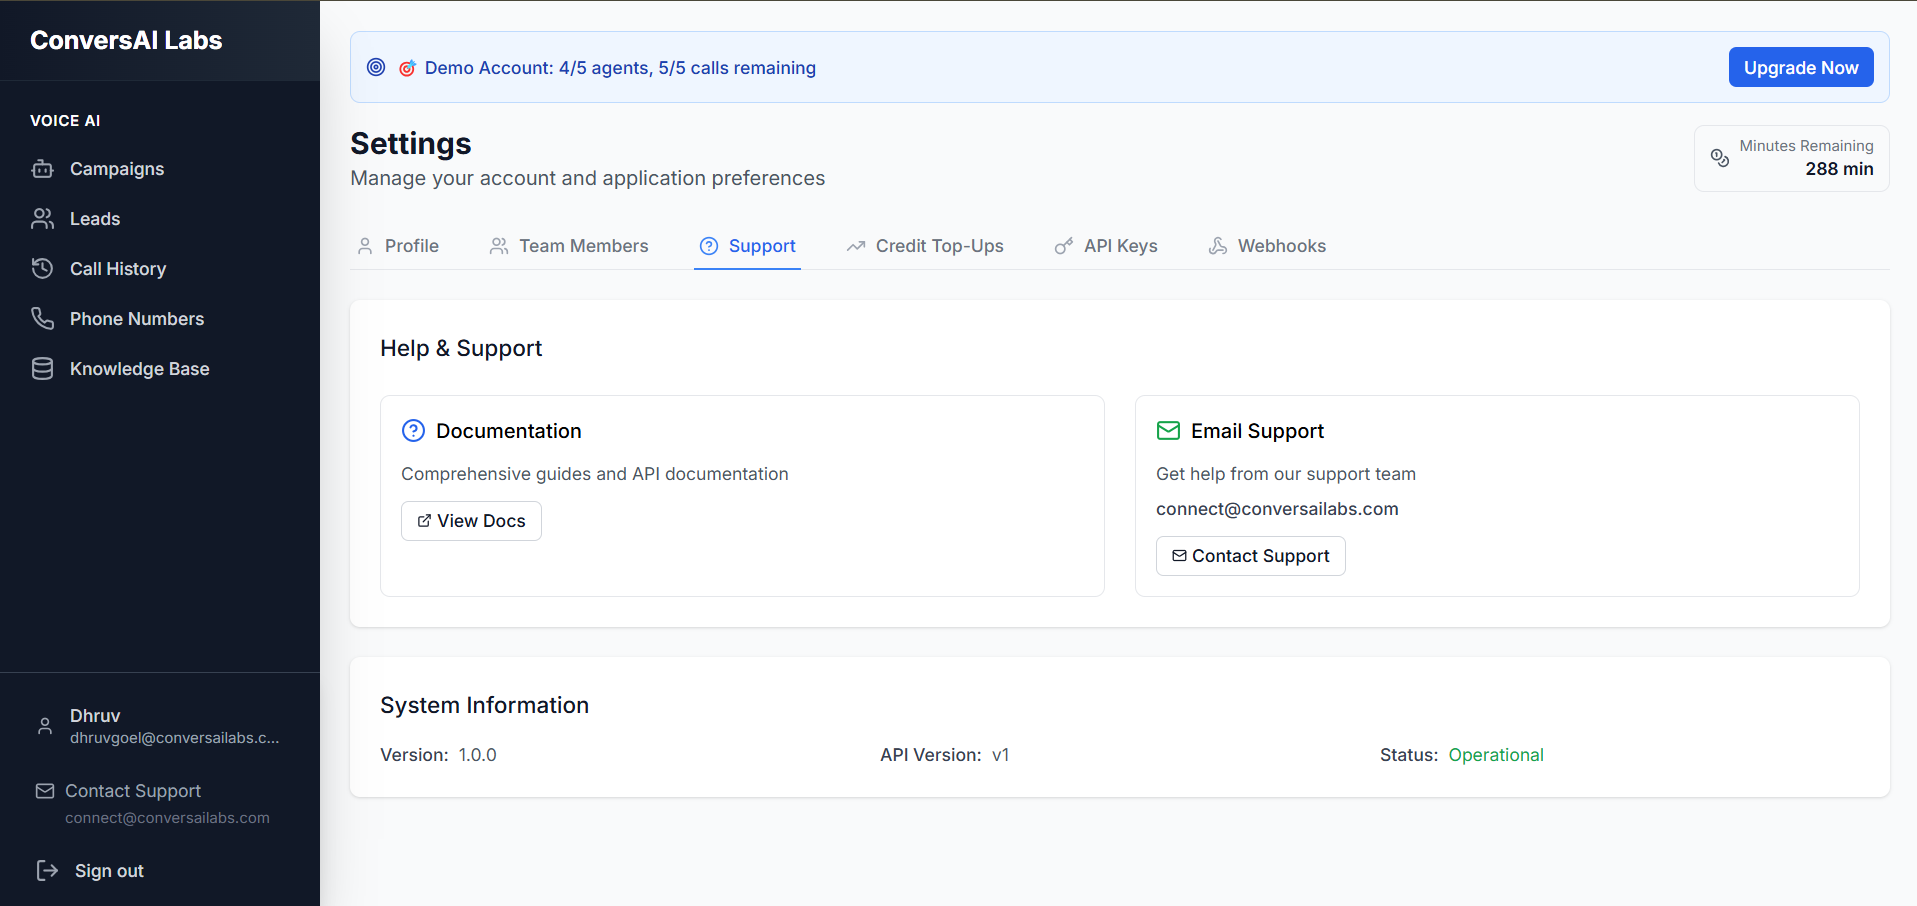
How to Create and Track Support Tickets
Create a Ticket
Click the Create Ticket or Contact Support button on the dashboard. A form will appear for you to describe your issue.
Submit Details
Fill out the subject and provide a detailed description of the problem. Attach any relevant screenshots, then click Submit.
Track Progress
Your new ticket will appear in the table. You can click on the ticket row at any time to view updates, reply to support agents, or close the ticket if resolved.
Billing & Credits
Overview
Credit Management
Workflow creation, runs and tests are free for now. Only connected voice calls use credits. ConversAI Labs voice billing uses ₹1 = 1 credit. Voice calls use 4 credits per connected minute, equivalent to ₹4/minute. Review your balance and usage here, and see the pricing page for plan details.
Credit Top Up
Instantly purchase more credits to ensure your agents never experience downtime due to low balance.
Filters
Filter your usage history by specific date ranges, agents, or campaigns to see exactly where your credits are going.
Export Reports
Download detailed CSV/PDF reports of your usage for accounting and internal auditing purposes.
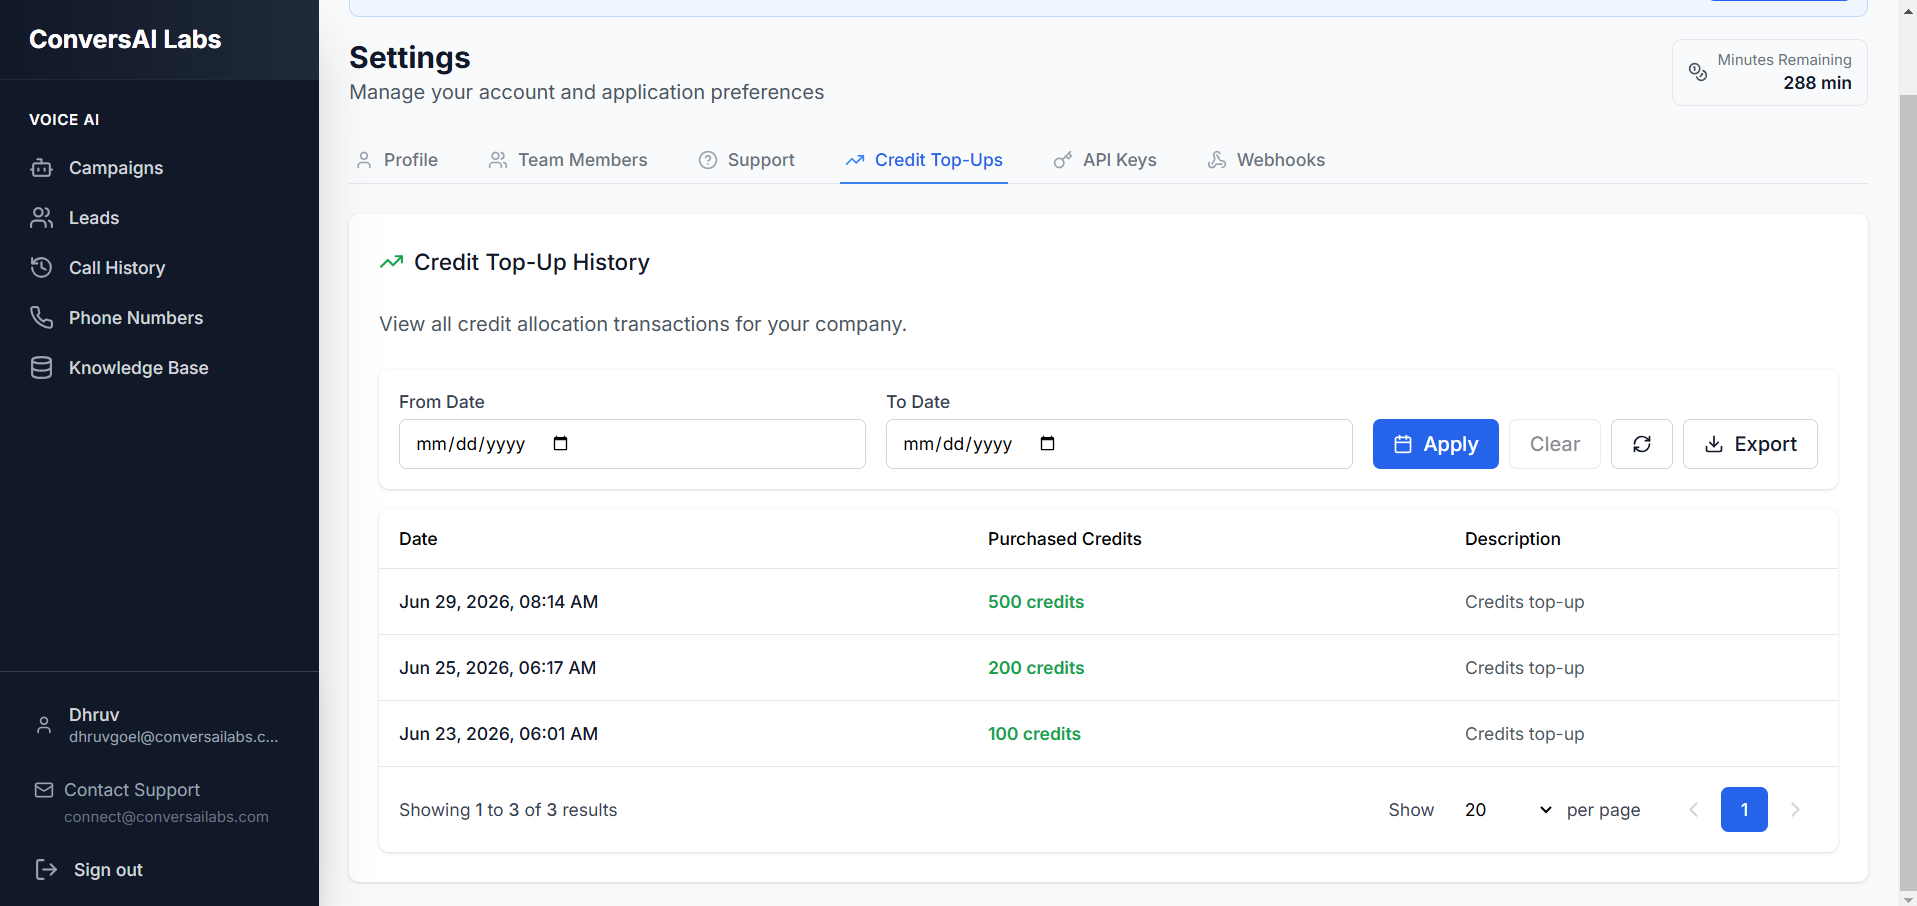
How to Add Credits and Manage Billing
Top Up Balance
Click the Top Up or Add Credits button. A payment window will appear.
Complete Purchase
Select the desired amount, verify your payment method details, and click Confirm Purchase to immediately add credits to your account.
Export Data
To download billing history, locate the Export button near your usage logs. Select your preferred format (CSV/PDF) and click download.
API Keys
Overview
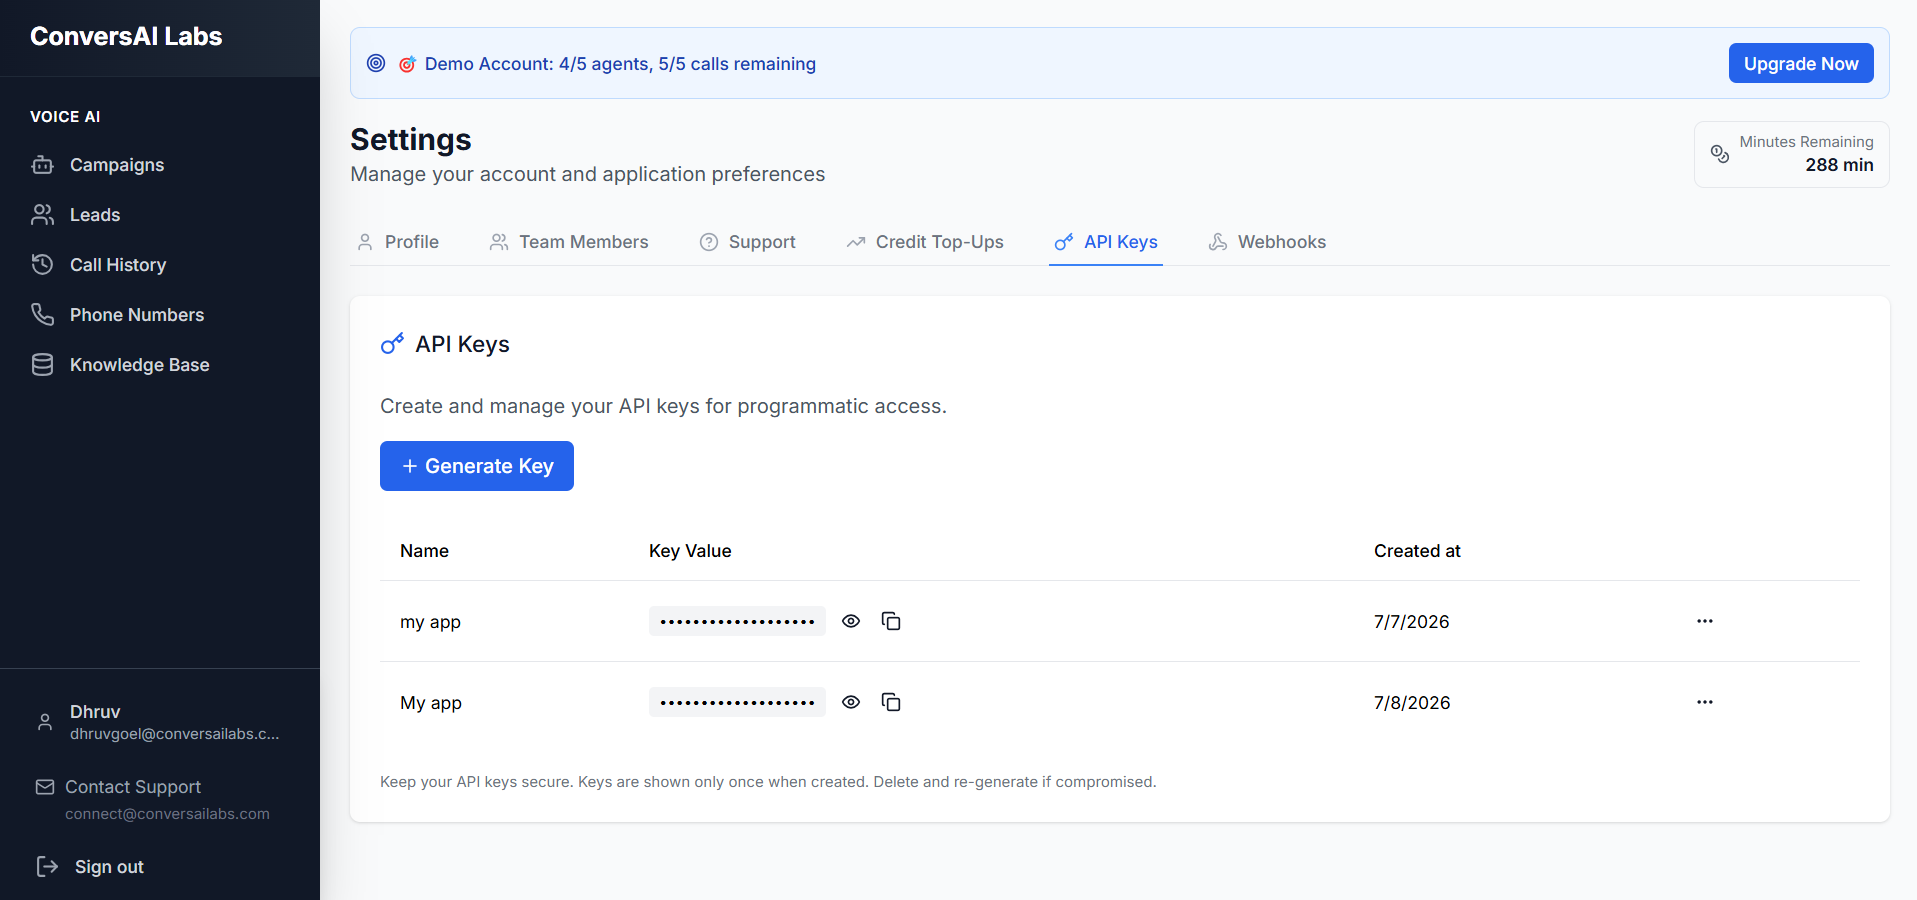
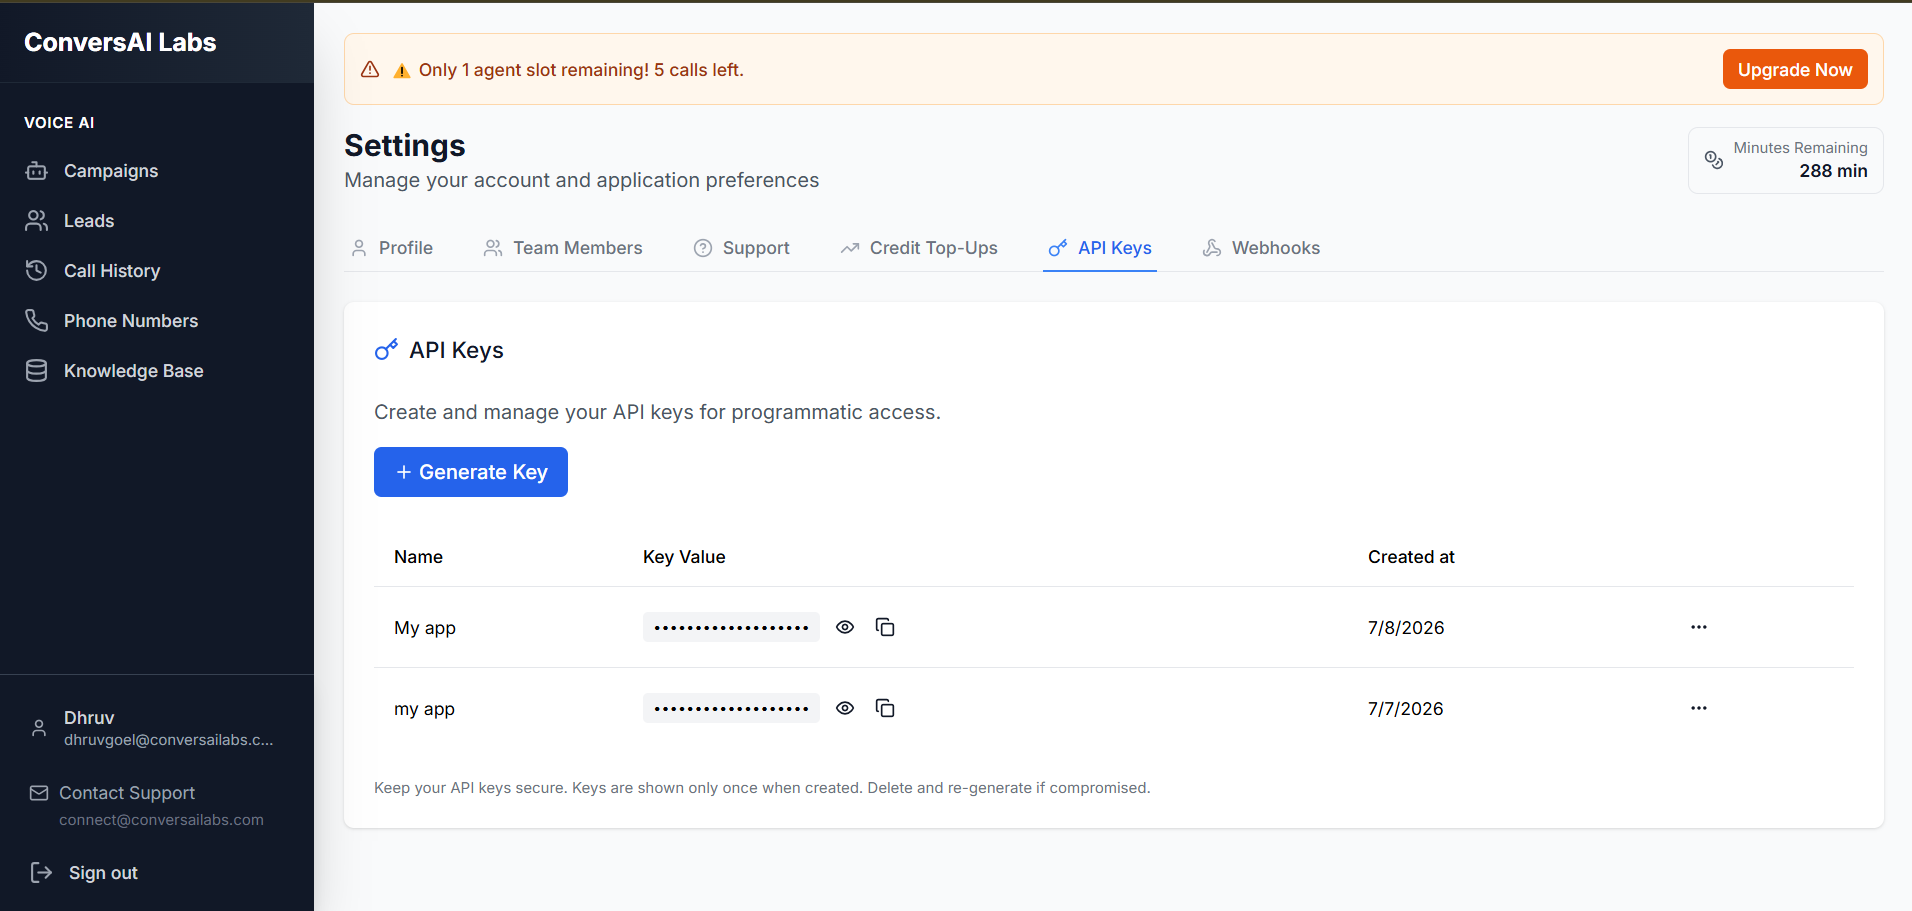
API Key Dashboard
View your active keys, their creation dates, and revoke any keys that are no longer needed.
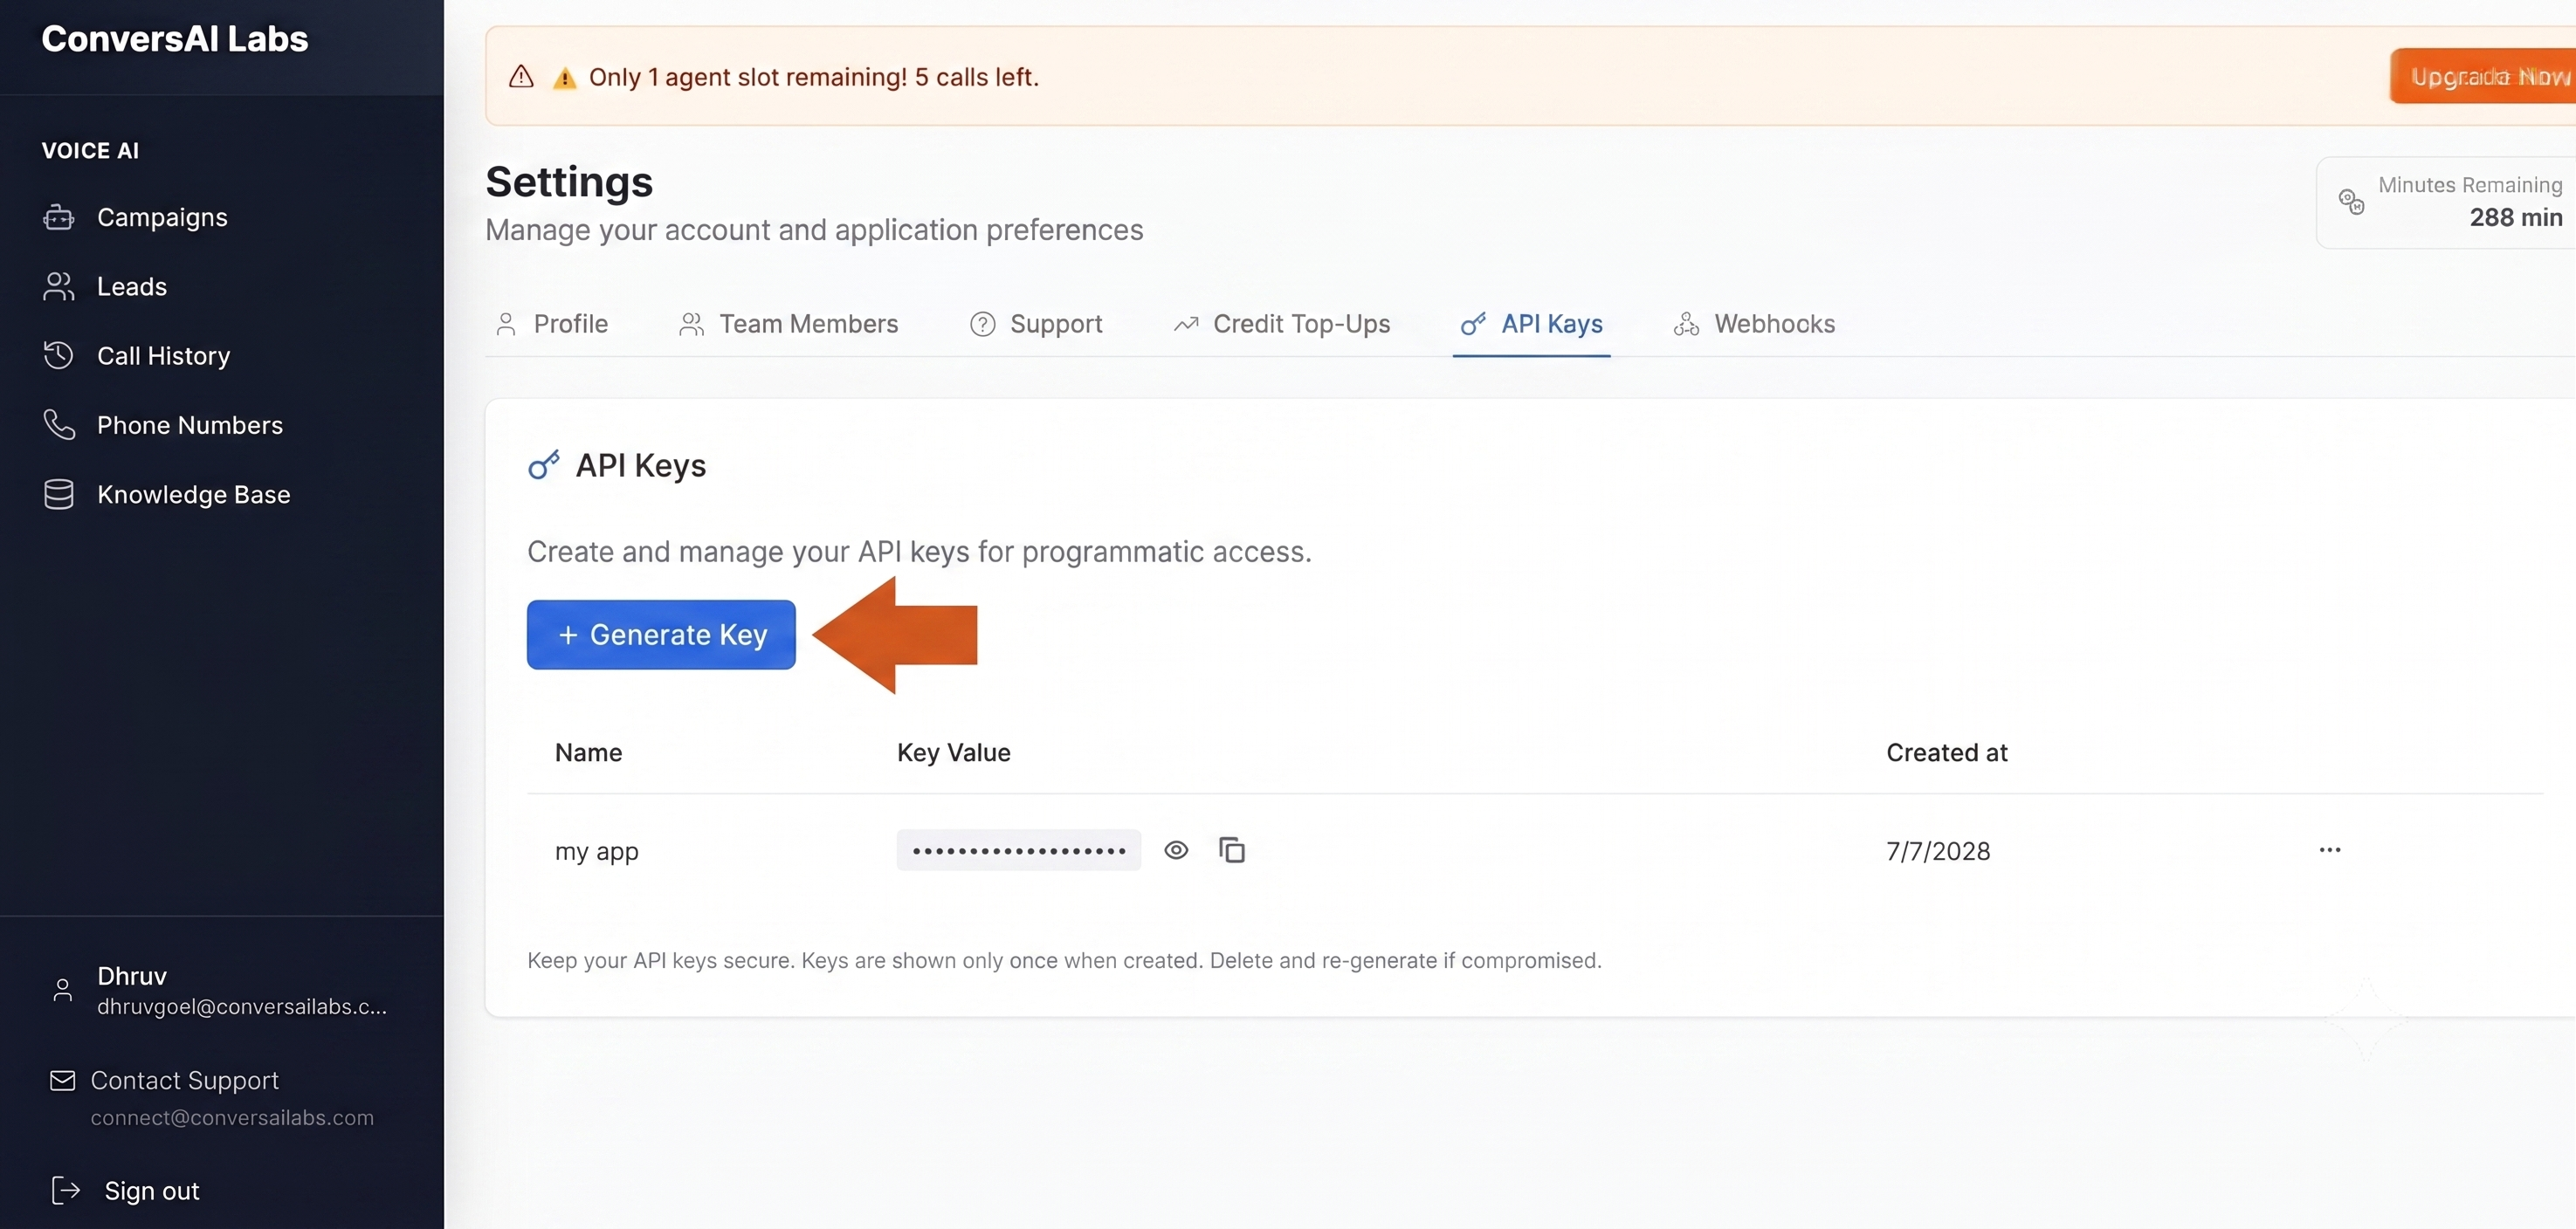
Generating a New Key
Click on Generate Key
Click on the generate key button in the top right to start creating a new API key.
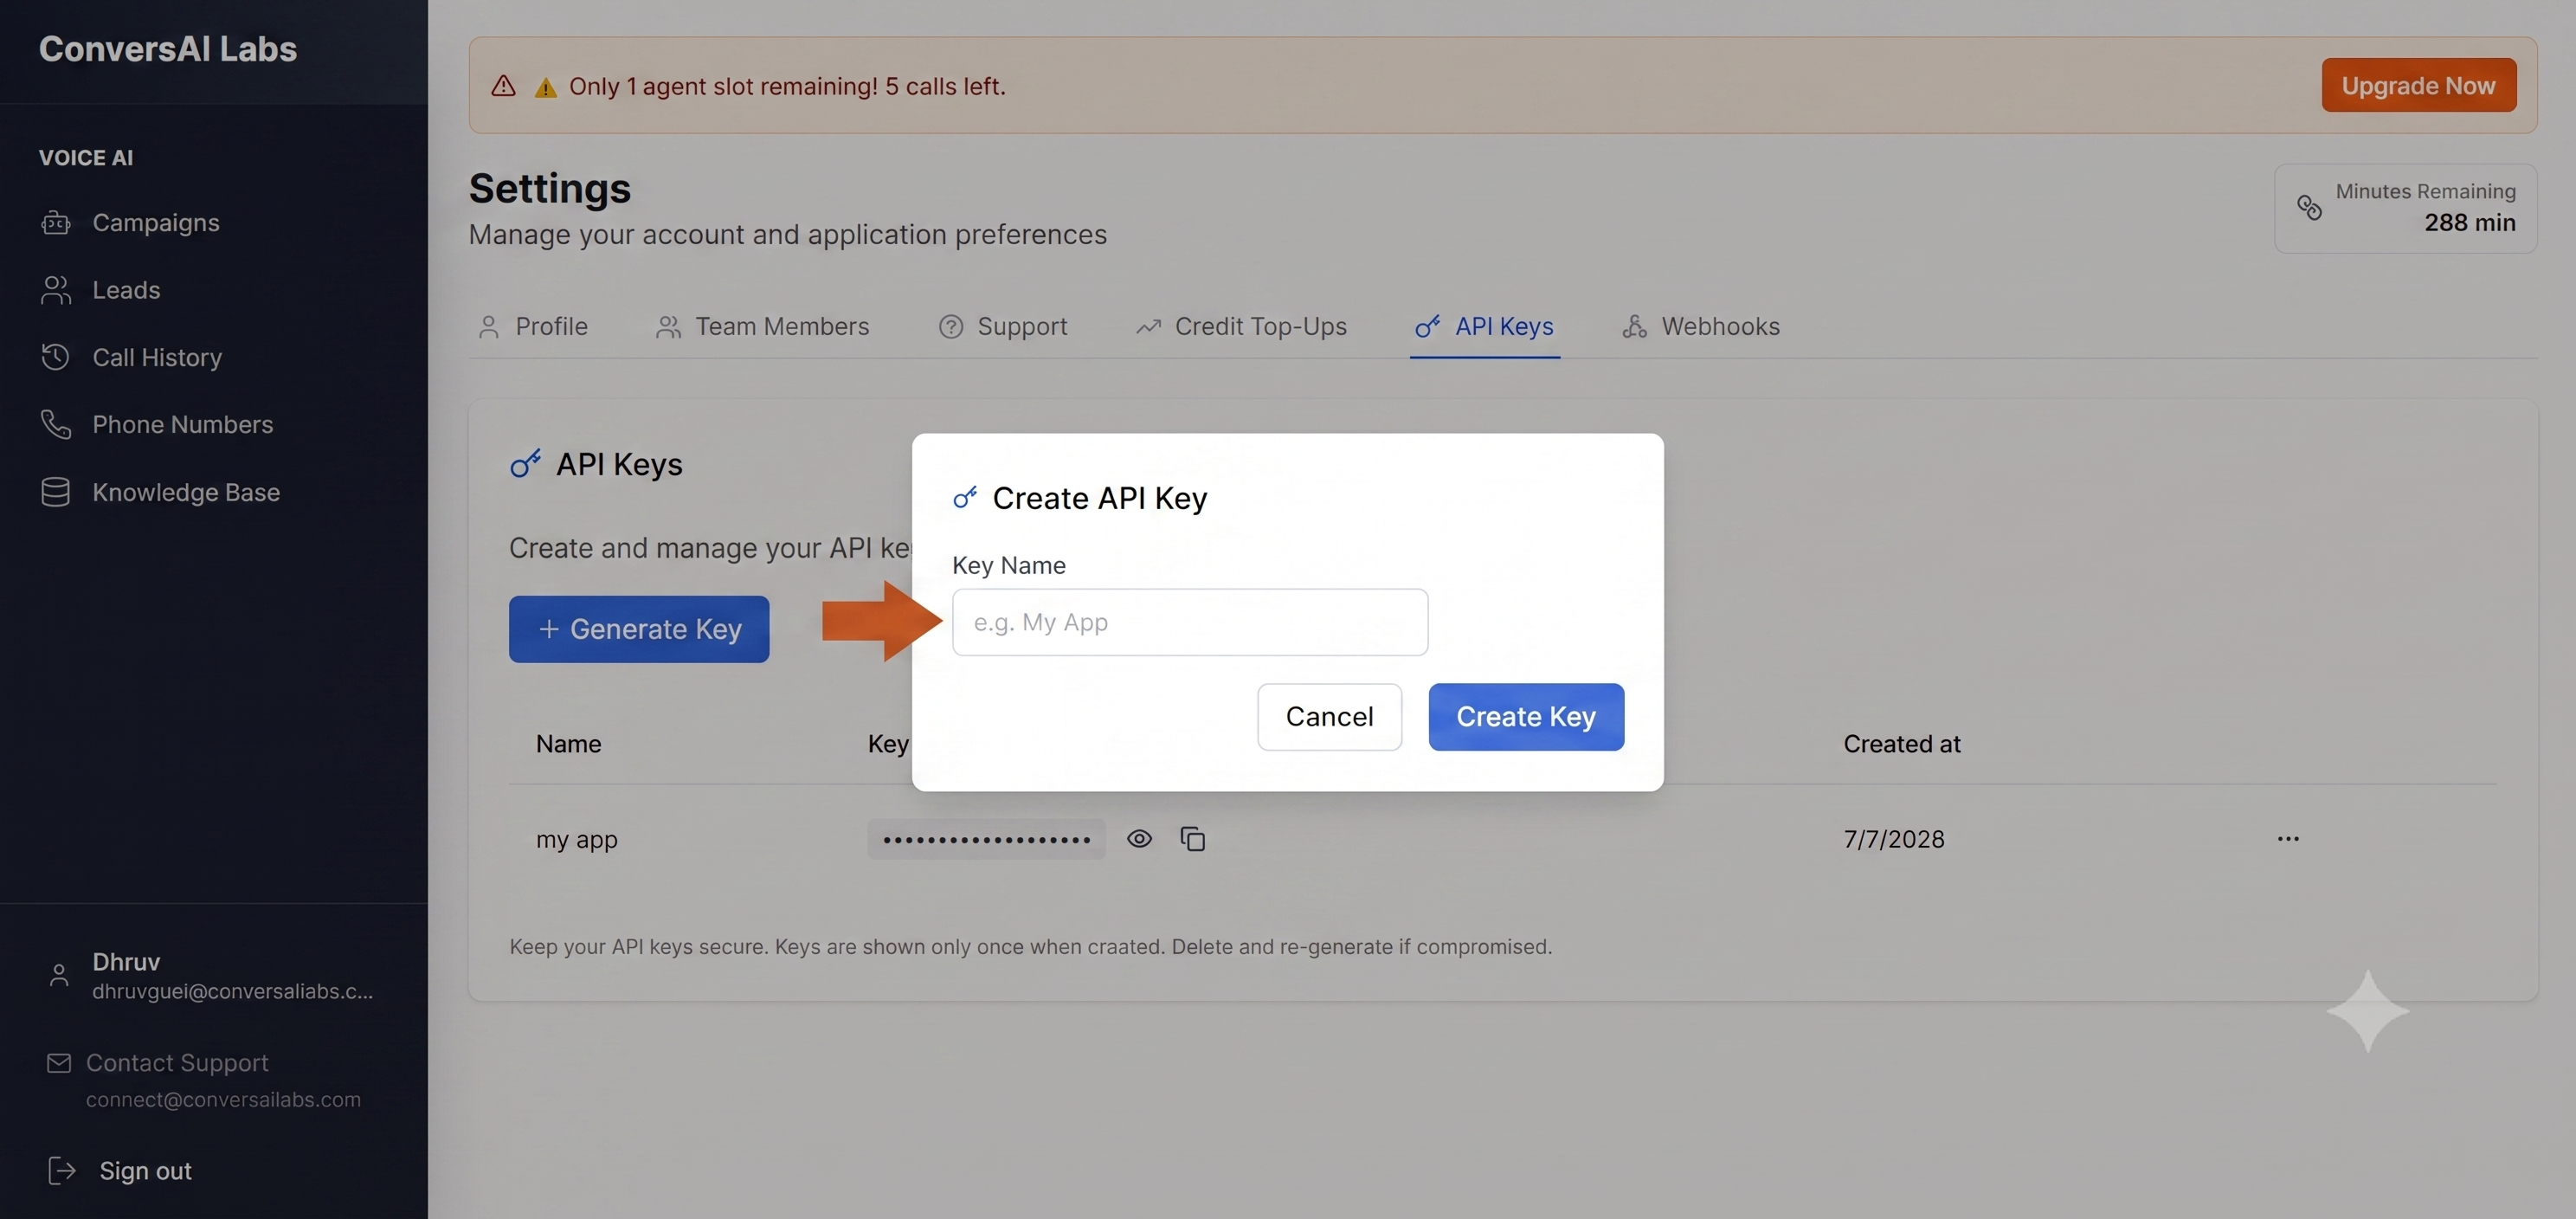
Enter API Key Name
Provide a recognizable name (e.g., "Production Backend") so you know what this key is used for later.
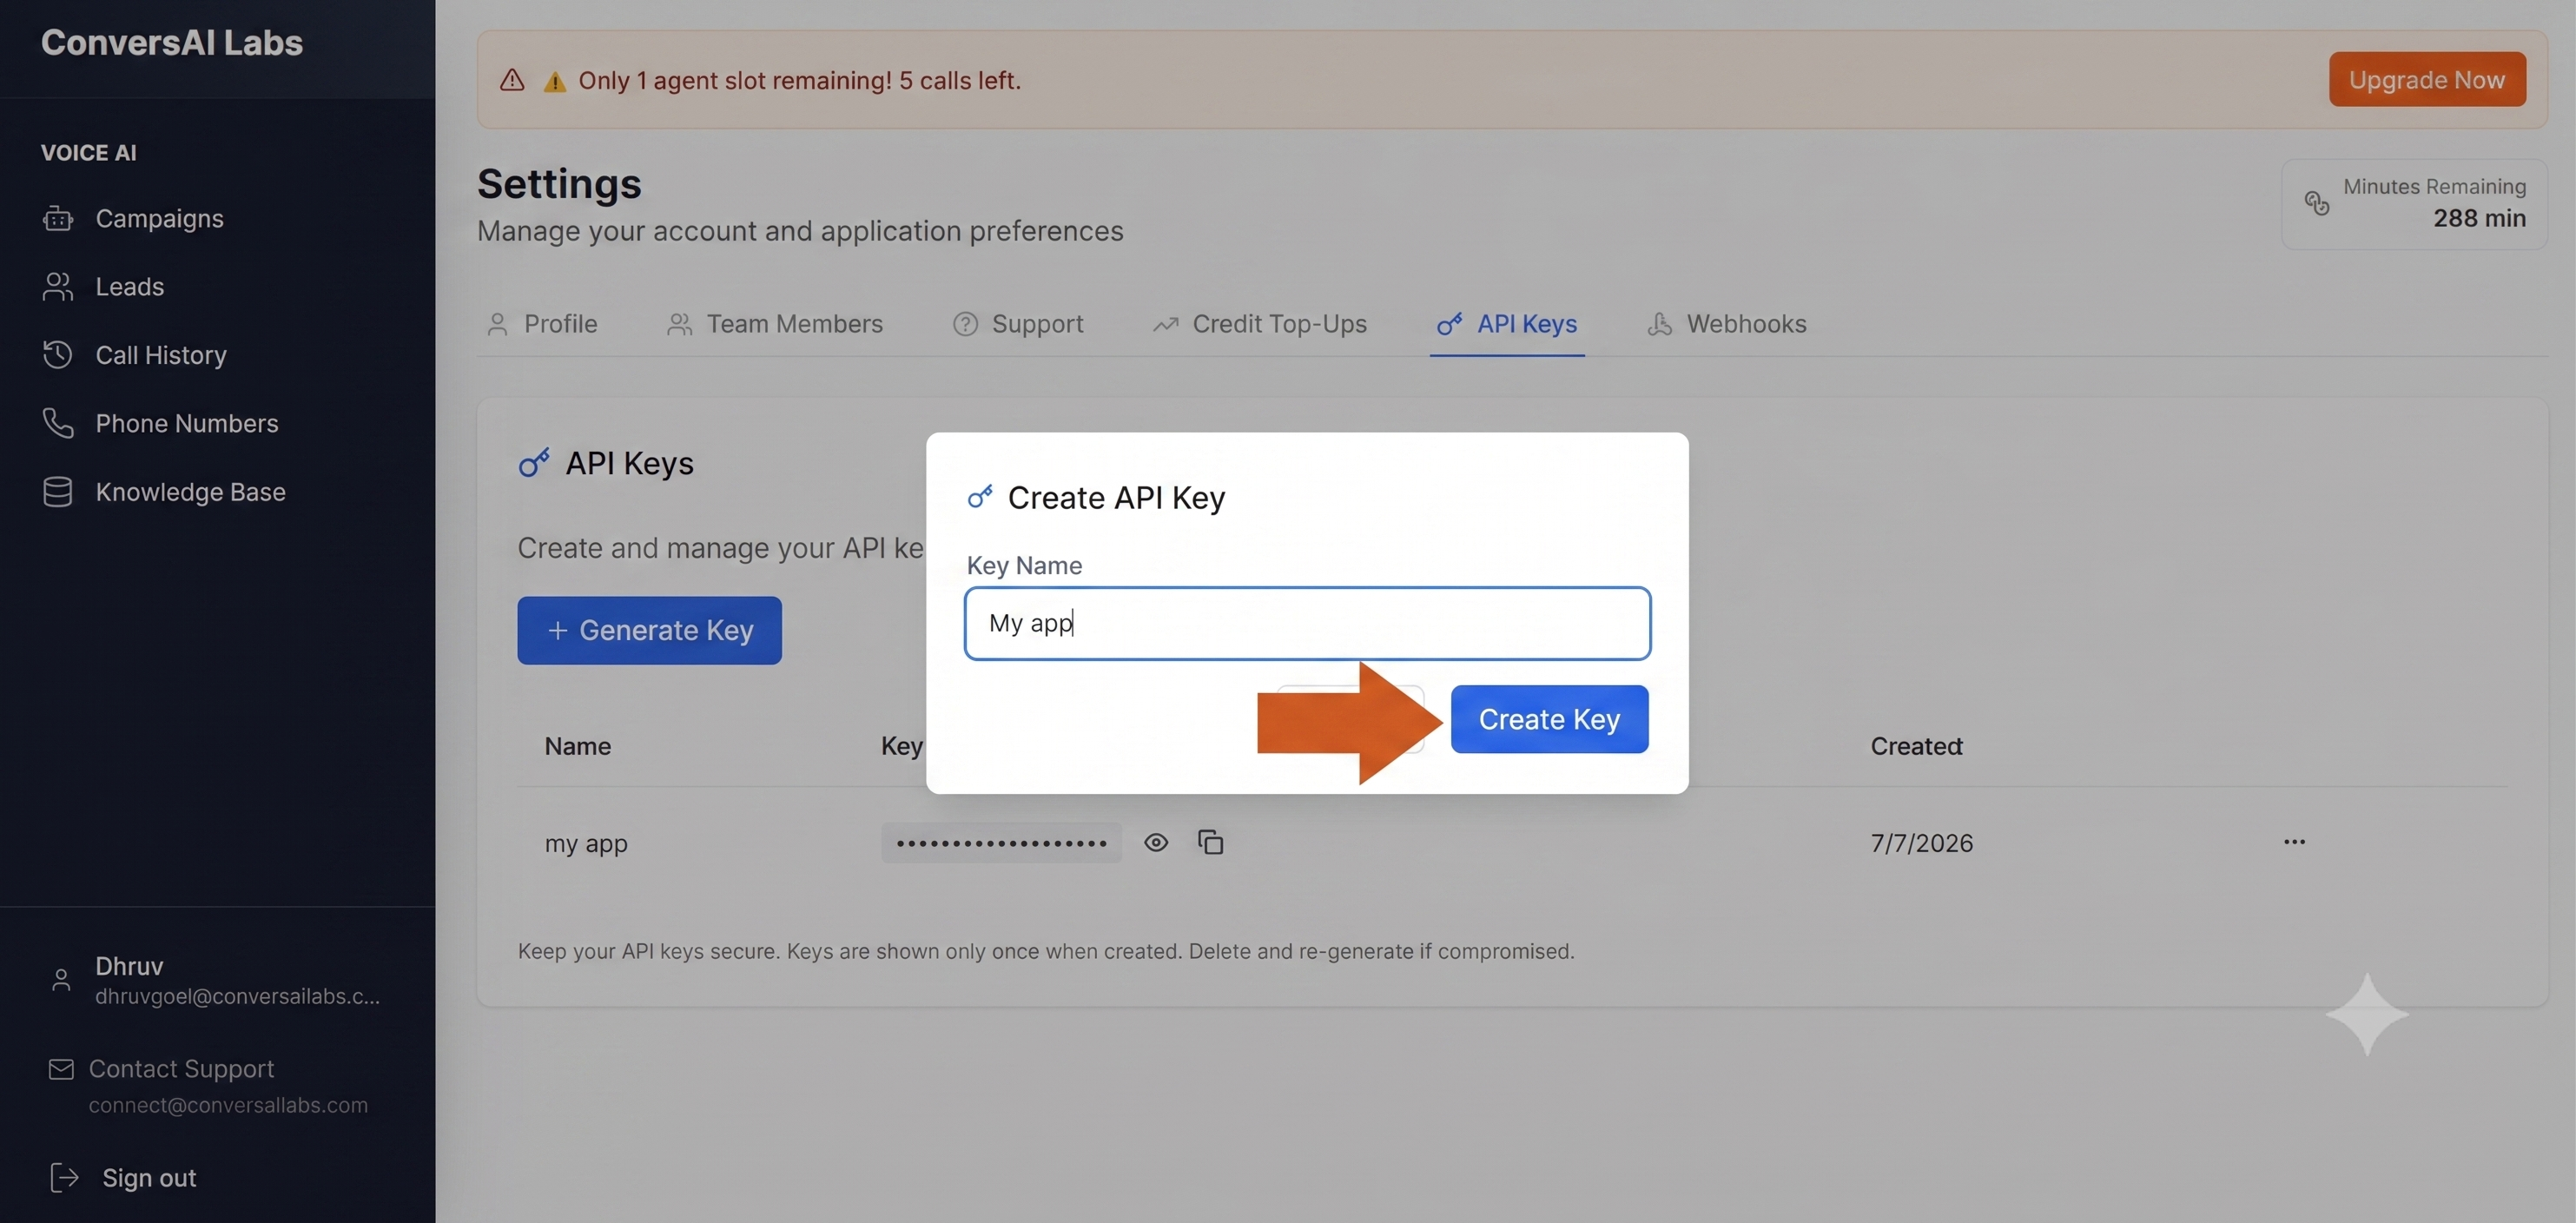
Create Key
Click the create button to finalize.
Copy Your Key
Your final API key is generated. Copy it immediately and store it securely. You will not be able to see the full key again once you close this window.
How to Revoke an API Key
Locate the Key
Find the API key you wish to disable in the list of active keys.
Revoke Access
Click the Revoke or Delete icon on the right side of the key's row.
Confirm Action
A confirmation prompt will appear. Click Confirm to permanently disable the key. Note that any services using this key will immediately stop working.
Webhooks
Overview
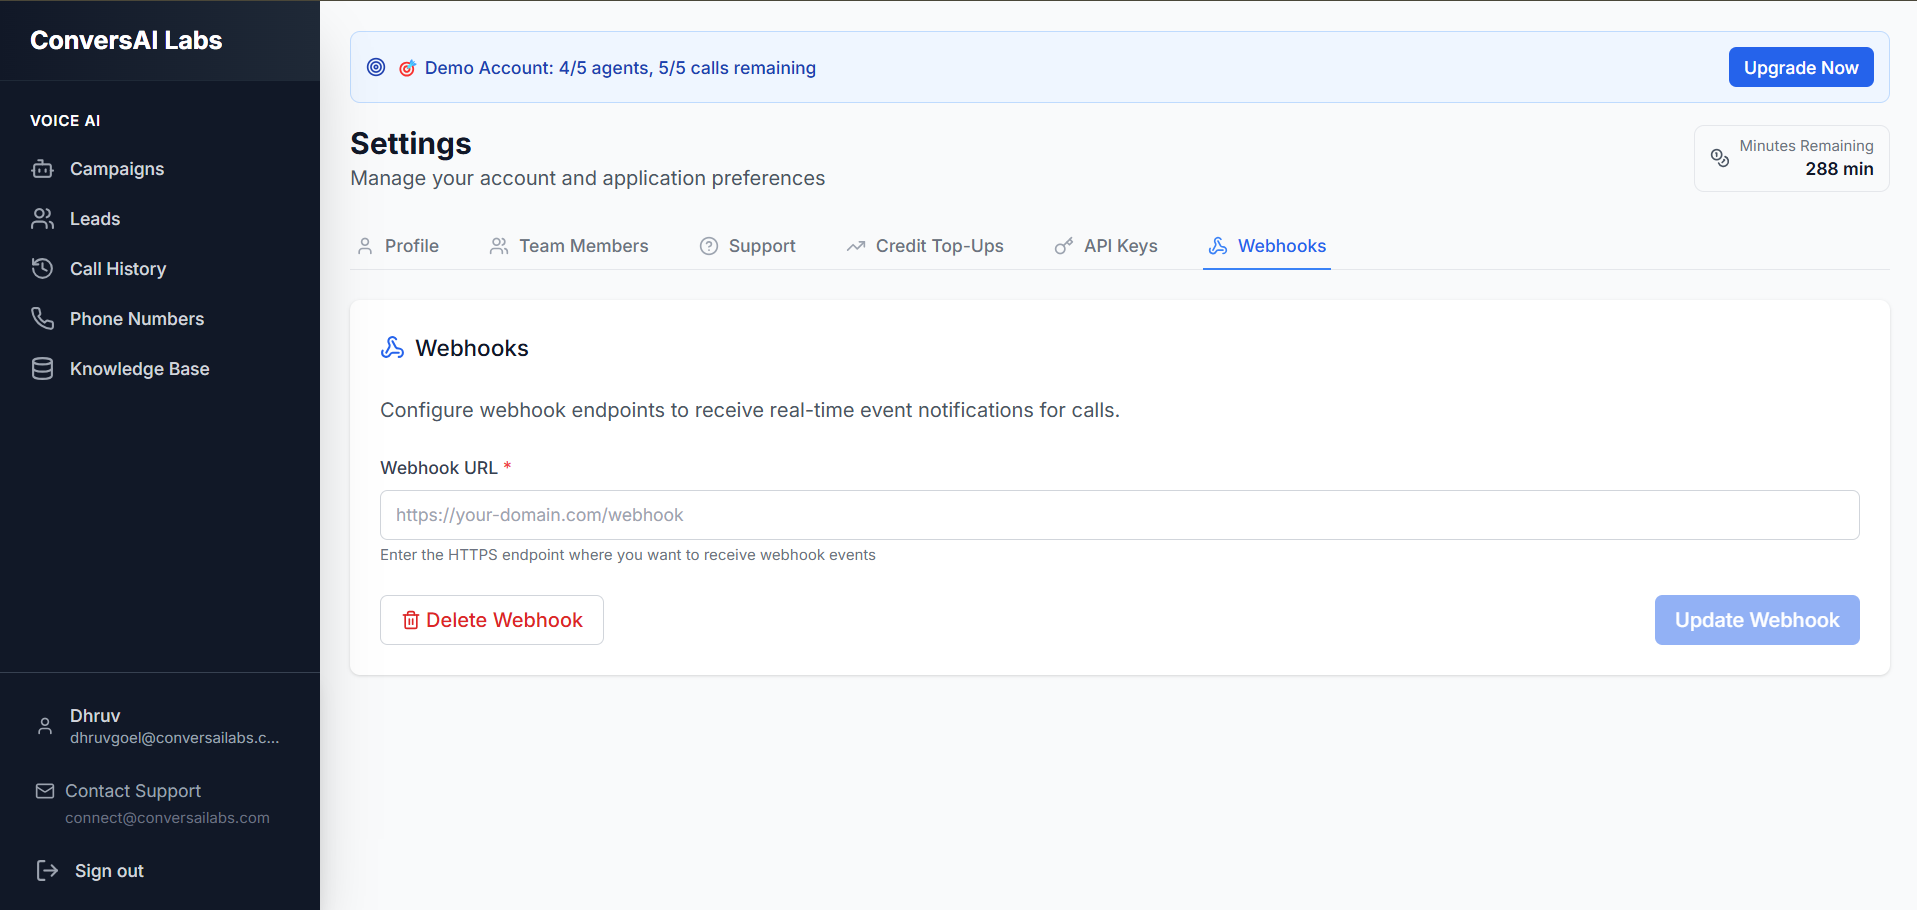
Webhook Configuration
For call-result events, an agent webhook takes priority. The company webhook receives the event only when the agent has no webhook configured.
Adding/Updating Webhooks
Simply paste your secure endpoint URL into the text field and click Update Webhook. We will immediately begin dispatching POST requests to that URL.
Deleting Webhooks
To stop receiving events, simply clear the text field and update. Agent-specific webhooks remain active until removed separately.
Webhook Limits
How to Manage Webhooks
Add a New Webhook
Click the text input field, paste your endpoint URL (e.g., https://your-domain.com/webhook), and click the Update Webhook button.
Update an Existing Webhook
To change the URL, simply clear the existing text in the input field, enter the new URL, and click Update Webhook again to save the changes.
Remove a Webhook
If you wish to stop receiving webhook events, completely clear the text field so it is empty, then click Update Webhook.